
Believe us, independent stations, especially new sites, should know how to curry favor with search engines, and only in this way can we get a better display position. One of the ways to make search engines feel your site is more friendly is to make your site’s images smaller to improve site performance. If
simply and rudely compresses images regardless of quality, it will only be counterproductive, because it may make visitors hate your site. What we need to do is to compress the image without harming or minimizing the image quality. There are some techniques that can allow you to reduce the file size of the image and ensure the quality, so that the user is not aware that you have compressed the image. So let’s take a look at how to format images without making them ugly, and how to optimize images for web pages and performance. Large
images can slow down your web page, resulting in a poor user experience. To optimize the image, you can use plug-ins or scripts to reduce the file size to speed up the page loading time. Lossy and lossless compression are two commonly used methods. Benefits of
- formatted images
- how to use the WordPress image optimization plug-in
- to optimize images for Web and performance optimized images case study
- uses SVG with other images best practices when using images
- directory
- hides
It is more important than optimizing scripts and fonts. The image optimization workflow is one of the easiest tasks to achieve, but many website owners ignore this.
average number of bytes per page (KB) below
is the main advantage.
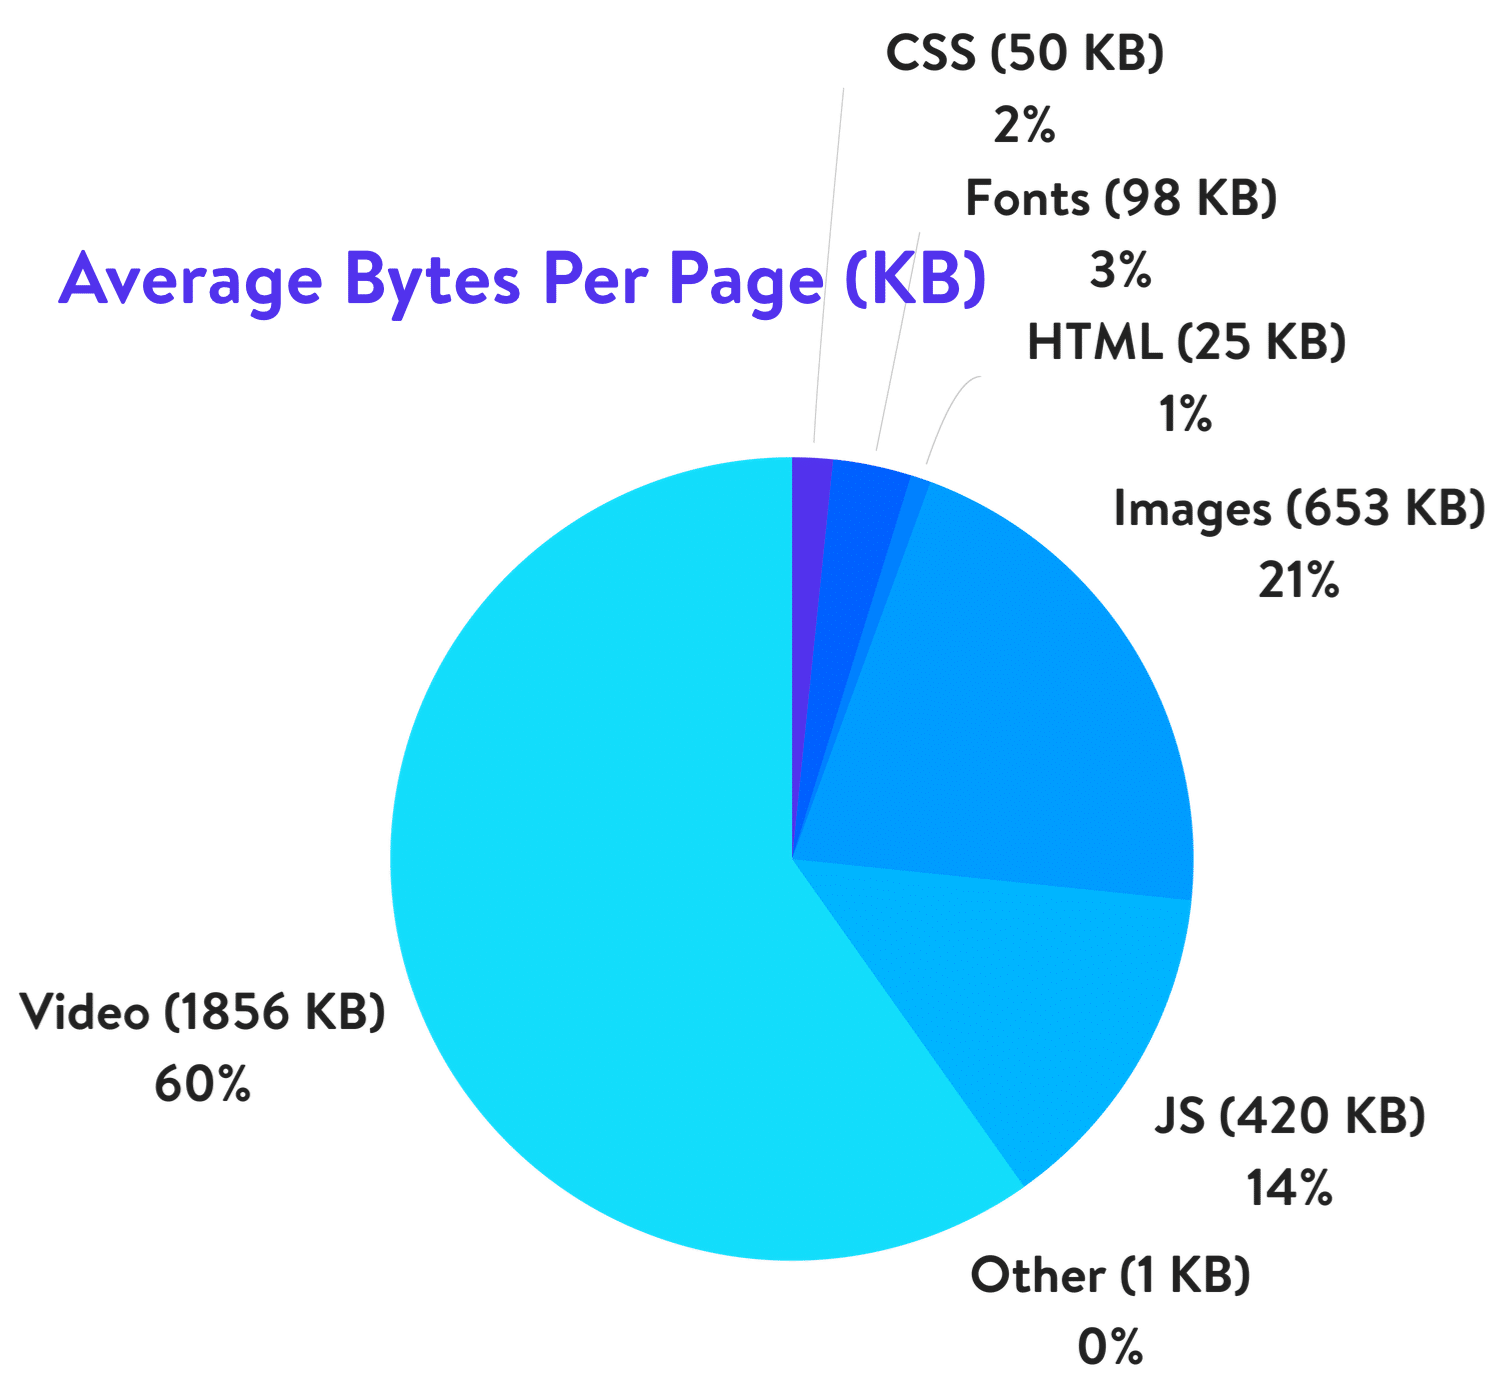
it will increase your page load speed (see the case study below to see how much it affects your speed). If your page takes a long time to load, visitors may not want to wait and jump out. For more information about optimizing page load time, see “how to achieve a full / 100 score on the Google PageSpeed Insights test.”
uses the WordPress search engine optimization plug-in to help you improve the SEO of your site. Your site will rank higher in search engine results. Large files can slow down your site, and search engines hate that the site is slow (if the crawler is too slow to respond to the page content, the crawler may leave or reduce the crawling frequency of the site). Search engines may also grab your images faster and index them for image search. Want to know how much of your traffic comes from image search? You can use Google Analytics or Baidu statistical subdivision to check image search traffic. It is faster for
- to create backups. Smaller image file sizes in
- use less bandwidth. Less storage space is required on the
- server (depending on the number of thumbnails you optimize)
- How to optimize image
- for Web and performance the main goal of formatting an image is to find a balance between the minimum file size and acceptable quality. There is more than one way to optimize an image. One of the most popular methods is to simply compress them before uploading them to WordPress. Typically, this can be done in tools such as Adobe Photoshop or Affinity Photo. Some of these tasks can also be performed using plug-ins, which we will describe in more detail below.
The two main issues to consider are the file format and the type of compression you use. By choosing the correct combination of file format and compression type, you can reduce the image size by up to 5 times. You will have to try to use each image or file format to see the best results.
choose the correct image format
make sure that the best file type is selected before you begin to modify the image. You can use several types of files:
PNG-produces a higher quality image, but the file will also be larger. Lossless image format, although it may also be lossy.
JPEG-use lossy and lossless optimization. You can adjust the quality level to achieve a good balance between quality and file size.
- GIF-only 256 colors are used. This is the best choice for animated images. It only uses lossless compression. There are several other
- , such as JPEG XR and WebP, but not all browsers support it. Ideally, colorful images should choose JPEG (or JPG) and relatively simple images should choose PNG.
- Compression quality and Volume
below is an example of what happens when there are too many compressed images. The first is to use a very low compression ratio, which results in the highest quality (but larger file size). The second is to use a very high compression ratio, which results in very low image quality (but small file size). Note: the unmodified original image is 2.06 MB.
low compression (high quality) JPG-590 KB
high compression (low quality) JPG-68 KB

as you can see, the first picture above is 590 KB. This is very big for a picture! In general, we should keep the total volume of the page of the website not more than 1 or 2MB. 590KB is already 1/4 of them. The second image obviously looks bad, but it’s only 68 KB. What you need to do is to find a balance between your compression ratio (quality) and file size.

So we re-compress the image at a medium compression ratio, as shown below, with a file size of 151KB, which is acceptable for high-resolution photos. This is nearly four times smaller than the original photo with low compression ratio. In general, images like PNG should be less than 100 KB or less to get the best performance.
medium Compression (quality OK) JPG-151Lossy KB
is as important as lossless optimized
to understand that there are two types of compression available-lossy and lossless.
Damaging-this is a filter that deletes some data. This degrades the image quality, so you must be careful to reduce the weight of the image. File size can be greatly reduced. You can use tools such as Adobe Photoshop,Affinity Photo or other image editors to adjust the image quality settings. The example we used above is the use of lossy compression.
Lossless-this is a filter for compressing data. This does not degrade the quality, but requires the image to be decompressed before rendering. You can use tools such as Photoshop,FileOptimizer or ImageOptim to perform lossless compression on the desktop.
It is best to try different compression techniques to see which method works best for each image or format. If your tool has options, be sure to save it as a Web image. This is an option in many image editors that will provide you with quality adjustments so that you can perform the best compression. The image will lose some quality, so try to find the best balance and reduce the volume as much as possible without affecting the quality.
Image Optimization tools and programs
has a wide selection of image optimization tools and programs, including paid and free, that you can use to optimize your images. Some provide you with optimization tools, while others help you do it directly. Affinity Photo is a very good choice, cheaper than Adobe Photoshop, but with almost the same features.
uses Affinity Photo to compress images
here are some of the tools and programs we have collected for image compression:
resizes images to scale
in the past, you need to upload images proportionally and don’t let CSS resize them. However, since WordPress version 4.4, WordPress has begun to support responsive images (not zooming out by CSS). Basically, WordPress automatically creates several sizes for each image uploaded to the library. By including the available size of the image in the srcset property, the browser can now choose to download the most appropriate size and ignore the others. See the screenshot of the code example below.
- Adobe Photoshop
- Gimp
- Paint.NET
- GIFsicle
- JPEGtran
- JPEG Mini
- OptiPNG
- pngquant
- FileOptimizer
- ImageOptim
- Trimage
- ImageResize.org
srcset response image sample code
is now all over the street HiDPI display, often is 4K resolution, responsive image is a must. But 2x or 3x the column or div size of your site is still smaller than the original size. The browser will display the appropriate Size image based on the resolution of the device.

WordPress Media Library creates thumbnails based on your settings. However, the original remains and is not affected. If you want to resize the image and save server hard disk space without saving the original, you can use a free plug-in like Imsanity.
WordPress Multimedia Settings
Imsanity allows you to set limits so that all uploaded images are constrained to a reasonable size, which is sufficient to meet the needs of a typical website. Imsanity processes images in WordPress and processes pictures. Therefore, WordPress behaves exactly the same in all respects unless the contributor zooms its image to a reasonable size before uploading.
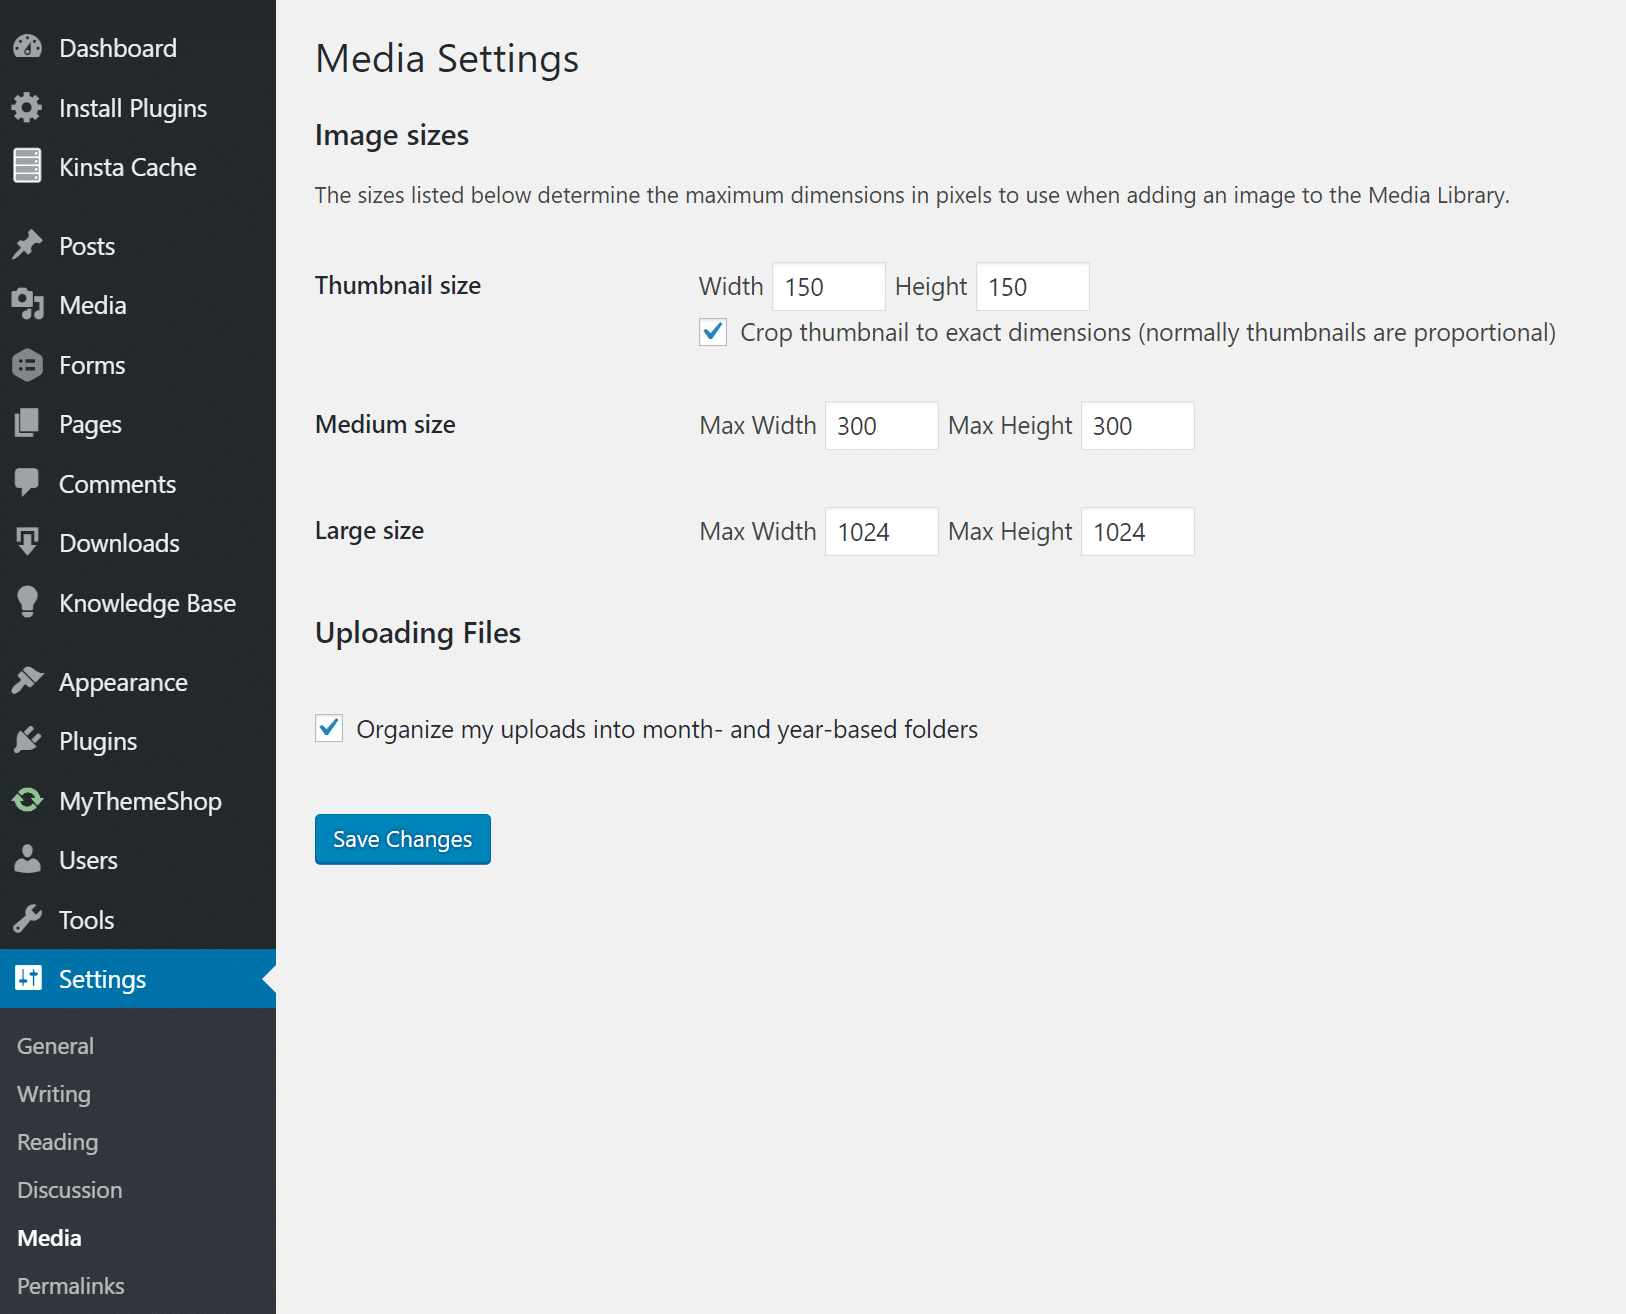
Fortunately, with the WordPress image optimization plug-in
, with WordPress, you don’t have to manually format or compress all images. You can use plug-ins to automate these operations. Some plug-ins will automatically optimize image files when you upload them, and even optimize your uploaded images. This is a very thoughtful feature-especially if your site has too many pictures in stock. Here are some of the best plug-ins to format images for better performance.
However, it is important that you should not rely 100% on the plug-in itself. For example, you should not upload 2MB images to the WordPress library. This may cause your Web host to run out of hard disk space quickly. The best way is to quickly resize the image in the photo editing tool in advance, then upload it and use the following plug-ins to further reduce it. The
WordPress image optimization plug-in, Imagify
Imagify, was created by the team that developed WP Rocket, and most people are probably familiar with it. Compatible with WooCommerce,NextGen Gallery and WP Retina. It also has a batch optimization function, and you can choose from three different compression levels, normal, radical and Super. It also provides recovery, so if you are not satisfied with the quality, you can restore and re-compress it with one click to make it more in line with your needs. Plug-ins are available in free and advanced versions, of which the free version is more stingy and only has the quota of 25MB. The
- Imagify Image Optimizer
- ShortPixel Image Optimizer
- Optimole
- EWWW Image Optimizer Cloud
- Optimus Image Optimizer
- WP Smush
- TinyPNG
- ImageRecycle
- Jetpack Image CDN
- Compress JPEG & PNG Images
Imagify Image Optimizer

WordPress image optimization plug-in-Imagify
Imagify also supports compression of images on third-party servers instead of yours, which is important in terms of performance. So Imagify doesn’t slow down your WordPress site.
WordPress Image Optimization plug-in-ShortPixel
ShortPixel Image Optimizer is a free plug-in that compresses 100 images per month and supports compression of many types of files, including PNG,JPG,GIF,WebP and even PDF files. It provides lossy and lossless image compression and supports the conversion of CMYK to RGB. It will put your images and thumbnails in the cloud for processing, and then send them back to your website server to replace the original. The plug-in creates a backup of the original files so that you can restore them manually as needed. The plug-in also supports batch conversion of library files, and there is no limit on file size.
ShortPixel Image Optimizer

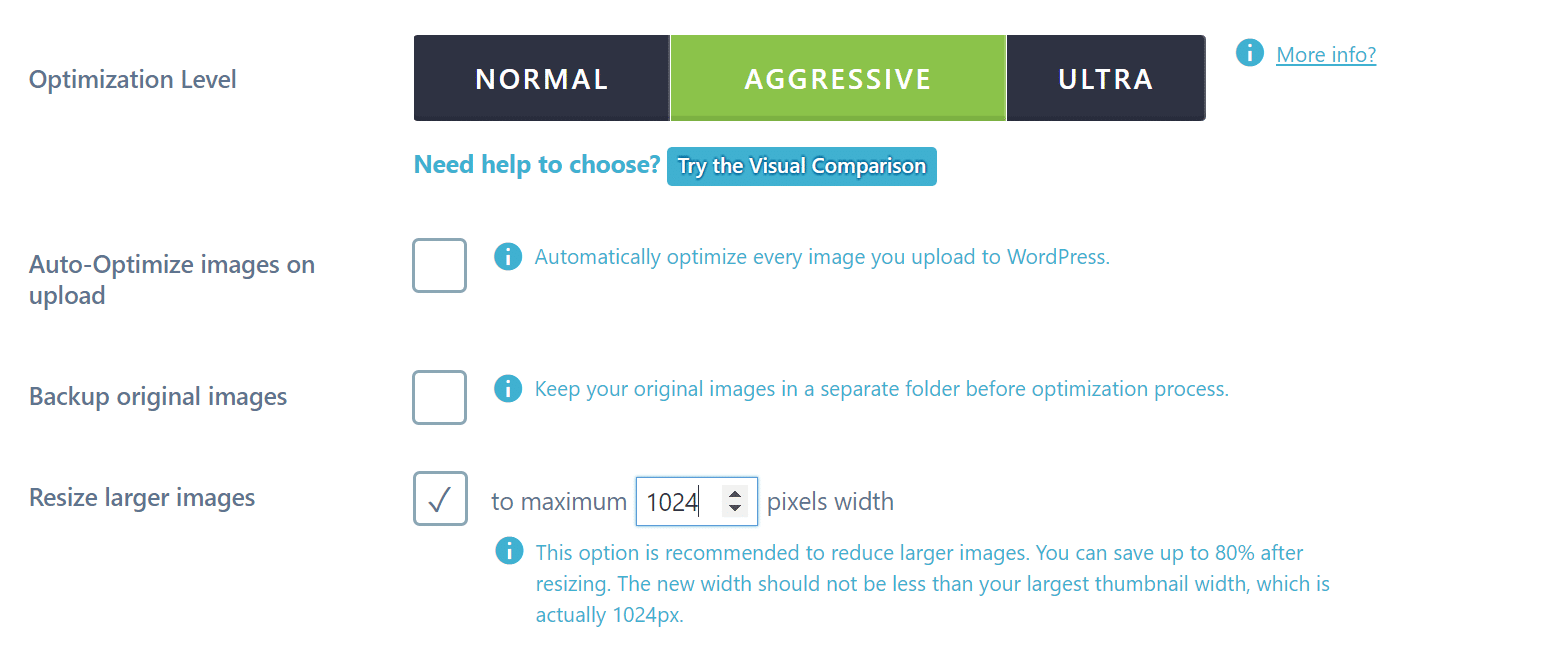
Step 1: after requesting the free ShortPixel API key
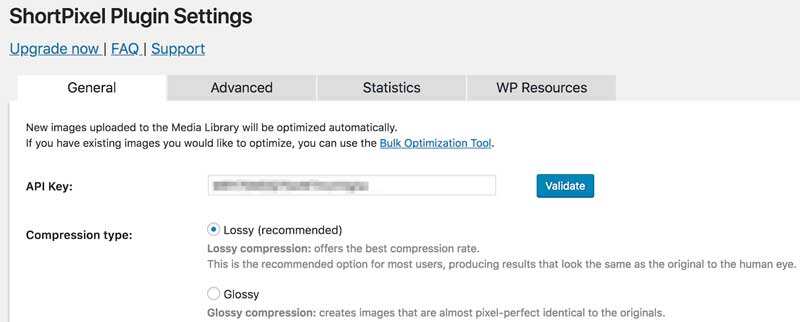
to install and enable the plug-in, the plug-in will ask for an API key. This establishes a connection between your site and the ShortPixel optimization tool.
If you don’t already have an API key, you can apply for a free API key. Just enter your email address and click Request Key. A key will be generated for you, and you will also set up a ShortPixel account. After entering and verifying the key, you will be taken to the ShortPixel plug-in settings screen.
step 2: configure Optimization Settings
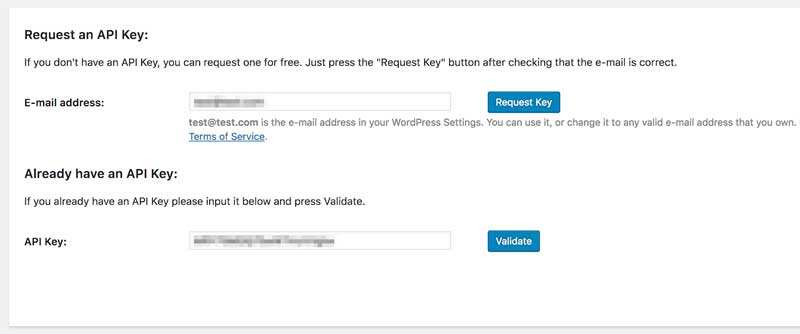
If you do not want to configure the ShortPixel plug-in, you can leave the default settings separately. However, if you do want to customize the plug-in, you can do it here. Let’s take a quick look at the General Settings tab, which is what most users need.
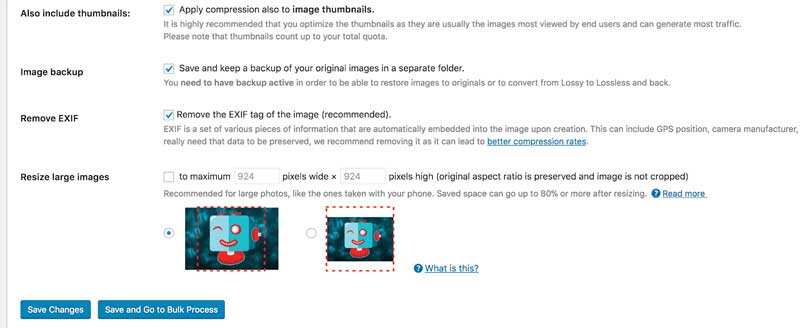
here, you can decide whether you want the plug-in to also optimize your thumbnails, set the compression level to apply to all files, and delete EXIF data. You can also back up the original image and choose whether you want the plug-in to resize the image automatically.
When you are satisfied with these settings, click Save changes. Or, if you want to start optimizing existing images immediately, you can choose to save and go to batch processing.
step 3: batch compress existing image
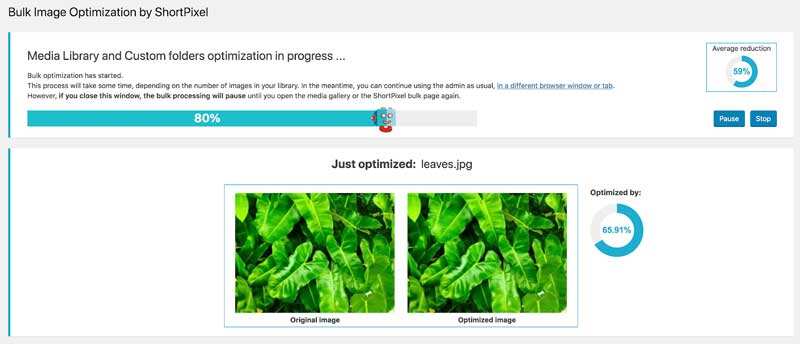
The ShortPixel plug-in will automatically compress all images you upload in the future, but it also enables you to optimize existing images. You can do this using Bulk Optimization Too, which you can access through Media & gt; Bulk ShortPixel in WordPress.
Here, you will see the number of existing images on the site, including thumbnails.
To start the process, click the Start Optimizing button. You can see how each image is compressed in real time, including the total amount of space saved.
When the process is complete, you will see a message confirming that all the original images have been backed up and replaced with a compressed version. From now on, you don’t have to worry about pictures slowing down your website!
WordPress Image Optimization plug-in-Optimole
Optimole is a WordPress image optimization plug-in that automatically reduces the size of images without any manual work. It has a great advantage in the loading speed of your site because it is completely cloud-based and never provides larger images than they should, striking a balance between visitors and browsers.
Optimole

In addition, the plug-in provides delayed loading and efficient image replacement-which reduces image quality if visitors have a slow Internet connection-which makes it stand out from the crowd. It also automatically detects the user’s browser and displays the image in WebP format according to the actual situation.
All images compressed by Optimole are provided through fast CDN. You can try Optimole for free, and if you need extra bandwidth and processing space, consider upgrading to a paid package.
WordPress Image Optimization plug-in-EWWW Image Optimizer Cloud
EWWW Image Optimizer Cloud can help you reduce images, speed up website creation, and reduce hassle. Without size restrictions and sufficient flexibility, you can use default values or customize plug-ins exactly to your liking. All EWWW IO users can use the batch optimizer to compress their existing images, or use the Media Library list mode to select specific images to compress.
EWWW Image Optimizer Cloud
You can scan other folders to ensure that each image on your site is properly optimized. EWWW IO even allows you to convert images to next-generation formats such as WebP, or to find the best image format for images with multiple format conversion options. The price of image compression starts at only $0.003 per piece.
WordPress Image Optimization plug-in-Optimus Image Optimizer
Optimus WordPress Image Optimizer uses lossless compression to optimize your image. Lossless means you won’t see any quality loss. It supports WooCoomerce and multi-site, and for those who already have a large existing media library, it provides good batch optimization capabilities. It is also compatible with the WP Retina WordPress plug-in. Plug-ins are also available in free and paid versions. In the paid version, you pay once a year, and you can compress images indefinitely. If you use it with the Cache Enabler plug-in, you can also learn more about WebP images, a new lightweight image format provided by Google. The
Optimus Image Optimizer

WordPress image optimization plug-in-WP Smush
WP Smush is available for free and premium. It will reduce the hidden information in the image to reduce the size without reducing the quality. When you upload images to your website, it scans the images and reduces them. It also scans the images you have uploaded and reduces them. It will batch refresh up to 50 files at the same time. You can also perform it manually if necessary. It supports JPEG,GIF and PNG image types, but the file size is limited to 1MB.
WP Smush
is compatible with some of the most popular library plug-ins, such as WP All Import and WPML. All
images are optimized using lossless compression technology to maintain high image quality. The directory where
- saves the images doesn’t matter. Smush finds and compresses them.
- Smush can choose to automatically set the width and height of all images, so all images are resized to the same scale.
- WordPress Image Optimization plug-in-TinyPNG
- TinyPNG uses TinyJPG and TinyPNG services (a free account allows you to compress approximately 100 images per month) to optimize your JPG and PNG images. It will automatically compress new images and bulk compress existing images. It converts CMYK to RBG to save space. It can compress up to 60% of JPEG images and up to 80% of PNG images without significant image quality loss. It has no file size limit.
TinyPNG (also compressed JPGs)
WordPress Image & PDF Optimization plug-in-ImageRecycle
ImageRecyle plug-in is an automatic optimizer for images and PDF. A very convenient feature is the ability to set the minimum file size for compression. For example, if you set the image size to 80 KB, they are automatically excluded from compression. This ensures that images and files are never overcompressed. It also includes batch optimization and automatic image resizing. Note: they have a free trial period of 15 days, but this is a paid service and uses the server to upload and compress images. Instead of charging a monthly fee, they charge for the total number of compressed images, starting at $10.
ImageRecycle
Jetpack is a popular WordPress toolkit plug-in that includes image optimization in the form of service CDN. This module, formerly known as Photon, allows you to speed up the loading time of images on your site by switching individual settings (located in Jetpack & gt; Settings & gt; Writing).
Image CDN uses image_downsize filters to quickly optimize images on articles and pages, including feature images and thumbnails. After you select the accelerated image and photo settings, all your articles will use Image CDN to optimize their images. Main features of

:
automatically resizes optimized images so that they do not affect the appearance of the theme you choose.
is very easy to set up.
- filters the content without changing the image information in the database. The free version of the
- Jetpack plug-in includes full Image CDN functionality, but also provides advanced planning.
- Compress JPEG & PNG Images will be familiar to TinyPNG users; this is the plug-in version of the tool. This allows you to use TinyPNG services directly from your site, making it one of the most user-friendly options.
The plug-in sends each uploaded image to the TinyPNG service to automatically determine the best way to compress the image. The image is then optimized and returned to your site. Compressing JPEG and PNG images can also bulk compress your existing files.
Compress JPEG & PNG Images
main feature:
enables you to resize the image automatically.
compresses animated images.
- converts images from CMYK to RGB to save extra space. The plug-in
- is free to use and can compress up to 500 images per month for free. After that, you can buy additional compression packages at the price of $0.009 per image. TinyPNG provides a convenient price calculator that can be used to estimate prices based on your requirements.
- Optimize the image case study
to conduct your own small case studies and tests to show you the impact of image optimization on the network and the overall speed of your WordPress site.
uncompressed JPG
We first uploaded six uncompressed JPG to the test site, all of which are more than 1 MB. Then five tests were carried out by Pingdom and the average value was taken. As you can see from the following speed test, the total load time is 1.55 seconds and the total page size is 14.7 MB.
uncompressed JPG Image website Speed Measurement
compressed JPG

then use the Imagify WordPress plug-in to compress JPG using “radical Settings (aggressive setting)”. Then five tests were carried out by Pingdom and the average value was taken. As you can see from the following speed tests, the total load time is reduced to 476ms and the total page size is reduced to 2.9MB. In other words, the total loading time was reduced by 54.88%, and the page size was reduced by 80.27%. The results of website speed measurement after
compressed JPG images there are few other optimizations that can reduce your loading time by more than 50%. This is why image optimization is so important, and the above process is done automatically by the plug-in.
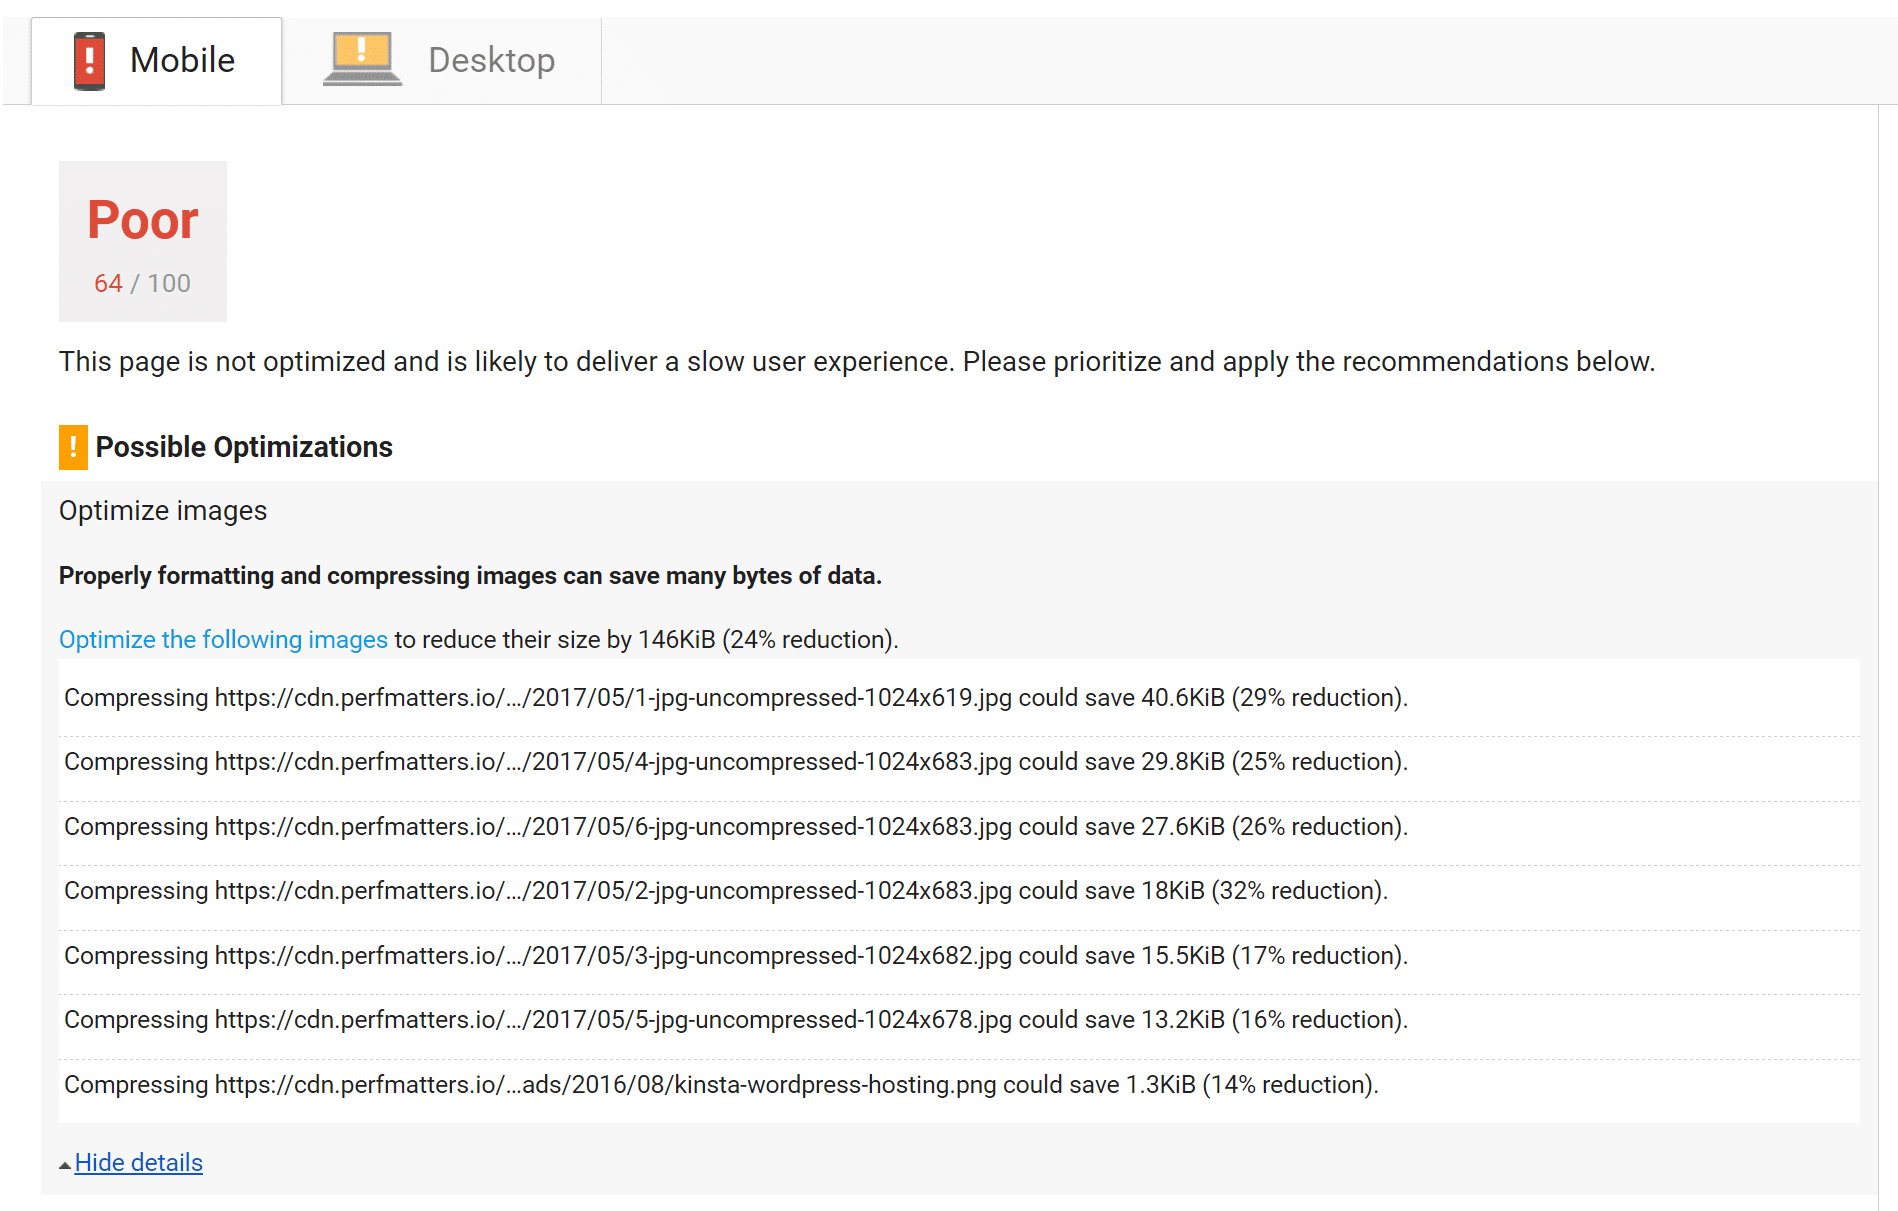
You can also fix the “optimize Picture” warning in Google PageSpeed Insights by optimizing your pictures, whether using the photo editing tool or the WordPress plug-in (see below).

PageSpeed Insights optimized Image warning
if you find that Google PageSpeed Insights has more optimizations, you can read “how to achieve a full score of Google PageSpeed Insights test / 100” to learn more about website optimization, or try to use more website optimization tools to understand the causes of slow website loading, see the “website Speed performance testing tutorial [with 15 commonly used website speed tools]”.
Another suggestion for using SVG format graphic
is to use SVG with other images. SVG is a scalable vector format for logos, icons, text and simple images. Here are several reasons:
SVG can be scaled indefinitely in browsers and photo editing tools.
‘s mainstream search engines index SVG, just as it does with PNG and JPG, so you don’t have to worry about SEO.
SVG traditionally (not always) the file size is smaller than PNG or JPG. This speeds up the loading time. Genki, a foreign blogger from
- , wrote a great article comparing the sizes of SVG, PNG and JPEG. Here are some of his tests, where he compared three different image types.
- JPG (optimized volume: 81.4 KB)
- JPG image
PNG (optimized volume: 85.1 KB)
PNG image

SVG (optimized volume: 6.1 KB)
SVG graphic

as you can see, the file size of SVG is 92.51% smaller than that of JPG. Compared with PNG, it is 92.83%.
Best practices when using images

here are some general best practices on how to optimize images for Web: if
uses the WordPress plug-in, use plug-ins that compress and optimize images externally on its server. This reduces the burden on your own website.
uses vector images as much as possible and PNG and JPG
use CDN acceleration to provide images to global visitors
- removes unnecessary image data
- Crop the blank area and recreate it with a fill provided by CSS.
- use the CSS3 effect
- as much as possible to save the image in the appropriate size. Remember, though, that WordPress now supports responsive images to provide them without having to adjust them using CSS.
- uses Web fonts instead of placing text in images-they look better and take up less space when zoomed
- only uses raster images
- for scenes with a lot of shapes and details to reduce bit depth to smaller palettes
- as much as possible use lossy compression
- to try to find the best setting for each format
- if animation is needed Please use GIF (compressible GIF animation)
- if you need high detail and high resolution, use PNG
- to get regular photos and screenshots
- delete all unwanted image metadata
- automate the process
- as much as possible in some cases You may want to delay loading images to speed up the rendering of the first page
- in tools such as Photoshop to save images as “optimized for Web” images
- in Chrome using WebP format images can provide smaller images
- after formatting images for better performance and following best practices, search engines, browsers and the web will better load your website and provide faster loading for your readers.
- If you have anything to add on this topic, you are welcome to tell us your techniques and practices in the comments below!
- 在Chrome中使用WebP格式图像可以提供较小的图像
在对图片进行格式化以获得更好的性能并遵循最佳做法后,搜索引擎,浏览器和网络将更好地加载您的网站,并为您的读者提供加载更快网站。
如果你关于这个话题有什么要补充的,欢迎在下面的评论中告诉我们您的技术和做法!

