
If you have been using WordPress for a while, you may be running multiple websites. If your site has something in common, you may wonder: is there a more efficient way to run them than to manage them as a single installation?
WordPress Multisite (hereinafter referred to as WordPress multisite) may be what you are looking for. It allows you to create a network on your WordPress installation, which means you can run any number of sites on that network, all on one WordPress instance. Think about it: WordPress.com is a good example of a WordPress multi-site installation that runs millions of sites.
In this article, I’ll guide you through everything you need to install WordPress multi-site and make the most of it. I will introduce:
- What is WordPress multisite?
- Benefits of WordPress multi-site
- WordPress multisite: the most common use case
- How to set up and activate WordPress multisite
- How to fix WordPress multi-site Cookie errors
- How to manage sites in a WordPress multi-site network
- Multi-user WordPress: working with users in WordPress multi-site
- Using plug-ins and themes in WordPress multi-site
- How to store media in multiple sites
- How to store data in multiple sites
WordPress multi-site is a big topic involving many aspects. But it’s not hard to master, and once you’ve finished this article, you’ll know everything you need to run a multi-site network in WordPress.
So let’s first determine what WordPress multisite is.
What is WordPress multisite?
WordPress Multisite is a way to add multiple sites to a WordPress installation. You can add it to an existing or newly created WordPress site. To activate WordPress Multisite, you need to add a few lines of code to several files in your WordPress installation (I’ll show you later). Then create a site in your network. The existing site remains there with its URL unchanged, while the new site is added to the top.
WordPress installation and WordPress multi-site (main difference):
- The number of individual sites.
- WordPress user role-activating multiple sites adds the Network Administrator role.
- Access themes and plug-ins-only network administrators can install them.
- Management screen-multiple sites have added some screens for managing the network.
- How media is stored-multiple sites add additional upload folders for each site.
- Data storage method-multiple sites create additional database tables for each site, but store some data (such as users) for the entire network.
WordPress multi-site user role: from administrator user to network administrator
After you install WordPress multisite, you will become a network administrator with administrator privileges for any site you create on the network. You can also allow others to create their own sites on the network and make them site administrators for that site.
The access level of site administrators is lower than that of network administrators. As a network administrator, you can install themes and plug-ins, while site administrators can activate them for their sites, but cannot install new ones. This helps you keep your network secure because you don’t want the site administrator to add code that could endanger the network.
Site administrators can add new users, but these users can only access the individual sites they add, not all the sites on the network. Users across the network are stored once, so you can give existing users access to more sites without adding additional accounts. I’ll show you later in this article how WordPress multiple sites store user data and other data.
WordPress multi-site and domain name
Another key difference between a standard WordPress installation and a multisite network is the domain name. Your network has the same url as the site you set up. Therefore, if your site is located in mysite.com, the network is also at that address.
When activating multiple sites, you can specify whether the site uses subdomains (site1.mysite.com) or subdirectories (mysite.com/site1). You can also map other domains to your network so that each site behaves as if it were in its own domain: as far as site users are concerned, the site appears to be using its own stand-alone WordPress installation.
The largest example of a WordPress multi-site network in the world is WordPress.com. It hosts millions of sites of all sizes, from mom blogs to large companies, and does so by managing data in customized and complex ways that you don’t have to worry about. There are other organizations that use WordPress multiple sites in ways that you will be able to identify more closely, and I’ll show you some examples in this article.
WordPress.com Registration Page
You might think that all of this adds additional complexity and that it would be easier to run only multiple WordPress installations. But WordPress multi-site does have many advantages, so let’s look at them in more detail.
Benefits of WordPress multi-site
I have to admit: I am biased. I am a big fan of WordPress multi-site, and I have been using it for many years to create personal and customer sites.
But there is a reason for this bias, because WordPress multisite is a great tool. If you are running multiple WordPress sites, it will save you time and improve your efficiency.
If you have ever had the following situations, multiple sites may be right for you:
- Install the same plug-ins (for example, performance, security, search engine optimization) on each site you start.
- Use a frame theme as a parent theme on multiple sites.
- Multiple sites have been developed for different branches of the organization that have common elements, such as brand or structure.
- When you prefer to spend time developing or managing them, it takes longer than you want to update multiple sites.
Let’s look at these benefits in more detail.
More efficient code
Running multiple sites on a network means less code. No matter how many sites are activated, there is only one set of core WordPress files, and only one copy of each theme and plug-in.
This means that your network takes up less server space than running a separate WordPress installation for each site. The more sites you add, the more it adds up. It saves you hosting costs and keeps your code up-to-date.
More efficient development
If you are developing a Web site with a custom theme, you may use a basic theme as a starting point. This can be a frame theme, a simple parent theme, or a getting started topic.
By working in Multisite, you can install a WordPress theme once, use it as the parent of a theme that is activated on various sites in the network, and save yourself time.
When I started working as a client, I developed a framework theme for all my websites. I used to install it in every new WordPress installation for each customer and then create a subtheme that will be activated for the site. Now, there is only this framework theme in my multi-site network, and each site has its own subtheme.
This is especially useful if your site has common design elements. For example, if you are creating a site for multiple departments of your company, you can create a parent theme that contains all the common design and layout elements, and then develop a subtheme for each site and activate each subtheme for the related site.
This not only saves storing (and updating) multiple instances of your parent theme, but also means that you can display content from other sites on your network on your business site. This allows you to create more than just a collection of individual sites.
More efficient management
Keeping your WordPress multi-site network updated will be much more efficient than performing the same operation for multiple WordPress installations.
You only need to update all topics and plug-ins in the network once, no matter how many sites they are active on.
Rigorous testing is particularly important when you run themes or plug-ins on multiple sites because you need to test on all relevant sites.
WordPress multisite: the most common use case
You can use WordPress Multisite in many different ways. Let’s look at some examples.
Personal website
If you run multiple personal sites, migrating them to a multi-site installation will save time. This is what I do. I keep all my sites on a multi-site network for three reasons:
- They have common code (parent theme and some plug-ins).
- It saves hosting space and updates them in a timely manner.
- I want to be able to display data from a site in my network on another site.
I use domain mapping to map a single domain name to each site, so as far as users are concerned, they are separate sites.
Hosting customer sit
When I started building the client site, I had a list of WordPress plug-ins that I would install on each plug-in. I will also use the same parent theme for each of them.
When I found WordPress multiple sites, I realized that I could improve efficiency by migrating all of these sites to a network and keeping the code updated there. This also means that I only have one WordPress installation to ensure security and backup. All this saves time and trouble.
You can use domain mapping to map customers’ domains to their sites, which will be applied to administrative screens as well as public sites. In this way, your customers don’t have to worry about the fact that you use Multisite to host their website (although I certainly have no objection).
Commercial website
If you run sites for different departments of your enterprise, it is more efficient to use WordPress multiple sites.
You only need to install a WordPress to update, you can share data and users across sites, and you can use the same parent theme and plug-ins on the network. This will save time when developing the site and managing it later.
BBC America is an example of an enterprise that uses a multi-site network for more and more sites: each show has its own site in a network.

BBC USA website
Intranet
Even if you are not suitable for using WordPress multi-site for public-facing sites, you may find that using Multisite for a company intranet is better than having a large WordPress site or multiple small sites.
Using Multisite for corporate Intranet means that you can:
- Add a separate site for each department and allow employees to access the appropriate site.
- You only need to add each employee as a user once and grant them access to the desired site.
- Share content across sites, such as displaying updates from a central site on the home page of each site.
Separate user management will make this option more efficient than any other method.
Community network
Community groups and organizations need to exist online, but will find it expensive. Sites that host multiple groups using a multi-site network will save money and increase the chances that these groups will connect to each other.
You can install plug-ins that allow site users to follow each other’s blogs and communicate with each other on the administration screen, or you can share content between sites.
You can save a lot of money by simply installing a WordPress to purchase a managed service.
WordPress multiple sites are used by charities, non-profits, and educational institutions: one example is the University of British Columbia, which uses Multisite to host a blog network for faculty, staff and students.

UBC blog
Monetization
Running a multi-site network is a good way to make money from WordPress. WordPress.com is an example of a company that makes money by providing websites for people on the web, as well as other companies, such as edublogs, which hosts educational websites and blogs.

Educational blog
You can use your base site (the site that initially activated Multisite) to run a page that allows people to create their own sites on your network, either for free or for a fee. You can then provide blog owners with plans ranging from free to advanced, somewhere in between.
You can use network administrators to support blog owners, communicate with them through notifications and updates, and build a user community.
So, these are some of the ways you can use Multisite. Now let’s see how to activate it on the WordPress website.
How to set up and activate WordPress multisite
When setting up WordPress multi-site, you have two choices: you can activate it on a new site, or you can add it to an existing site. Both are equally effective, but there will be some differences.
Let’s start with the first option: how to activate WordPress multiple sites on a brand new site.
To do this, you need to access the files in the WordPress installation. Use SFTP and the code editor to access your files. The two files you will edit are .htaccess and wp-config.php, both of which are located in the base folder of your WordPress installation. Back up these two before you begin. It’s also a good idea to back up the entire site. )
First, open the wp-config.php file in your code editor (see the 10 best free HTML editors). In the file, find this line:
/* That's all, stop editing! Happy blogging. */
Directly above it, add this line of code:
define( 'WP_ALLOW_MULTISITE', true );
Now save your file.
Go to your site administrator in the browser. Go to the network settings screen that will be created for you (through the tool & gt; Network Settings).
You will see a screen asking how you want to set up the network using subdomains or subdirectories.
If you have an option, select the option you want to use (see the section below to find out the difference). Enter the title and administrator email address of your network in the relevant fields, and then click the install button.
You will be taken to the network settings screen. This screen will contain some code that you need to copy and paste into two files: the wp-config.php file and the .htaccess file.

Network Settings screen
Open both files and paste the code on this screen, making sure to overwrite anything it tells you.
Note: your code will be different from the code in the screenshot above, because your website is different from mine.
Save and close these two files, and then return to your site administrator. Click the link on the Network Settings screen to log in to your network. Use the same login credentials that you have been using.
You will now notice some changes in your administration screen. You will have a new project named My Sites in the top toolbar and another project named Network Admin.
Hover over the my site link and you will see a new menu that will take you to the network management screen. Click the dashboard link to go to the network dashboard.

Network dashboard
This dashboard looks very similar to the dashboard of the standard WordPress website. There will be no blog posts, quick edits, or anything related to content-because there is no content on the web. This is all the content in each site.
The administration menu on the left is also different. You will have a new project called site, which gives you access to site creation and management. Some other menus are slightly different. Take some time to explore and understand them. We will show you how to use these screens to manage your network later in this article.
Activate WordPress multisite on an existing WordPress installation
To activate Multisite on an existing WordPress site, follow the same manual steps above. There is only one difference: if the site is longer than a month, you will not be able to use subdirectories.
This is because the more content you have added to your site, the greater the risk that the URL of existing posts and pages will conflict with the URL of new sites in the network.
Imagine that you create a site for a company called McCollin Paints that has a market segment called McCollin Varnishes. You may have created a page in mccollin-paints.com/mccollin-varnishes. Then you create a site for McCollin Varnishes in the new network. If you use subdirectories, the site may be on exactly the same URL. When a user accesses the URL, the WordPress does not know what to display. Therefore, your network will use a subdomain, which is located in mccollin-varnishes.mccollin-paints.com.
WordPress multi-site: subdomains and subdirectories
I have already mentioned subdomains and subdirectories. If you activate Multisite on a new WordPress installation, you can choose which one to use. The differences are as follows:
- Using subdomains means that each site will have a URL similar to https://site1.yournetwork.com. If you want to allow others to create sites on your network, this is the best choice.
- If you select a subdirectory, each site will have a URL similar to https://yournetwork.com/site1. If your site has been running for more than a month, you will not have this option: you must use subdomains.
Of course, you might want to use domain mapping to map independent domain names to each site in the network, just as I did on my own network. If this is the case, it doesn’t matter which subdomain or subdirectory you use, because they will never be seen.
How to fix WordPress multi-site Cookie errors
In some cases, you may encounter cookie-related errors when logging in to a WordPress multi-site installation.
Your browser blocks or does not support Cookie. You must enable cookie to use WordPress.
This common error occurs in some multisite configurations, especially those with custom domain mappings. To fix this error, add the following code to your wp-config.php file.
define('ADMIN_COOKIE_PATH', '/'); define('COOKIEPATH', ''); define('SITECOOKIEPATH', ''); define('COOKIE_DOMAIN', false);
How to manage sites in a WordPress multi-site network
Now that you have set up the network, the next step is to start adding some sites. There are two ways to do this: through the management screen or through the front end of the main site. Let’s start with how to get through the administrator.
WordPress multi-site: adding sites through the WordPress administration background
In the Network Administration dashboard, click the site (Sites) link in the left menu. Suppose you add some sites, which will display a list of sites in your network. When you start for the first time, it will be empty.
To create a new site, click the Add New button to go to the Add New Site screen:
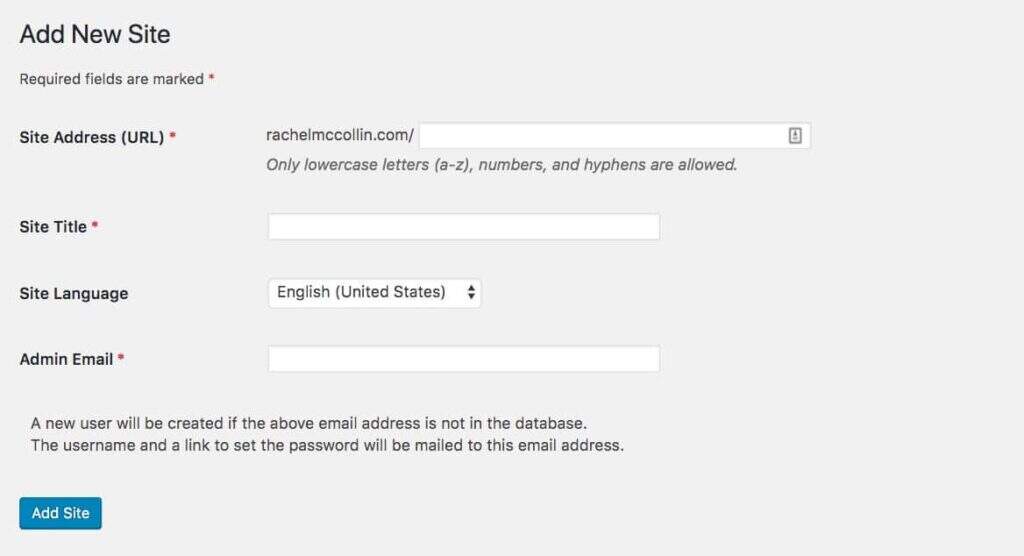
Add a new site
Fill in the details of the new site and click the Add Site button. When you return to the site screen, your new site will be displayed. If you hover over its name, you will get some available links:
- Edit-Edit site settings (not content).
- Dashboard-access the site dashboard from which you can add new posts and pages and configure the site.
- Deactivate-disable the site so that no one can access it.
- Archive-prevent visitors and site administrators from accessing the site, but do not delete it.
- Spam-marked as spam so that the user who created the site can no longer create it.
- Delete-deletes the site and all its data.
- Visit-visit the front end of the website.
The most useful option at this stage is Edit. Click to view the site editing screen.
This is an example of an existing site on my network:
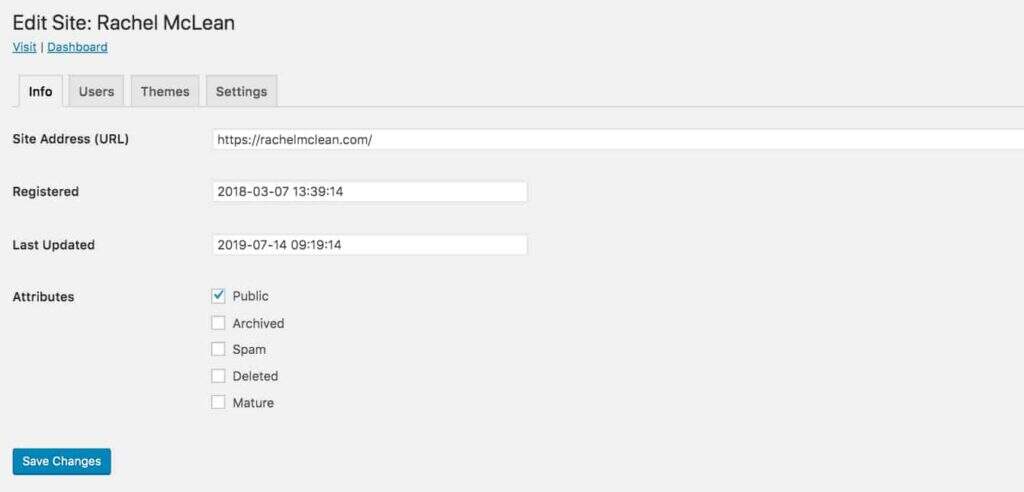
Edit site screen in multiple sites
Here you can change the main settings of the site, such as its domain name and title. You can also access the theme screen, where you can specify which themes will be enabled for this site.
If you host your own site or customer site, you may want to enable only one theme for each site. For networks where you allow people to create their own sites, you need to enable networks with multiple themes. You can do this from the network administrator’s main theme screen.
We’ll take a closer look at how you manage themes and plug-ins in your network later in this article, because it’s different from the standard WordPress site.
WordPress multi-site: creating a site from the front end
If you allow users to create their own site, they will do so on the / wp-signup.php screen of the main site.
This displays a screen that allows someone to log in and create a site using an existing user account, or to create both a site and a user account.
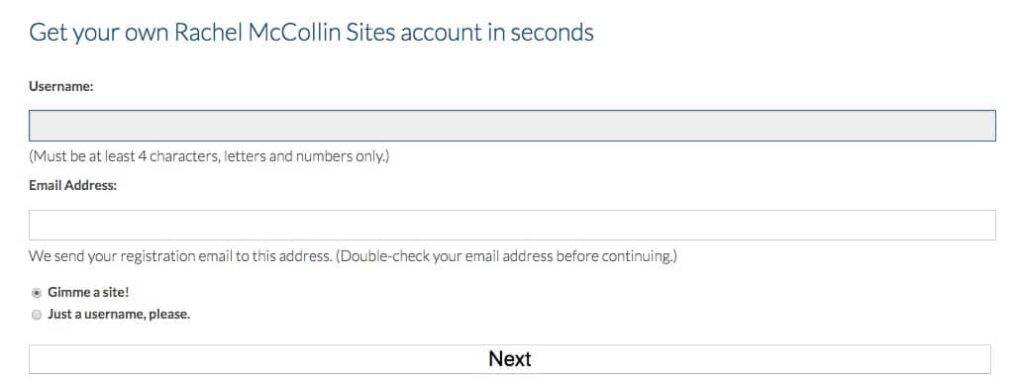
Wp Registration screen
If you only want to create your own website through the administration screen, you can disable registration. Go to Network Admin & gt; Network Settings and select the Registration is disabled radio button.
If you create a site from the administration screen, you will have site administrator privileges for that site, and it will be located in the My Sites drop-down menu. If someone else creates a site, you will not have site administrator privileges, and it will not appear in the list (although you can always add yourself as a site administrator to any site through the site screen).
WordPress multi-site and domain mapping
Domain mapping is one of my favorite Multisite features. It allows you to map a domain to a site in the network and make it behave as if it were hosted on that domain.
Note: prior to WordPress version 4.5, you needed a plug-in to do this. The later version is not needed.
To map a domain to a site, you first need to make sure that it points to your network.
After the domain points to your network, you need to add the domain name to the settings of the site. In the Network Administration screen, go to Sites and click Edit under the site you want to map. In the site editing screen, add a domain name.

Edit site screen in multiple sites
Click the Save changes button and the site will now use the new domain instead of a subdomain or subdirectory of the network.
Clone a site in a WordPress multisite network
When you create a new site in your network, you can sometimes speed up the cloning of an existing site. To enable this feature, install and activate the plug-in, such as MultiSite Clone Duplicator or NS Cloner-Site Copier, over the network.
When you hover over the site name in the site settings screen, this will provide you with a Clone or Duplicate link. Click this button to copy the site.
Deactivate or delete sites in an WordPress multisite network
Sometimes you need to shut down a site on the network. Maybe this is a personal website that you no longer use. Maybe it belongs to the customer who canceled the hosting plan.
There are several options to remove a site from your network, all of which you can access by going to the site screen and clicking the relevant link under the site name:
- Deactivate: this option deactivates the site, so no one can access it, but the files or data are not deleted. The site administrator can still access it.
- Archiving: this option prevents visitors and site administrators from accessing the site, but does not delete it.
- Spam: this option marks the site as spam, deletes it, and ensures that the user who created the site can no longer create the site.
- Delete: this option deletes the site and all its data.
Multi-user WordPress: working with users in WordPress multi-site
The multi-user WordPress setup is very similar to a standard WordPress installation, with only a few differences.
Multi-user WordPress sites allow users to be created and managed by site administrators and network administrators. The difference is that site administrators can only remove user rights from their sites: they cannot remove users from the network.
Add a user as a network administrator (AKA Super Admin)
To add a user as a network administrator, go to the user on the network administrator screen, gt;, to add a new user.

Add a new user screen
Fill in your user name and email address here. Users will receive an email inviting them to set their password and log in.
After adding a user, you can edit the user through the user screen, just as in a standard WordPress installation. There is then a special permission called Super Admin, which you can grant to the user.

Multi-user WordPress Super Admin privileges
Add a user as a site administrator
Site administrators can also add users to their site. They can add existing users or new users to the network. To do this from the site administration screen, go to the user & gt; to add a new one.

Add a user as a site administrator
For existing users, simply fill in their email address or user name and their role on the site. For new users on the network, you need a user name (which must be unique) and an email address. If you skip the confirmation email, you need to assign them a password yourself through their user management screen: it will be easier for WordPress to process these passwords for you.
Set up and manage user roles (site administrator and network administrator)
Both site administrators and network administrators (AKA Super Admin) can add users and edit their permissions and information, although network administrators can do more.
As a network administrator, you work with users by going to the users screen. Here, you can see which sites each user has access to and access their editing screen.
To change the user’s permissions on the site or remove or add it to the site, you need to go to the editing screen of the site. Go to the site screen, click the site’s edits, and select the user tab.
From here, you can change the user role on the site, delete users, and add new users.
As a site administrator, you can edit or delete the user details of each user on the site. Go to the user screen and click the user to access their editing screen. From here you can edit their details and change their roles in the same way as a standard WordPress installation.
Delete users (site administrators and network administrators)
Network administrators can remove users from a single site or from the entire network. Site administrators can only delete users from their sites.
As a network administrator, go to the user screen, select the check box next to the user record, and then select the drop-down list batch operation above the user list. From here you can delete users and / or mark them as spam. If you mark them as spam, they will not be able to register for your network again.
As a site administrator, you can remove users from your site through the users screen. Select the check box next to the user name, and then click the Delete option in the bulk Action drop-down list.
Users and security
Because people can create accounts on your network and then create their own sites, you may have some security concerns.
The good news is that you can configure network settings based on the level of access you want, and you can enhance security by blocking e-mail domains.
In the Network Administration screen, go to Settings & gt; Network Settings. Here, you can find fields that can be used to enhance security and restrict access in the Registration Settings section.
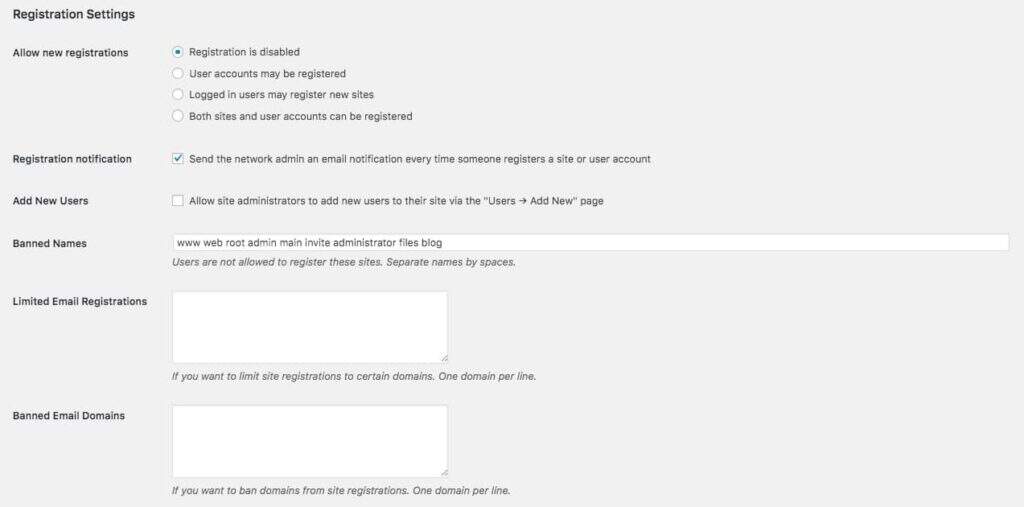
Register Settin
- Allow new registrations: specify whether new users can register and whether the site can be created by first-time registrants or only by existing logged-in users. Or you can close site registration so that only you, as a network administrator, can do this.
- Registration: I recommend keeping this notice so that you know when someone signed up for the website or account. It can help you keep track of what is happening and provide you with the opportunity to contact new customers.
- Add new users: if you uncheck this box, you can prevent site administrators from adding new users to the network. Instead, they can only add existing users on the network to their site.
- Forbidden name: you can add words here that you do not want to include in the user name.
- Limited email registration: lists the email domains that can be used for new user accounts. Suitable for Intranet or corporate or educational networks.
- Disable email domains: if you are worried about spam or malicious accounts, disable some email domains.
Using plug-ins and themes in WordPress multi-site
One of the benefits of Multisite is that your plug-ins and themes are only stored once. This means less storage space and less update time. Let’s take a closer look at how plug-ins and themes are managed in Multisite.
How to store plug-ins and themes
Themes and plug-ins are stored in the wp-content directory of the WordPress installation in the same way they are stored in the standard site. This means that each plug-in and theme is stored only once, no matter how many times it is used.
Install and activate plug-ins
Only network administrators can install themes; site administrators do not have permissions. Depending on how you configure the network, you can prevent the site administrator from activating the plug-in by selecting it on the Network Settings screen.
To install the plug-in, go to the plug-in in the network administrator, the gt; installation plug-in, and install it in the usual way. You can then choose the network to activate it. If you do not, individual site administrators can activate it on their site.
Network-activated plug-ins will run on all sites and are visible on the plug-in screens at those sites. But the site administrator will not be able to deactivate them. They can activate any other installed plug-in.
Install and enable themes
You can only install themes through the network administration screen. To do this, go to the theme screen in the network administrator and install it in the same way as a normal site.
WordPress multi-sites work differently in terms of enabling themes. You can enable themes for the entire network or for a single site.
Note: multi-site includes the ability to enable themes for the site, rather than activating it. This is because you can only activate one theme per site, and you can do this through site settings rather than network settings.
To enable a theme over the network, go to the topic screen in the network administrator, locate the topic, and click the network enable link below it.
To enable themes for a single site, go to the site screen and click the edit link for the related site. Click the topics tab, and then click the enable link under the topic name.
This will allow site administrators to see the topic, so they can choose to activate it. Any themes that are not enabled for the network or for a single site are not visible to site administrators.
This means that there is a fundamental difference in the way themes and plug-ins are activated in Multisite:
- The Network Activation plug-in will run on all sites in the network and site administrators will not be able to deactivate it. Network-enabled themes will be available for site administrators to choose to activate.
- Site administrators can activate plug-ins that are not activated over the network if they wish. Themes that do not enable the network apply only to sites that have been enabled for that site. The site administrator will not see themes that have not been enabled for the network or for the site.
How to store media in multiple sites
WordPress multi-site networks store media in a different way than standard sites.
When you upload attachments to pages and posts on each site, the interface works in the same way as a normal site, so the site administrator or editor will not see any differences. The difference lies in the way files are stored.
When you activate Multisite on a WordPress installation, a new folder called “sites” is created in the wp-content/uploads directory. This will save all media uploaded to sites on your network.
Each time you create a new site (or user creation) on the network, WordPress creates a new folder in the sites folder with the same name as the site ID. The ID of the base site is 01, so the ID of the first new site you create in the network is 02. This means that WordPress will create a new folder in wp-content/uploads/sites/02. All uploads from the site will be stored in this folder, and its year-and month-based structure is the same as that used in the standard site.
Files uploaded to the base site are stored in the wp-uploads folder in the same way as standard sites: Multisite does not create additional folders for these files.
How to store data in multiple sites
Multiple sites also store data in a slightly different way.
When you activate multiple sites, seven new database tables are created. These will store network-related data.
They are:
- wp_blogs
- wp_blog_versions
- wp_registration_log
- wp_signups
- wp_site
- wp_sitemeta
- Wp_sitecategories (optional)
Other tables that store data for the entire network are wp_users and wp_usermeta, because users are stored for the network, not for a single site. These tables are not created because you already have them in the database of the standard site.
When you create a new site on the network, WordPress creates 11 new tables for that site. These are given the prefix corresponding to the ID of the site. So for site 02, the following table is created:
- wp_2_posts
- wp_2_postmeta
- wp_2_comments
- wp_2_commentmeta
- wp_2_users
- wp_2_usermeta
- wp_2_links
- wp_2_term_relationships
- wp_2_term_taxonomy
- wp_2_terms
- wp_2_options
If you activate the plug-in that creates additional database tables on the site, it uses the same prefix and creates tables for each site that activates it.
As your network grows and more sites are added, more database tables will be added. This allows WordPress to store data for each site separately, so site administrators do not have the opportunity to access data from another site.
Summary
WordPress multisite is a very powerful tool. If you want to create multiple sites for yourself, the community, or your customers, it can save disk space and improve efficiency.
WordPress multisite has many uses: you can use it for your personal site, for hosting customer or community sites, for corporate sites, or for blogging systems created by people like WordPress.com. In the long run, spending time mastering Multisite may pay off handsomely.

