
WooCommerce will provide a default store page for your virtual store. However, their customization options are limited. In addition, WooCommerce’s pre-built store page is not optimized for your conversion rate. A good transformation is accompanied by a well-designed WooCommerce store page.
Did you know that only 22% of the industries are satisfied with their conversion rate?
Now I want to ask you a question. Do you want to be part of 22% happy industries or 78% unhappy industries? It’s up to you to decide. If so, you need to use coding or use the WooCommerce builder to customize your store page. Let’s not use coding here because you need to have a good knowledge of coding. Therefore, continue to use the WooCommerce builder to customize your store page. This is another task to choose the best WooCommerce builder.
ShopEngine is the complete solution for your WooCommerce page, because after using this plug-in, you don’t need another plug-in. This plug-in will provide solutions for your product comparisons, change samples, wish lists, quick viewing, quick checkout, late delivery, badges, sales notices, partial payments, etc. In addition, you can completely customize these options. This is why using this plug-in is cost-effective and user-friendly.
So in this blog, I’ll discuss how to use ShopEngine to create a WooCommerce custom store page, which is the best free tool for WordPress.
- What is the WooCommerce Store page?
- What’s wrong with the default WooCommerce Store page?
- Benefits of customizing the WooCommerce Store page
- How to customize the WooCommerce Store page using ShopEngine
- Why use ShopEngine as the WooCommerce page builder?
- Where can I search for WooCommerce Store page templates?
- Summary
What is the WooCommerce Store page?

WooCommerce Store Page
The WooCommerce Store page is the most important page on your website, where you will showcase all your products or services. When any customers log on to your website to buy products or services, they will visit your store page directly.
You can say that it is the core of your site, because your success will depend on this page. Because after visiting this page and viewing the product, they will decide whether to buy your product or not. This is why your WooCommerce store page needs to be user-friendly and well-designed.
What’s wrong with the default WooCommerce Store page?
Your WooCommerce store page plays a vital role in improving conversion rates. Therefore, you need to always keep in mind that your store page needs to be well optimized. This is a problem with using the default WooCommerce store page. Because the default WooCommerce store page is not well optimized for increasing conversion rates.
Imagine yourself in the position of the customer. As a customer, what do you want from the website when purchasing products?
Of course, a simple and clean design that you can use to easily search and find products. Your default WooCommerce store page is not suitable for it.
76% of customers want a simple design website, not a complex and confusing design. Via- HubSpot.com
This proves its importance to your customers. Now look at your default WooCommerce page and check it. Does it bring you target income? If not, be prepared to customize your WooCommerce store page ShopEngine using the Elementor and WooCommerce store page plug-ins.
Before we do that, however, let’s take a look at what benefits you will get by changing the WooCommerce Store page.
Customize the benefits gained from the WooCommerce Store page
Before putting in time and hard work, it’s time to check the benefits. See why you need to customize the WooCommerce Store page:
- A high conversion rate store page will significantly change your return on investment.
- Excellent user experience.
- Optimized for SEO and different devices.
- Increase the opportunities for users.
- Store pages that stand out in the highly competitive e-commerce world.
- Quickly load the store page.
These are the benefits you will get from the optimized store page. Now that you know the benefits, it’s time to take you to the topic. How to edit the WooCommerce Store page for a better user experience?
Keep digging to find out.
How to customize the WooCommerce Store page using ShopEngine
When WooCommerce page customization appears, nothing beats ShopEngine. ShopEngine is a WooCommerce drag-and-drop page builder plug-in available in WordPress. It is known for its user-friendly and fully customizable features. In addition, it provides advanced modules and gadgets suitable for building websites without coding.
This means that you don’t have to bother to customize the WooCommerce store page programmatically. Now you might wonder where you can find the WooCommerce Store page template?
ShopEngine also comes with WooCommerce Store page templates, which you can create again. So, don’t worry. Simply follow these steps to edit your WooCommerce store page using ShopEngine, the simplest and most efficient WooCommerce page builder:
Step # 1: create a store page template.
To customize the WooCommerce store page, you need to create a store page template. Go to the ShopEngine>> Builder template to create a new WooCommerce Store page template.
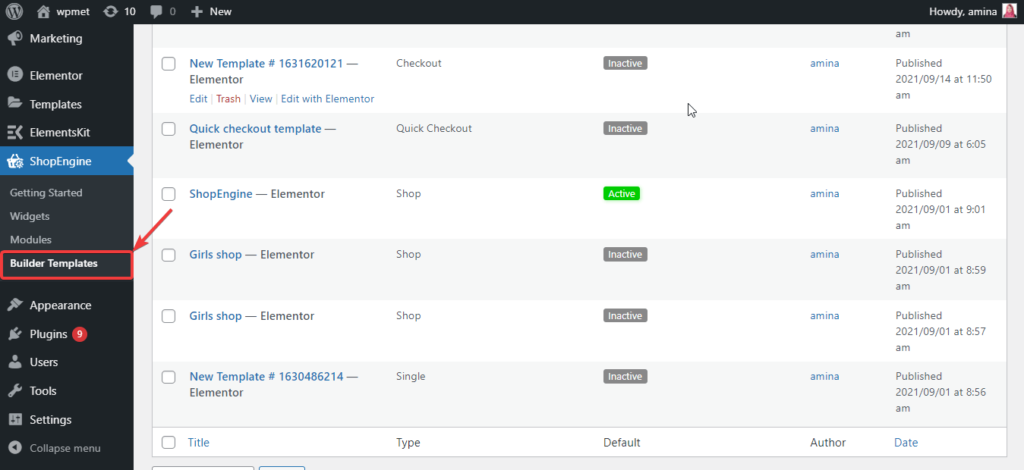
Store page template creation
After that, click the add New button, and a pop-up template settings bar appears. You need to enter the following information to set up your store page template:
- Name: enter the name of the WooCommerce store that you selected for the Woo store page here.
- Type: in this gap, you need to select the type of template you want to create. When you create a store page template, you must select a store.
- Set default value: if you want to add a default template, enable the default button. I am enabling it because I will use the default one.
- Sample design: you will have two designs here. If you choose the left, you can edit your WooCommerce store page from scratch. Also, if you choose the right one, you will get the default design of the store page template. You don’t need to edit it from scratch. Here, I chose the default sample design. Finally, to edit it, click the Edit with Elementor button.
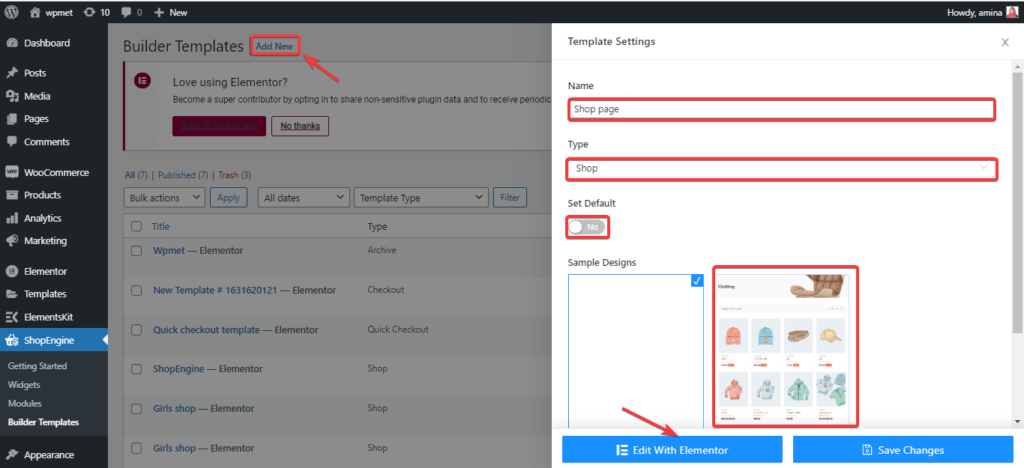
Store Page template Settings
The creation of your store page template is now complete. So it’s time to get to the actual customization section.
Step # 2: customize your WooCommerce Store page template using ShopEngine.
Now that you have created the store page template, it is time to edit it. To edit it, click the archive title and customize the following options to suit your needs:
- HTML tag: select the tag you want to use for the archive title.
- Alignment: you can select the alignment of the archive title here.
- Color: choose the correct color for your file title.
- Layout: edit the layout of the file title. You can change the series, font size, line height, weight, and transformation from here.
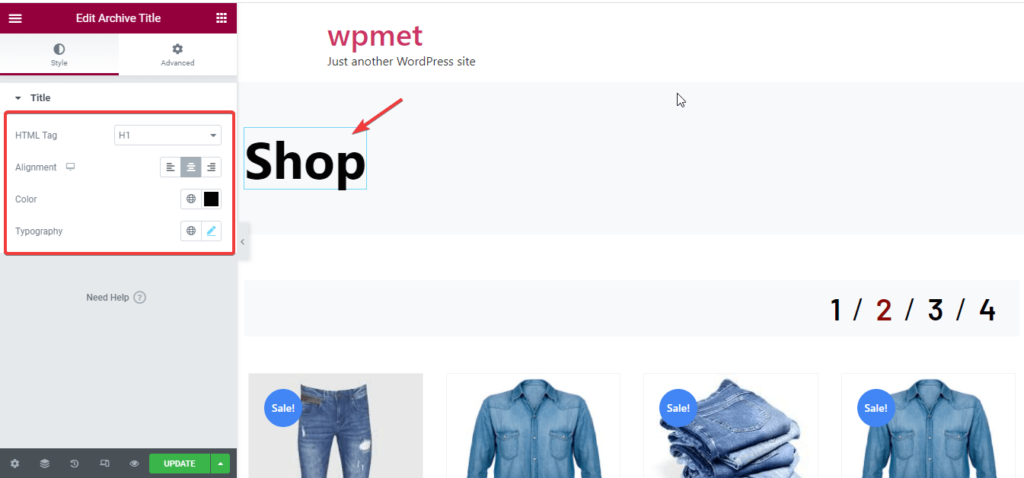
After that, customize the next archive page gadget, the per-page product filter. You can customize the following areas for each page filter of your product:
- List: type your number of pages on the store page.
- Typesetting: edit typesetting for each page of your product filter.
- Spacing: customize the spacing between numbers.
- Alignment: select the alignment for each page filter of your product.
- Color: you can select a color for the gadget here.
- Activity color: you can choose a different color for the activity page.
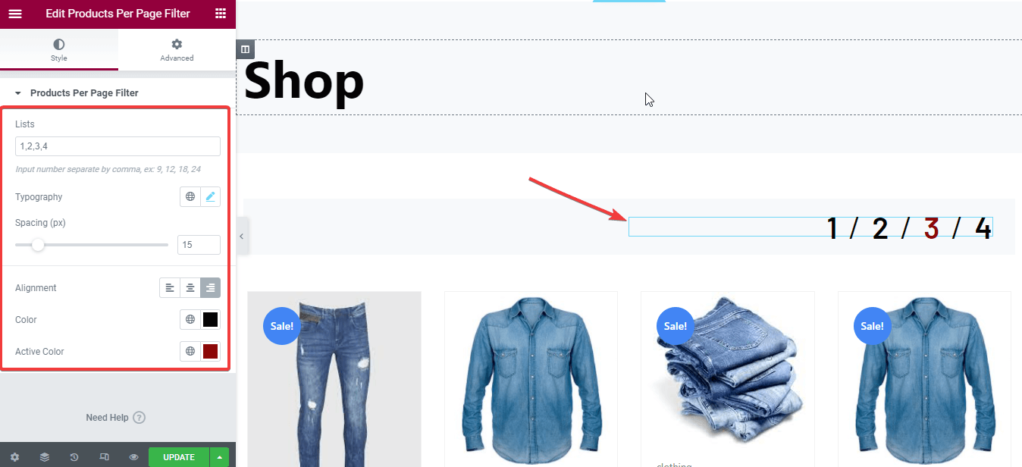
Now is the time to edit the layout of the archived product. Here you can edit:
- Layout settings: you can enable or disable layout settings for archived products.
- Products per line: select the number of products to display in each line.
- Rows per page: select the number of rows to display on each page.
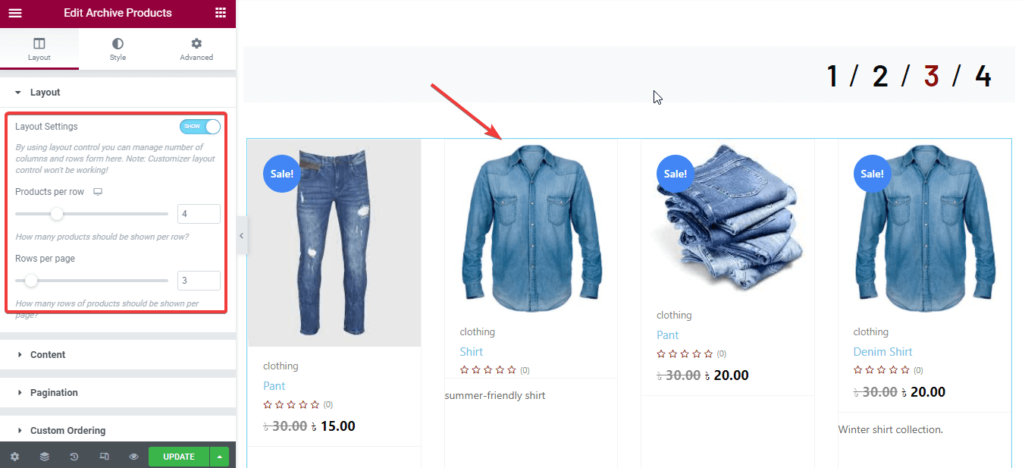
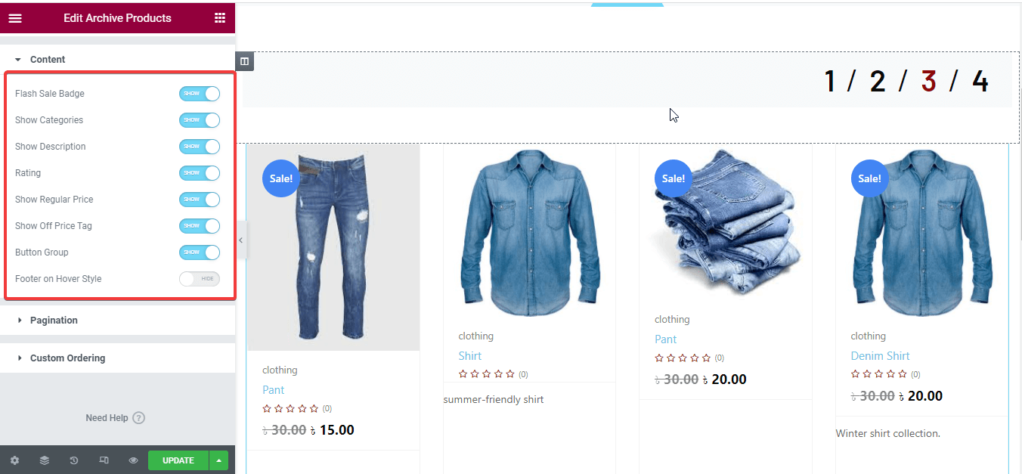
After that, you can enable and disable many options for archived products. For example:
- Flash purchase of badges.
- Displays the category.
- Displays the description.
- Score.
- Displays the normal price.
- Show off the price tag.
- Button group.
- The footer of the hover style.
If you enable these options, they will be displayed with your archived product.
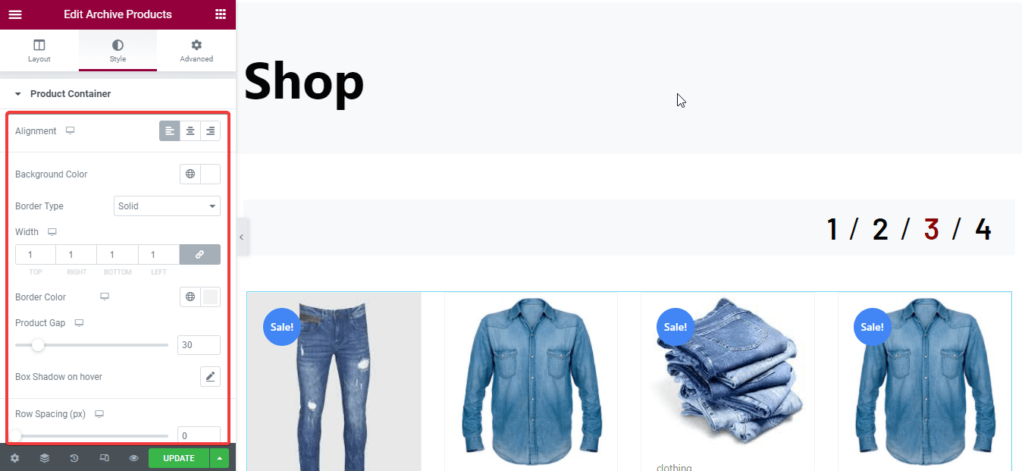
Then edit the product container, such as:
- Alignment.
- Background color.
- Border type.
- Width.
- Border color.
- Product gap.
- Box shadow when hovering.
- Line spacing.
- Fill it.
You can also edit the following areas of the archived product:
- Product pictures.
- Product category.
- Product Name.
- Product price.
- Product description.
- Close the label.
- Add to the shopping cart button.
- Score.
- Flash purchase.
- Button groups, etc.
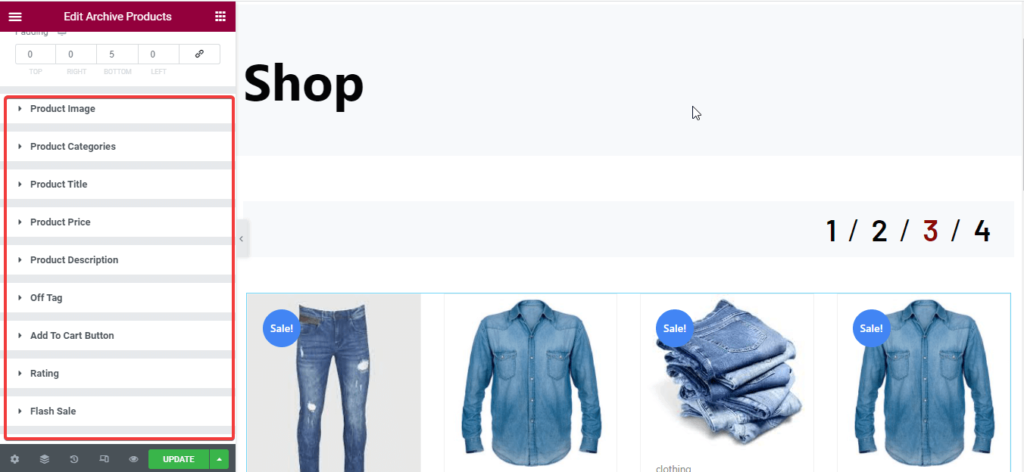
You can also customize more by dragging and dropping the gadget shown on the left. Finally, after you drag and drop the gadget and customize it, click the update button.
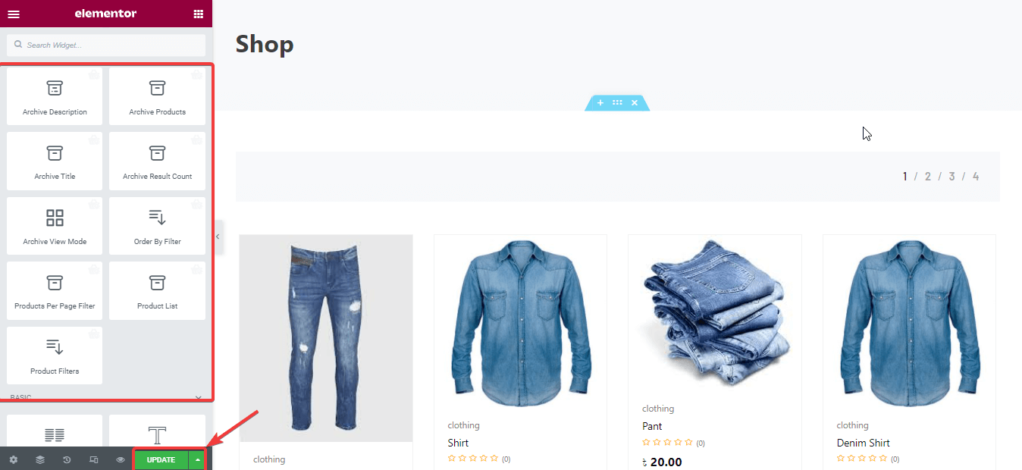
Create a custom store page
What you need to know:
Before you begin customization, you need to make sure that the product has been added to your website. If you don’t add these products, you won’t see any products. If you don’t know what to do, read how to add products to WooCommerce.
Now, take a look at your customized WooCommerce store page:

Notes:
Want to know more about ShopEngine Pro? Read about ShopEngine Pro: the revolutionary WooCommerce builder.
Why use ShopEngine as the WooCommerce page builder?
After learning about the simple process, you can still have another problem. Why use ShopEngine to customize your store pages instead of using other WooCommerce page builders?
The answer is that ShopEngine will unlock many new features through its upcoming version (ShopEngine Pro), which you won’t be able to get if you use other WooCommerce builders. Not only that, ShopEngine provides many other features to provide you with the best user experience. Here is a quick comparison with other WooCommerce builders:
| Features | ShopEngine | ShopEngine Pro | WooLentor | JetWooBuilder |
| Product comparison | ✅ | ✅ | ✅ | ✅ |
| Flash purchase countdown | ✅ | ✅ | ✅ | ✅ |
| Product category | ✅ | ✅ | ✅ | ✅ |
| Product description | ✅ | ✅ | ✅ | ✅ |
| Wish list | ✅ | ✅ | ❌ | ✅ |
| Quick browsing | ✅ | ✅ | ❌ | ✅ |
| Color swatch | ✅ | ✅ | ❌ | ❌ |
| Delay in delivery | ❌ | ✅ | ❌ | ✅ |
| badge | ❌ | ✅ | ❌ | ✅ |
| Sales notice | ❌ | ✅ | ✅ | ❌ |
| Partial payment | ❌ | ✅ | ❌ | ❌ |
| Advance purchase | ❌ | ✅ | ❌ | ✅ |
| Quick checkout | ❌ | ✅ | ❌ | ✅ |
| Additional checkout field | ❌ | ✅ | ❌ | ❌ |
| Add to shopping cart | ✅ | ✅ | ✅ | ✅ |
| Bread crumbs | ✅ | ✅ | ❌ | ✅ |
| Product excerpt | ✅ | ✅ | ❌ | ✅ |
| Product filter | ❌ | ✅ | ✅ | ✅ |
| Account details | ❌ | ✅ | ✅ | ✅ |
| Product label | ✅ | ✅ | ❌ | ✅ |
| File title | ✅ | ✅ | ❌ | ✅ |
| Archive result count | ✅ | ✅ | ❌ | ✅ |
| Account navigation | ❌ | ✅ | ❌ | ❌ |
Where can I search for WooCommerce Store page templates?
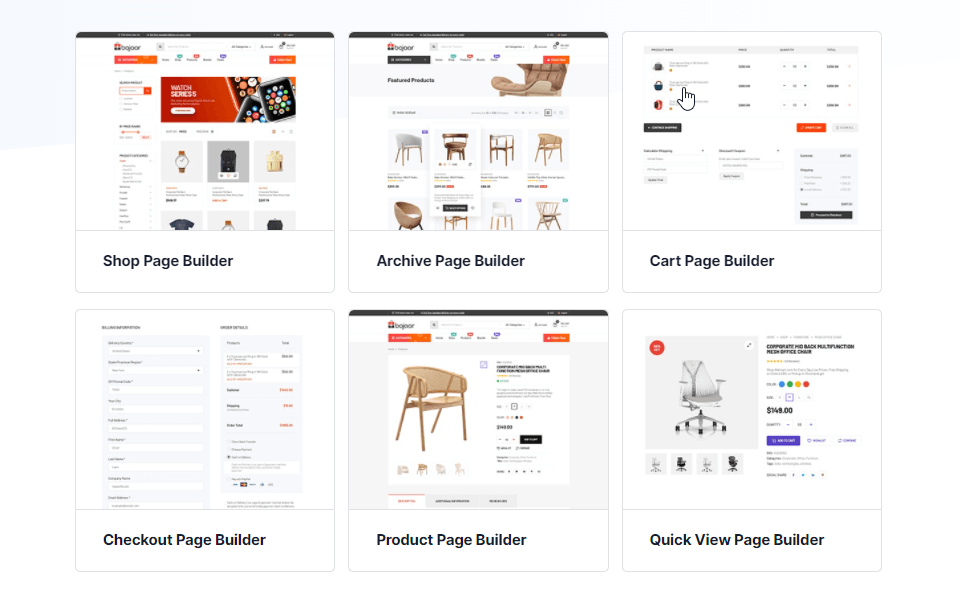
In ShopEngine, you will find a ready-made WooCommerce store page template. You can also create a store page template and customize it as needed. There is no need to customize these templates because ShopEngine provides all the customization options.
In addition, you will get WooCommerce product page templates and many other types of templates. It’s incredible that these will allow you to build WooCommerce products, categories, shopping carts, and so on in seconds.
The best part is that the free version of ShopEngine provides off-the-shelf templates. You can easily use it to make your WooCommerce store page. Check out the free WooCommerce store page template provided by ShopEngine:
Summary
Your WooCommerce Store page is the most important page in your WooCommerce page. Revenue will depend on how you display the product on the store page. In order to get a good demonstration, you must customize this page. Because the customization options on WooCommerce are limited, you need another tool.
ShopEngine is the most flexible tool you can try. Few tools can provide you with such a large number of customizations. In addition, a new version of ShopEngine pro has been released. Here, you can customize your page from scratch with more than 63 gadgets and 12 modules to make your page run smoothly in this competitive world.
In addition, you’ll find 16 page templates, and you’ll soon publish more attractive templates for your WooCommerce products, shopping carts, categories, and other pages. By using these, you can easily customize your store page and help your site stand out successfully.

