WordPress’s WooCommerce plug-in allows you to efficiently create and manage e-commerce platforms and provides built-in notifications to remind you of new or completed orders, insufficient inventory, and successful payments. These features are important, but there is little in-depth understanding of the valuable data collected by WooCommerce.
these limitations are features of traditional plug-ins that run in a WordPress environment. On the other hand, managed applications (network operations based on external servers) are much more scalable. By integrating with WooCommerce API and using external resources,
managed applications can provide advanced reports, custom alerts, and a detailed understanding of e-commerce transactions.
in this guide, you will learn how to create an application for the WooCommerce Store that uses comprehensive transaction data to generate email alerts that go beyond the capabilities of standard plug-ins.
existing reporting and notification functions
WooCommerce built-in alerts Reporting and status updates contribute to basic store management But it may not be able to meet all business needs. As a result, many users turn to third-party plug-ins to enhance their notification and reporting capabilities.
one of the most popular plug-ins include:
- WooCommerce Admin-provides an intuitive dashboard with key store metrics and reports.
- WooCommerce PDF Invoices and Packing Slips-customizable invoice and packing list templates, automatically sent to customers via email, and provide records of generated invoices and packing lists.
- WooCommerce Google Analytics Integration (WooCommerce Google Analytics Integration)-use Google Analytics tools to generate detailed reports on customer demographics and traffic sources. Through these plug-ins,
provides reporting and alert options, including order summaries, low inventory alerts, inventory management, and in-depth analysis through integration with tools such as Google Analytics. Limitations of
‘s current reporting system although
‘s current reporting system is useful, it has limited functions and some limitations, such as
- Customization: general reporting tools and plug-ins limit your company’s ability to gain in-depth and specific insights from the data. You may need specialized metrics, unique visualization, integration with proprietary analysis tools, or data filters that some general reporting tools and plug-ins cannot provide.
- Scalability: existing reporting systems may face scalability problems when dealing with large datasets. Slow performance and data processing bottlenecks can hinder efficient data analysis, resulting in delays in decision-making and response time.
- Relying on WordPress: because integration with WordPress limits independence, customization, and extensibility, you may face limitations related to server resources, plug-in compatibility, and security vulnerabilities. This integration may also prevent enterprises from adopting more advanced technologies and solutions.
, by contrast, customized reporting applications can provide detailed transaction and customer information. You can use this data to predict market trends and optimize your products accordingly.
in addition, you can quickly expand your custom reporting application to accommodate the growing amount of data and ensure seamless operations as your business grows.
Advanced reporting Application
the advanced reporting application envisaged in this guide has the following features:
- sends detailed transaction reminders to the shopkeeper via email when a customer places a new order. The application also has a dashboard that displays all orders and their details.
- inventory updates display store inventory details on the dashboard. Here, you can easily track the inventory level of each product. The
- Total sales report allows you to analyze revenue trends over time. Unlike the generic plug-in or the default WooCommerce notification and alert system,
provides detailed and customizable alerts about remaining inventory and total sales.
hosting the application also has the following advantages:
- Scalability: standalone hosting minimizes data processing bottlenecks and ensures that you can expand your business without resource constraints.
- Customization: standalone hosting allows you to customize how the collected data is used, for example, by integrating third-party services such as predictive analysis engines and implementing unique data visualization techniques to better meet your company’s requirements and goals.
- Autonomy: removing your application from the WordPress environment frees you from limitations such as limited server resources and potential conflicts between plug-ins. How
develops an advanced reporting application
in this section, let’s use Node.js to build a reporting application with WooCommerce REST API and webhooks to retrieve store data.
Request:
- runs locally in the WooCommerce store and sets up one or more products. A free Mailgun account used by
- to send email.
- has Node.js and ngrok installed. The startup template for the
- project.
- Code Editor.
configure startup template
follow these steps to configure the startup template:
1. Make a note of your Mailgun API keys and sandbox fields and paste their values into the .env file along with the corresponding variables. For theMAILGUN_SENDER_EMAILvariable, provide the email used to create the Mailgun account as the value.
2. On the WordPress management dashboard, select WooCommerce & gt; Settings & gt; Advanced & gt; REST API.

The WooCommerce Advanced tab displays the REST API section.
3. Click Add key to create the API key to validate the request from the application.
4. Open the Key details section and provide a description and user, select Read/Write permissions, and then click generate API key.

displays the WooCommerce Advanced tab for API key details.
5. Be sure to copy Consumer key and Consumer secret from the generated page, because you can’t see them again.
6. Open the .env file and assign the values copied in the previous step to their respective variables. Provide the store’s URL (similar toWOOCOMMERCE_STORE_URL) for thehttp://localhost/mystore/index.phpvariable.
7. Execute the following command on the terminal to install all project dependencies:
npm i express @woocommerce/woocommerce-rest-api dotenv ejs mailgun.js
npm i -D nodemon
these dependencies are used as follows:
-
express: the Node.js framework used to create API. -
@woocommerce/woocommerce-rest-api: make a network call to WooCommerce REST API. -
dotenv: loads environment variables from a .env file. -
ejs: create a JavaScript template. -
mailgun.js: use Mailgun to send email. -
nodemon: automatically restart the server when a file change is detected.
implements application functionality the
startup template contains the code for the embedded JavaScript (EJS) template in the views folder. In this way, you can focus on the server logic, taking the necessary data from WooCommerce API and passing it to the EJS template for display on the user interface (UI).
to implement the functions of the application, follow these steps:
1. Create a file named server.js in the root folder of the project. This file is the entry to the Express server.
2. Paste the following code in the server.js file: the code above
const express = require('express')
const WooCommerceRestApi = require("@woocommerce/woocommerce-rest-api").default;
require('dotenv').config();
const app = express()
const port = 3000
const WooCommerce = new WooCommerceRestApi({
url: process.env.WOOCOMMERCE_STORE_URL,
consumerKey: process.env.WOOCOMMERCE_CONSUMER_KEY,
consumerSecret: process.env.WOOCOMMERCE_SECRET_KEY,
version: "wc/v3"
});
app.set('view engine', 'ejs')
// endpoint to check if the application is up and running
app.get('/', (req, res) => {
res.send('The application is up and running!')
})
// retrieve all products in the store
app.get('/products', (req, res) => {
WooCommerce.get("products")
.then((response) => {
res.render('pages/inventory', {
products: response.data,
currentPage: req.originalUrl
});
})
.catch((error) => {
console.log(error.response.data);
});
})
app.listen(port, () => {
console.log(`App listening on port ${port}`)
})
uses Express.js to create a network server. First, you need to import the required packages, configure the WooCommerce client to interact with WooCommerce REST API, and set up the application to use the EJS template.
first defines a/endpoint that is used to check whether the application is running properly. Then, define a/productsroute to retrieve all the products in the WooCommerce store.
If successful, the path renders theinventorytemplate with the obtained data.
notice that the code also passescurrentPagefor all routed templates, which helps identify the active page on the dashboard.
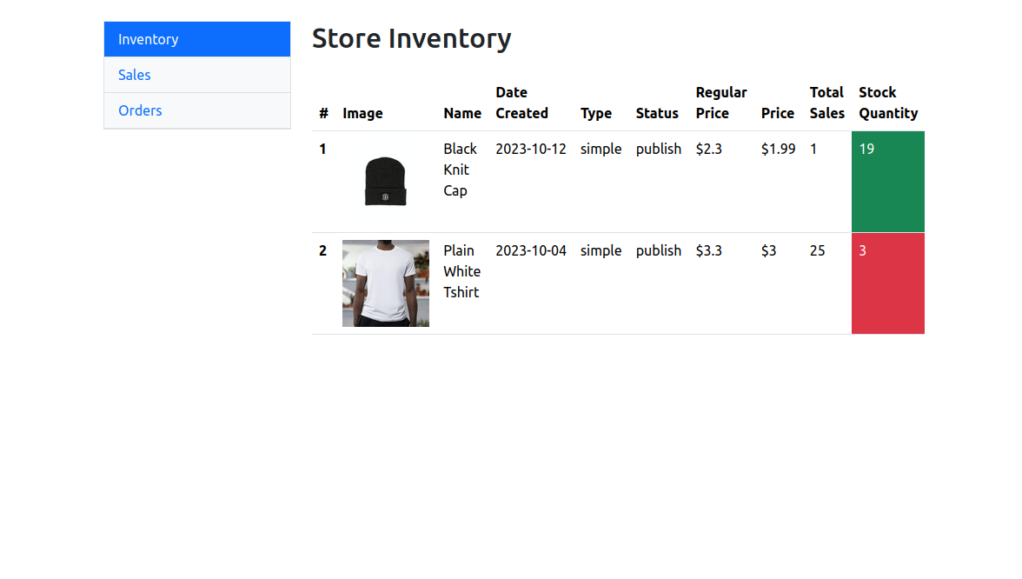
3. Run thenpm run devcommand and open thehttp://localhost:3000/productson the browser to see the results:

the store inventory page that contains the details of the item. The
Store inventory page displays all products in the store and their details. This information can help you track available products and manage inventory accordingly.
4. To process the sales report, add the following route to the server.js file: the
// retrieve monthly sales report
app.get('/sales', (req, res) => {
WooCommerce.get("reports/sales", {
period: "month"
})
.then((response) => {
res.render('pages/sales', {
sales: response.data,
currentPage: req.originalUrl
})
})
.catch((error) => {
console.log(error.response.data);
});
})
code defines a/salesendpoint that is used to retrieve the monthly sales report from the WooCommerce sales report API. The API call includes the parameterperiod, whose value ismonth, which specifies the sales report for the current month. After the request is successful, the code renders the sales EJS template with the acquired data.
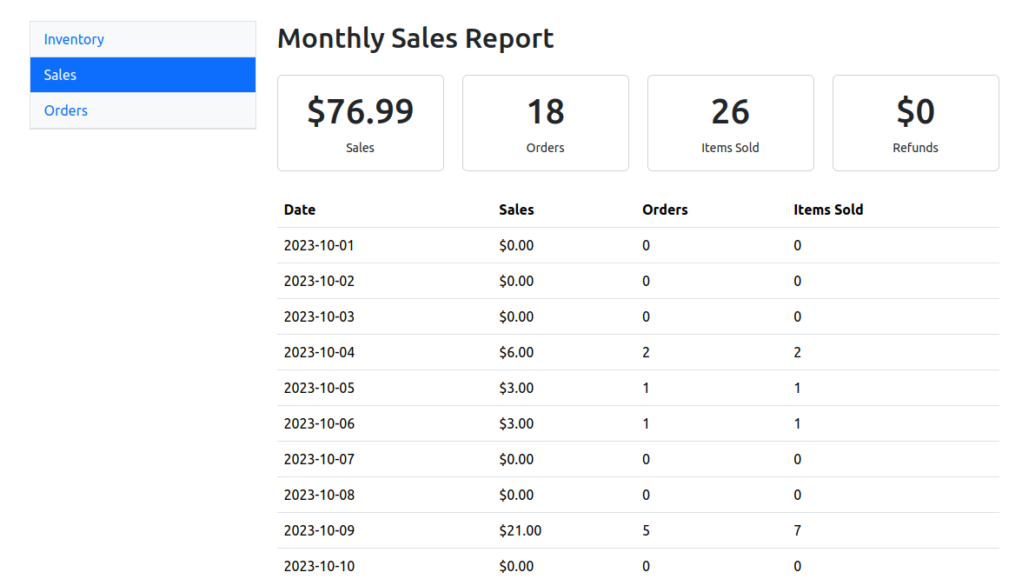
5. Navigate tohttp://localhost:3000/salesin the browser to view the results:

monthly sales report page.
this page displays a comprehensive total sales report to help you analyze your business’s monthly revenue trends.
implements order management
1. Add the following routes to the server.js file. The
// retrieve all orders
app.get('/orders', (req, res) => {
WooCommerce.get("orders")
.then((response) => {
res.render('pages/orders', {
orders: response.data,
currentPage: req.originalUrl
})
})
.catch((error) => {
console.log(error.response.data);
});
})
code retrieves all orders in the WooCommerce store and renders the order template with the obtained data.
2. Navigate tohttp://localhost:3000/ordersin the browser to view the results. This page displays the order management information: the

order page displays the deal details.
customizes alerts to provide comprehensive transaction reports
to enable the ability to send custom email alerts to you when customers order on the website, follow these steps:
1. Open a terminal window and runngrok http 3000to tunnel the network server connection. This command generates a HTTPS link that WooCommerce can use to send webhook data. Copy the resulting forwarding link.
2. Add the following route to the server.js file: the
app.post('/woocommerce-webhook/new-order', (req, res) => {
const data = req.body; // Received data from the WooCommerce webhook
console.log('New order:', data);
if(data?.id){
mg.messages.create(process.env.MAILGUN_SANDBOX_DOMAIN, {
from: `WooCommerce Store  `,
to: [process.env.MAILGUN_SENDER_EMAIL],
subject: "New Order Created",
html: newOrderEmail(data.order_key, `${data.billing.first_name} ${data.billing.last_name}`, data.billing.email, data.total, data.status, data.payment_method_title, data.line_items)
})
.then(msg => console.log(msg)) // logs response data
.catch(err => console.log(err)); // logs any error
}
res.status(200).send('Webhook received successfully'); // Send a response to WooCommerce
});
code defines a route to handle the incoming data from the WooCommerce network hook that the customer triggers when the customer creates a new order. If the data received contains aidattribute (indicating that the order is valid), it uses Mailgun API to send an e-mail notification to the specified e-mail address. The
email includes various order details, such as customer name, email, total amount, status, payment method, and list of items purchased. The
code writes the e-mail using thenewOrderEMail()function defined in the utils/new-order-email.js file, which returns a custom e-mail template. After processing the data and sending an email, the server responds to the status code 200, indicating that the network hook and the corresponding message were successfully received (“successfully received the network hook”).
3. Add the following statement to import thenewOrderEmail()function:
const { newOrderEmail } = require('./utils/new-order-email');
4. 0. Run thenpm run startcommand to start the server.
5. On the WordPress management dashboard, select WooCommerce & gt; Settings & gt; Advanced & gt; Webhooks. The

advanced page displays the Webhooks section.
6. Click Add webhook and provide the following information in the Webhook data table:
- Name: New Order Alert
- Status: Active
- Topic: Order Created
- Delivery URL: paste the ngrok forwarded URL that you copied in step 1. Be sure to add
/woocommerce-webhook/new-orderto the URL. This is the newly defined endpoint that receives the webhook payload. - Secret: leave it blank. The default is the consumer secret of the current API user. The secret generates a hash value of the delivered network hook in the request header. The receiver can use the secret to verify the authenticity of the incoming data. If the signature matches the expected value, you can confirm that the data is sent by WooCommerce, thus providing trust and security. The
- API Version: WP REST API Integration v3.

advanced page displays the Webhook data table.
7. Click Save webhook.
8. Visit your store and place an order. You should see an email like this: email reminder of new order and inventory information for

.
Summary
with the flexibility of external hosting, you have created an advanced reporting application that updates the remaining inventory levels and provides a comprehensive report on total sales.
also provides detailed transaction alerts that let you know specific transactions in real time, including product details, quantities, and customer information, so that you can proactively manage inventory, understand sales trends and revenue patterns.

