WP Rocket is one of the most popular caching plug-ins available for WordPress. It breaks the traditional rule of hundreds of options and provides users with an easy-to-use interface. You only need to switch options to speed up your site in a few minutes.
however, the plug-in does not provide any options on the front end to disable page caching or bypass specific page settings. In this article, we will explain how to bypass the WP Rocket cache in WordPress using various methods.
bypass WP Rocket cache
although caching can help users load pages quickly, it can cause problems when you perform certain activities. Here are some common scenarios where you might want to bypass the WP Rocket cache:
- you want to test the page speed score in the Google PageSpeed Insights tool with and without the WP Rocket plug-in. You may also want to see how many CSS or JS files are loaded without caching or do similar analysis.
- only wants to disable WP Rocket caching on certain pages. For example, WP Rocket will not work with WooCommerce and GeneratePress themes and make store pages unresponsive. You need to disable the WooCommerce style on the small screen to solve this problem
- you want to disable WP Rocket’s automatic page-level caching, and there is no option to disable it at the front end.
depending on the situation, you can bypass the WP Rocket cache by following one of the following options. In most cases, you may need to disable plug-ins at the entire site or page level instead of bypassing them. Therefore, we will explain the available options for disabling and bypassing.
1. The easy-to-use option of completely disabling plug-ins
is to simply deactivate plug-ins on your site. You can complete the test and then reactivate it. The good part is that the plug-in will retain all your previous settings. However, disabling plug-ins completely is not a viable solution every time you want to test something simple.
remember that when you want to test compatibility or test another caching plug-in, you should deactivate it. For example, if you want to test W3 Total Cache, deactivate WP Rocket before installing the W3 Total Cache plug-in. These cache plug-ins will add plug-in files such as advanced-cache.php, which may conflict with each other when both plug-ins are active. As a result, your website will show that the white screen crashes or the cache does not work.
goes to the plug-ins section of the WordPress administration panel, and then click the deactivate link under the WP Rocket plug-in. Click the Skip & Deactivate button to temporarily deactivate the plug-in without deleting the cached contents.

deactivates the WP Rocket plug-in
2. Disable plug-ins on specific pages
most WordPress business topics provide page builder integration, such as Elementor and Visual Composer. There is a real problem with caching when using a heavy JavaScript on a page using the page builder plug-in. Elements such as dynamic animation charts and jQuery datasheets may not work properly with aggressive caching plug-ins such as WP Rocket. The best solution is to disable WP Rocket caching on pages with cache problems.
- goes to articles or pages and finds your article in the Gutenberg editor and edits it.
- WP Rocket adds a meta-box to the editor that you can use to change the global behavior. If you do not see the meta-box in the sidebar, click the three dot buttons and select preferences. Go to the panels section and enable the WP Rocket Options meta box.

enable WP Rocket option meta box
- after seeing the meta box in the sidebar, select the “Never cache this page” option.
- publishes your article, and the plug-in will ignore all types of cached pages.

never caches a specific page
and you can perform the same process for any other custom article type on your site.
3. Clearing the cache
for specific pages is similar to excluding pages, and you may also want to simply delete the cache on some pages. By default, WP Rocket clears the cache every time you change the content of the page and publish it again. However, in some cases, cleanup may not work, such as when you change a category from the article index page or use a third-party tool to change content outside the editor. In any case, we recommend that you clear the cache for that particular page before sharing the URL or submitting it in Google Search Console.
- goes to the articles section and finds the page where you want to delete the old cache.
- hovers over the title link and then clicks the “Clear this cache” option.
- this removes the old cache, and when you visit the page again, WP Rocket caches the new content.

clears the cache
4. 0 for a specific page. Exclude pages from the cache
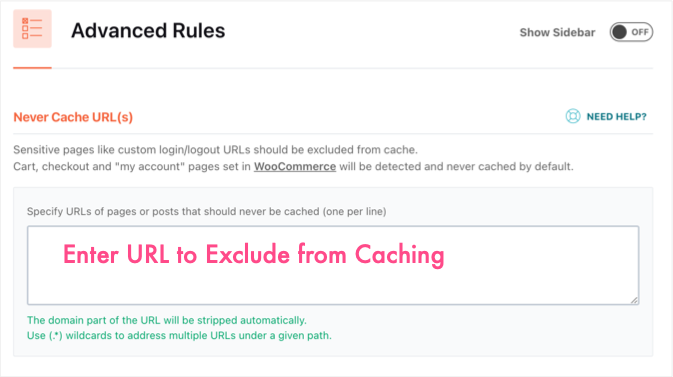
if you don’t want to exclude pages by going to the editor, you can also exclude them from the plug-in settings. The advantage of using settings is that you can use different options, such as regular expressions or restricting access to cached pages by specific user agents. You can ignore page caching by going to the Settings & gt; WP Rocket menu and navigating to the Advanced Rules section.

enter URL
to be excluded from the cache on the same settings page, you can add a user agent under the “Never Cache User Agent (s)” section.
5. Bypass the WP Rocket cache and keep using
sometimes you want to test multiple pages to bypass the cache and keep using plug-ins.
- Just add the? nowprocket parameter and the page URL that you want to test to access the uncached page to bypass the WP Rocket cache.
- for example, if your page URL is “https://yoursite.com/my-page/”, use a URL such as “https://yoursite.com/my-page?nowprocket” to access the contents of the uncached page.
this is the best way to bypass the WP Rocket cache and run compatibility tests to check page speed. However, this does not bypass the caching rules applied through the htaccess file. For example, WP Rocket will apply htaccess instructions for browser caching and GZIP compression, which may still be valid when bypassing nowprocket queries.
6. The last option to disable page-level caching
is to permanently disable page-level caching on the entire site or on specific pages. This is not desirable because page caching is important for speed. However, in some cases, you may need to do this if you have another page caching plug-in that conflicts with WP Rocket settings. For example, SiteGround provides automatic static cache caching (plus browser caching and GZIP compression) and Nginx direct delivery options from host accounts. We have confirmed with the WP Rocket support team that the WP Rocket on the SiteGround settings works without any conflicts. Static cache

in
SiteGround, however, this may not apply to all custom cache settings, and the solution is to disable page caching for WP Rocket because you cannot quickly change managed settings. Unfortunately, this is a long process, and you need to use different auxiliary plug-ins according to your requirements.
6.1 enable page caching for a specific URL
follow these steps to enable WP Rocket page caching only for specific pages on your site.
- goes to GitHub and downloads the WP Rocket helper plug-in for page caching with exclusions.
- unzips the archive file and edits the wp-rocket-no-cache-with-exception-urls.php file.
- they include three examples from lines 24 to 27 in this file, including URL, as shown below. You can replace “example.com/page-one/” and the other two sample routines with the URL of your domain. If desired, you can add more lines between the blocks.

includes URL
- for page caching to save the file and re-archive it as a ZIP folder along with the README file.
- goes to your WordPress admin panel, uploads the plug-in and activates it like any other plug-in on your site.
now WP Rocket does not cache pages throughout the site, except for the URL listed in the helper plug-in file.
6.2 disable page caching only on specific pages
in addition to the above, you can use the alternate help plug-in to disable page caching only on certain pages.
- you can download the help plug-in and edit the “wp-rocket-no-cache-for-page.php” file.
- in this case, you must enter the article or page ID on line 29 by replacing examples ID 1 and 2 in the file.
- saves the file and compresses it again and uploads it to your site.
- activates the plug-in to disable page caching only on the provided article or page ID.

disables page cache
on specific pages
6.3 completely disable page caching
use this help plug-in if you want to disable page caching on the entire site without exception. You can simply upload and activate it on your website without modifying the file contents of the plug-in.
6.4 disable page caching for logged in users
Both of the above methods of
disable page caching for ordinary users who do not log in to your site. However, WP Rocket also provides the ability to create a separate cache for logged-in users. You can enable this option in the “Cache & gt; User Caching” section.

user caching is enabled
use this help plug-in if you want to disable page caching for logged-in users. You don’t need to modify the content, just upload the zip file and activate the help plug-in. Keep in mind that you need to use this plug-in and one of the above methods to disable page caching for login and logout users. The main points to keep in mind for
typically, WP Rocket clears the cache whenever your site changes. However, we recommend that you delete the following cached content before trying to test the page again.
- deletes the browser’s cache by pressing “Control + Shift + Delete” in Windows and “Command + Shift + Delete” in macOS. This opens a pop-up window to delete the browsing history, where you can delete previously cached files from the browser. However, this will log you out of the WordPress management panel because the session cookie will expire. Therefore, save all changes and log out before clearing the browser’s cache. The best option is to test with an alternate browser so that you can test in parallel without logging out. If
- is active on your site, remove the cache from any other plug-in. As mentioned earlier, all SiteGround sites come pre-installed with the SG Optimizer plug-in. Therefore, you need to clear the SG Optimizer cache before testing.
- finally, clear the server-level cache if it is active on your managed server. This is the case with most hosting companies that provide varnish or custom cache settings.
summary
as you can see, it’s a simple task to bypass the WP Rocket cache in the WordPress site by adding parameters to your URL. You can also exclude individual pages from the plug-in’s global settings or from the editor meta-box. However, disabling page caching completely or on specific pages is a tricky task that requires help with plug-ins. Make sure you choose the right method to get the right results according to your needs.

