
One of the ways to improve the loading speed of WordPress sites is to reduce the size of images. On average, images account for about half of the file size of a web page, so even a small improvement can make a big difference.
WebP is a relatively new picture format (compared to jpg and png). The most important feature of this format is to reduce the size of the picture without affecting the quality. Converting the picture to WebP format can reduce its size by about 25-35% without causing quality loss.
, we will explore this topic in depth in this article!
- , what is WebP? Which browsers of
- support WebP?
- WebP vs JPG vs PNG size comparison how does
- use the WebP image
what is WebP?
so… What is a WebP file? In short, WebP is a picture format developed by Google. Our more common picture formats are JPEG or JPG and PNG,WebP are up-and-comers.
WebP is committed to providing pictures of the same quality, but the file size is small. By reducing the size of the image file, rather than “reducing the quality of the image rendering leads to a bad user experience”, and helps to improve the loading speed of the site.
in Google’s WebP compression study, Google found an average of one WebP image file.
- is 25-34% smaller than JPEG images.
- is 26% smaller than PNG images.
this is why if you run the website test through PageSpeed Insights, you will see images provided in next-generation formats such as WebP:
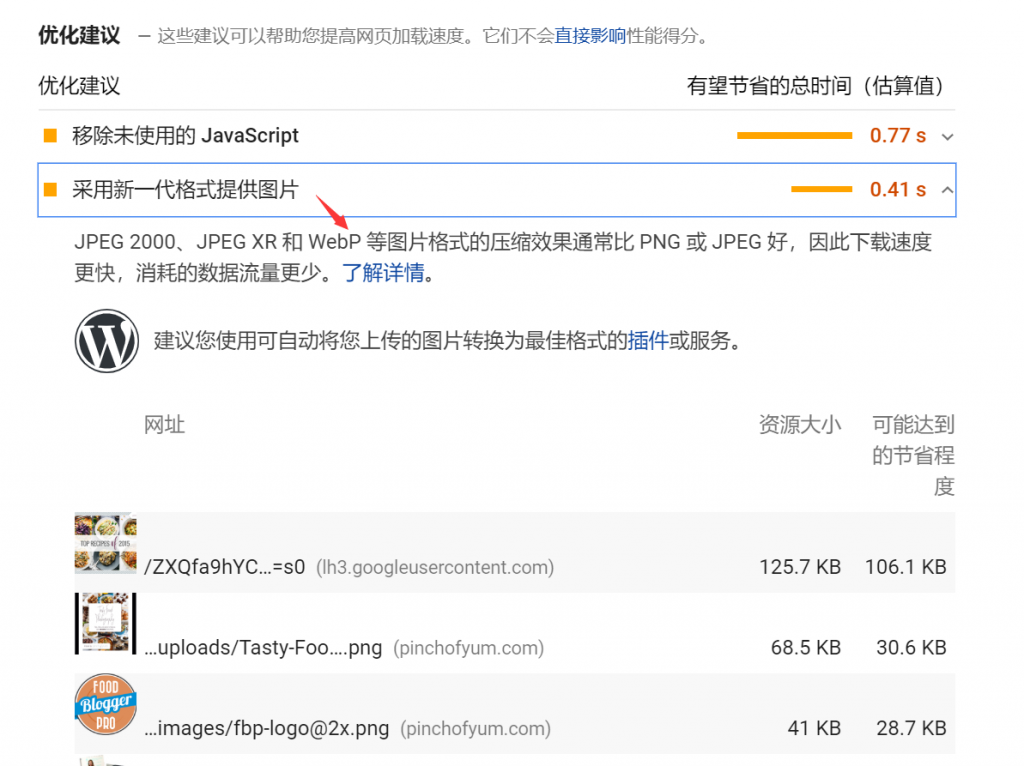
Google PageSpeed Insights recommends using WebP format image
, so how does Google’s WebP format achieve file size reduction? WebP supports lossy and lossless compression, so the exact reduction depends on whether you are using lossy or lossless compression.
uses lossy WebP compression, and WebP uses a method called “predictive coding” to reduce file size. Predictive coding uses the values of adjacent pixels in the picture to predict the value, and then encodes only the differences. It is based on VP8 key frame coding.
lossless WebP uses a more complex set of methods developed by the WebP team. If you want to learn more about WebP compression technology, you can read the Google documentation. Which browsers of
support WebP?
in order for WebP images to work, you need Web browser compatibility. Unfortunately, although more and more browsers are beginning to be compatible with WebP, WebP compatibility is still not universal.
current mainstream browsers generally support WebP images (stubborn IE is still not supported, or it may be because it is not open source), for example:
- Chrome (PC& Mobile)
- Firefox (PC& Mobile)
- Edge
- Opera (PC& Mobile)
it is worth noting that Safari,Safari desktop version and mobile version do not support WebP images. Apple tried Safari-compatible WebP development in 2016, but it hasn’t been heard from since.
Internet Explorer is also not compatible with WebP (Edge supports WebP because it is based on Chromium). In total, about 77% of Internet users use browsers that support
. But the 23% figure is too large to ignore (in the following WebP tutorials, we will explain in detail how to deal with this problem so that all visitors have a good experience):
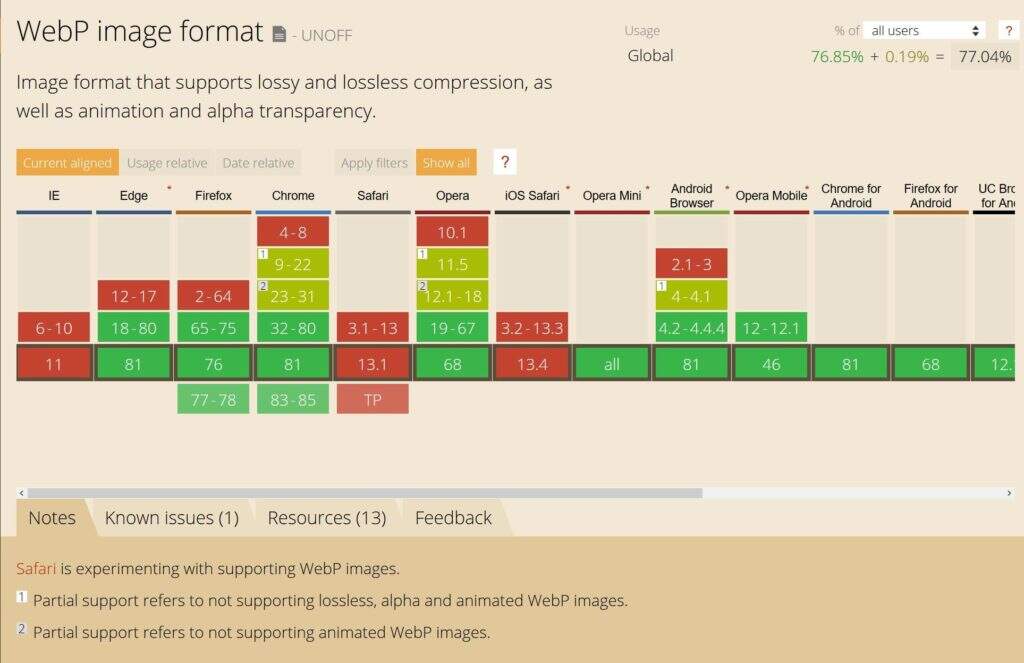
WebP supports
WebP vs JPG vs PNG size comparison
according to the Google test, the WebP picture is:
- is 25-34% smaller than JPEG picture
- is 26% smaller than PNG picture
if you want to know more about Google You can read some Google instructions about WebP: Lossless and Transparency Encoding in WebP,WebP Compression Study. Both
tests are based on more than 11000 images, including
- ‘s famous Lenna standard test pictures.
- 24 true color pictures of Kodak
- 100 Tecnick.com Images
- 11000 Random samples of Google Image search
how to use WebP Images on WordPress
since not all browsers support WebP images, you cannot upload WebP image files directly through the media library and use them directly, as JPEG and PNG do.
similarly, 23% of Internet users (including all Safari users) use browsers that do not support WebP. If all images are changed to WebP in an one-size-fits-all way, such visitors will not be able to see your website images, and the results can be imagined.
but do not worry, there is a problem, there is a corresponding solution!
you can use the WordPress plug-in instead of uploading WebP images directly to WordPress, converting your original images to WebP format and providing the original images as a backup if the guest browser does not support WebP.
for example, if you upload a JPEG file to your website, the plug-in,
- , converts the JPEG file to WebP and uses the WebP version for browsers such as Chrome,Firefox to browse.
- displays the original JPEG file to visitors using IE, Safari, and other browsers that do not support WebP.
allows everyone to view pictures of the site and ensures that 77% of visitors get a better site loading experience. Next, we will introduce some excellent WebP image plug-ins.
- ShortPixel
- Imagify
- Optimole
- EWWW Optimizer
- SG Optimizer
ShortPixel

WordPress plugin-ShortPixel
ShortPixel is a very popular WordPress image optimization plug-in that helps you automatically resize your pictures and compress and upload them to the WordPress website. As part of its feature list, ShortPixel can also automatically convert images to WebP and provide them to browsers that support WebP.
ShortPixel offers a basic free program that optimizes about 100 images per month for free. After that, the starting price of the paid package is $4.99 per month (5000 pictures), or $9.99 per visit (10000 pictures).
You can assign ShortPixel image optimization quotas on any site-there are no site restrictions (and all your sites can use the same ShortPixel account).
to use ShortPixel on your WordPress website, you need to install the plug-in from WordPress.org and add the API key (you can get it by signing up for a free ShortPixel account).
in the “General” tab, you can set basic settings for how picture optimization works. For example, which compression level to use and whether to resize the picture:
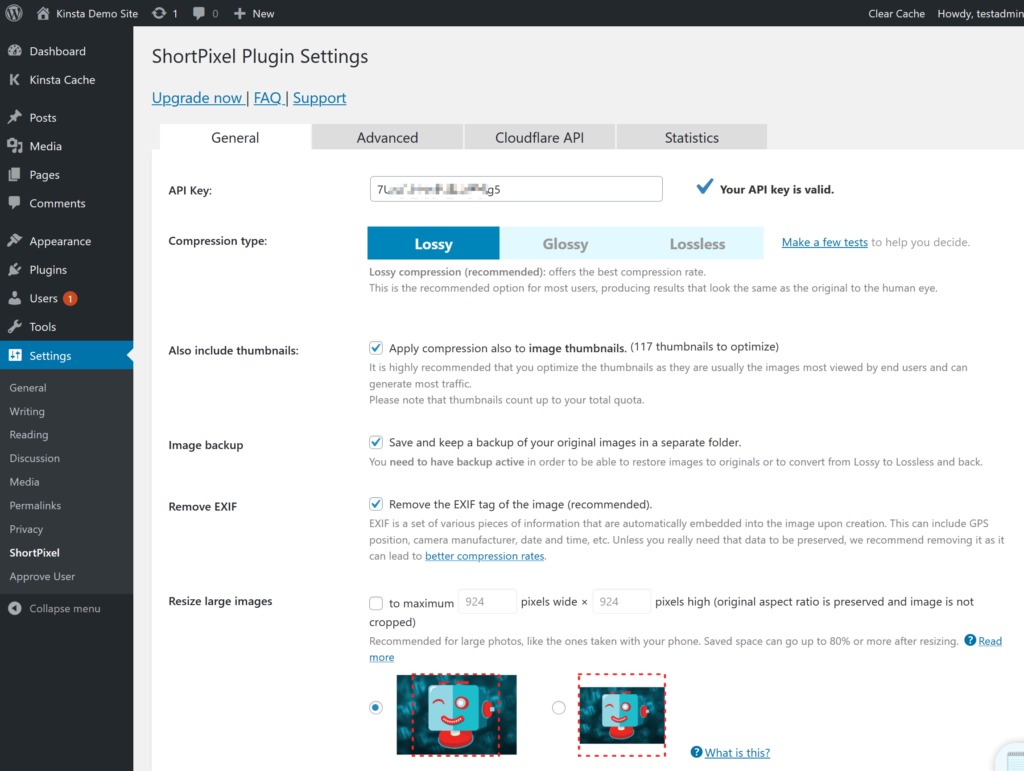
ShortPixel plug-in Settings
to enable WebP images, go to the “Advanced” tab, then:
- check the “WebP Images” box
- check the“Deliver the WebP versions..”box. (appears when the first box is checked)
- selects the“Using the tag syntax”radio button (displayed after the previous box is checked)
- leaves the default “Only via WordPress hooks selection”. The

ShortPixel plug-in enables WebP images to support
. Finally, save your changes.
Imagify
WordPress plug-in-Imagify
Imagify is another popular image optimization plug-in developed by the famous WordPress cache optimization plug-in WP Rocket developers.
automatically compresses and resizes the images you upload to the WordPress website. You can then convert the pictures to WebP and make the WebP version available to visitors using browsers that support WebP.
in terms of functionality, ShortPixel and Imagify have many similarities. The biggest difference is. ShortPixel is billed by the number of images, and there is no limit on the size of images, while Imagify charges according to the total file size, but there is no limit on the number of images.
therefore, if you need to optimize a large number of large images, ShortPixel’s billing method may be more suitable for you. On the contrary, if you need to optimize many small images, Imagify’s billing method may be more cost-effective.
Imagify’s free package feels “insulting to users” and only supports 25MB image optimization every month. After that, the payment method is $4.99 per month (up to 1GB) or $9.99 per time (up to 1GB).
is the same as ShortPixel, Imagify also supports unlimited sites, anyway, pay-per-view, no matter how many sites you use.
to use the Imagify plug-in to make the WordPress website support WebP images, you need to install the plug-in from WordPress.org and add the API key activation use. After
enables the plug-in, select “General Settings” in the plug-in settings interface to optimize the WebP setting.
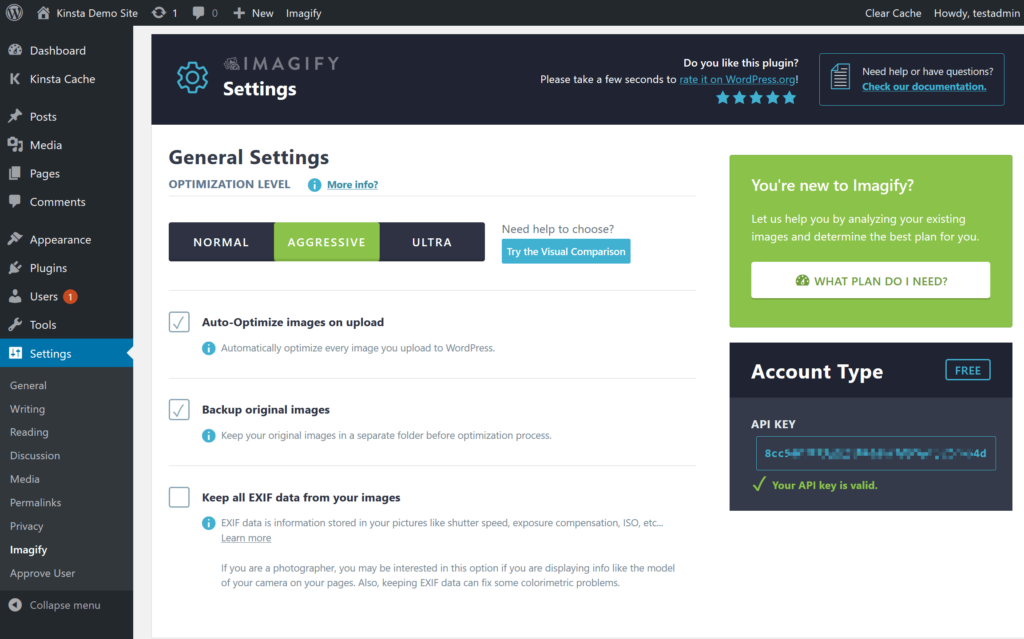
Imagify plug-in Settings
to enable WebP images, scroll down to the “Optimization” section, and then find the “WebP Format” section:
- check “Create webp versions of images”
- check“Display images in webp format …”
- Select Radio Button “use tags”
- if your WordPress site uses CDN, you also need to fill in the “If you use a CDN box” input box with the CDN acceleration address URL provided by your CDN service provider.
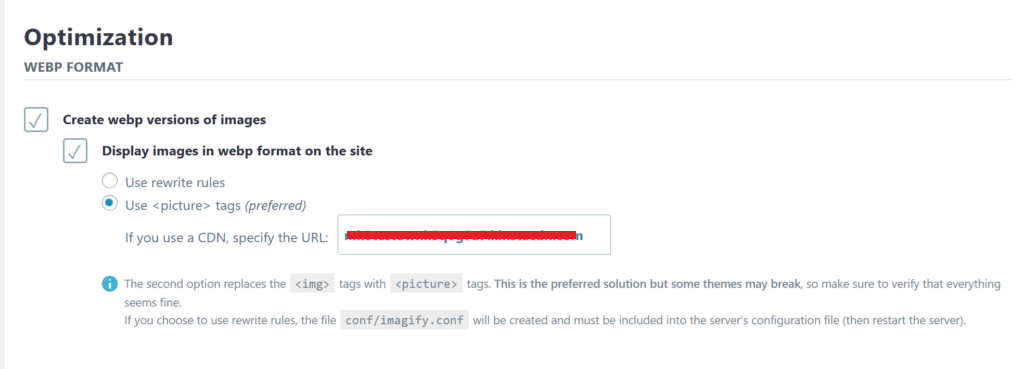
Imagify enables WebP picture optimization settings
Optimole

WordPress plug-in-Optimole
Optimole is the third WordPress image optimization plug-in introduced this time, and its operation is slightly different from that of Imagify and ShortPixel. Optimole can automatically compress and resize pictures. However it also provides two other remarkable features:
- which can provide images through its own CDN (supported by Amazon CloudFront).
- provides real-time adaptive images, and Optimole will provide the best size for each visitor.
‘s approach is similar to other real-time optimization services, such as Cloudinary,imgix,KeyCDN image processing.
as part of real-time image optimization, Optimole provides WebP images to browsers that support WebP.
Optimole also offers a free package that can handle pictures of about 5000 visitors per month. After that, the paid package starts at $19 a month and supports 25000 visitors.
first, you need to install the plug-in from WordPress.org and activate it using the API key (which can be obtained by signing up for a free Optimole account). When the
is complete, Optimole will automatically optimize the pictures and provide them to visitors through its CDN. WebP support is enabled by default and does not need to be enabled manually.
of course you also want to perform other settings, such as compression level and zooming, you can go to “Media → Optimole → Settings”:
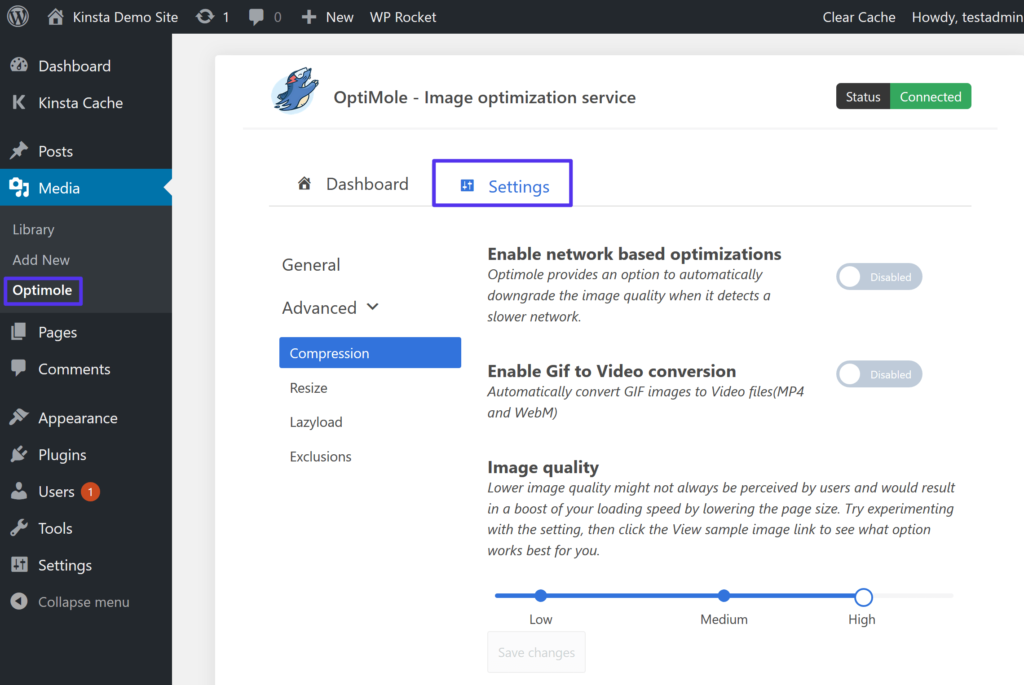 Optimole plug-in Settings
EWWW Optimizer
EWWW Image Optimizer plug-in is one of the best WordPress image compression plug-ins that allow you to optimize WordPress images. It also supports WebP images and can automatically display them on supported browsers.
the first thing you need to do is install and enable the EWWW Image Optimizer plug-in. After
is activated, go to the Settings »EWWW Image Optimizer page to configure plug-in options. You can configure the plug-in according to the installation wizard, but if you don’t need it, you can click the “I know what I am doing” link to exit the wizard. The
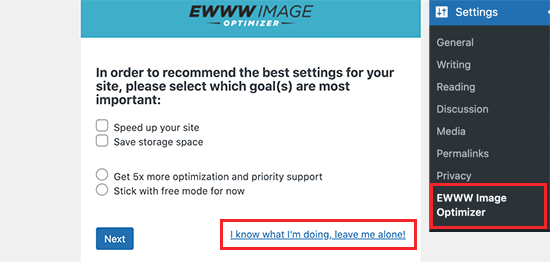
EWWW Optimizer plug-in installation wizard
can see some plug-in options on the next interface. Scroll down and check the box next to the WebP Conversion option. After the
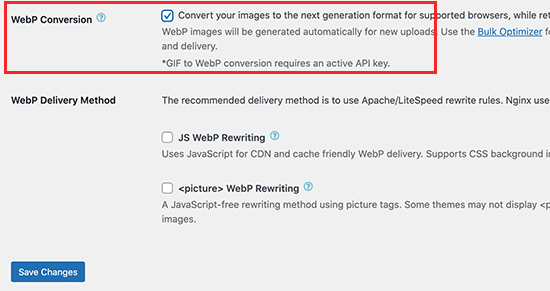
EWWW Optimizer plug-in WebP conversion option
, click the “Save Changes” button to save the settings.
next, scroll down to the “WebP Conversion” section. Now the plug-in will show you some rewriting rules with a red preview image.
you need to click the “Insert Rewrite Rules” button, and the plug-in will automatically attempt to insert these rewriting rules into the .htaccess file.
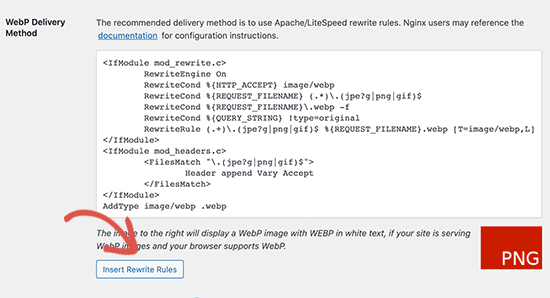
.htaccess rewrite rules
if the plug-in successfully adds these rules, the red image preview changes to green with “WebP” text.

.htaccess file WebP rewrite rules take effect
Sometimes, plug-ins may not be able to insert rules. In this case, you need to copy the rewrite rule from the plug-in’s settings page, and then manually paste it to the bottom of the .htaccess file. When the
is complete, return to the plug-in’s settings page and click the “Save Changes” button again. If the preview image turns green, you have successfully enabled WebP image delivery on the WordPress website.
or you can choose either of the two WebP rewriting methods, JS WebP Rewriting or, as the WebP delivery option. These methods are slower than the .htaccess method, but can get the job done.
Batch convert old images to WebP version
EWWW Image Optimizer supports converting previously uploaded image files to WebP images. Just go to the Media »Library page and switch to the list view. The
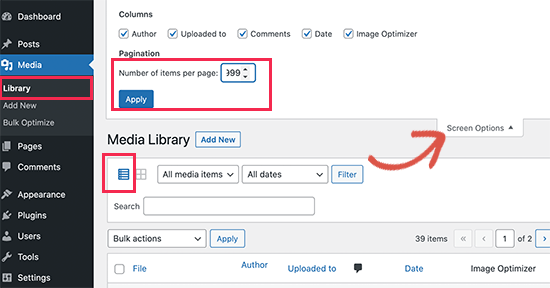
WordPress multimedia library list shows the quantity
next, you need to click the Show options button and change the items per page to 999. If you have more than 1000 images, they will be displayed on the next page.
this way, you will be able to quickly select a large number of images for batch optimization. Next, click the check box at the top to select all images. After

batch optimizes the picture
, click the batch operation drop-down menu, and then select the batch optimization option. Finally, click the apply button.
on the next interface, the plug-in will give you an option to skip image compression and just convert it to WebP. You can select this option if your image has been optimized. After
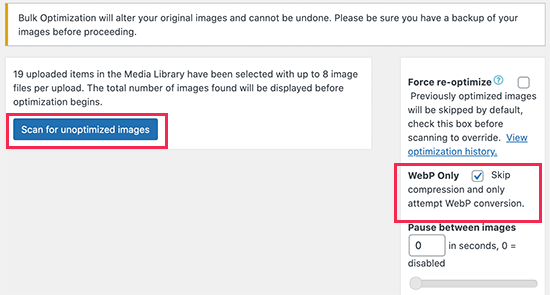
skips picture compression and converts only WebP
, click the “Scan for Unoptimized Images” button to continue. The plug-in will then show you the number of images found, so you can click the “Optimize” button to continue.
will now optimize your image, and EWWW Image Optimizer will generate a WebP version of your image.
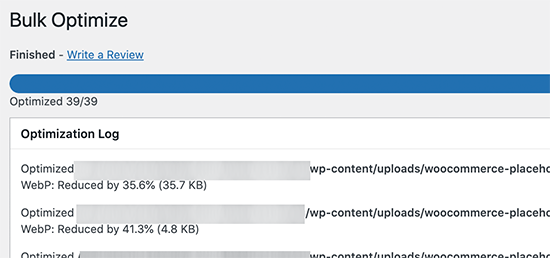
batch conversion progress
Test the validity of the WebP image
After
optimizes images, you can go to blog posts or pages that contain multiple images. Move your mouse over any image and right-click to open the image in a new tab. A new

window opens to view the image
which will open the image in a new browser tab and you will be able to see it with the .webp extension in the address bar.

WebP format picture
if the plug-in cannot provide webp images, you can return to the plug-in’s settings page. Here, you can change the WebP Delivery option to the “JS WebP Rewriting” or “WebP Rewriting” method.
SG Optimizer
this method is recommended if you are a SiteGround user.
SiteGround is one of the best WordPress hosting companies. They provide users with a free SG Optimizer plug-in that allows you to optimize WordPress performance. It also includes options to optimize WordPress images.
first, you need to install and enable the SG Optimizer plug-in. When
is enabled, the plug-in adds new menu items to the administrative sidebar marked “SG Optimizer”. Clicking it takes you to the settings page of the plug-in.
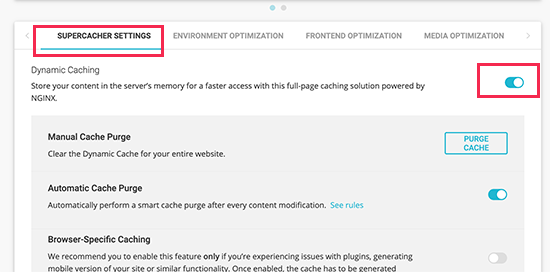
SG Optimizer cache settings
if you want to use SiteGround’s built-in caching system, you can turn on the cache settings here. After
, you can switch to the “Media Optimization” tab and turn on the “Generate WebP Copies of New Images” option.

generates a copy of WebP for the new picture
under it, you will see the “Bulk Generate WebP Files” option. Click it to start making WebP copies of all image files in the WordPress library. After

batch generates Webp files
is complete, your WordPress website will begin to provide WebP images.
Testing WebP Images in SG Optimizer
to see if your site is providing WebP images, you need to open a page on the site that contains some images. After
, right-click and select the check tool. This opens the developer console, where you need to switch to the “Network” tab.
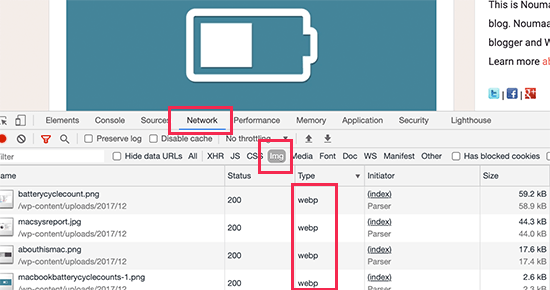
browser debug check picture format
here, click the “img” tab, and then reload the page (CTRL + R on Windows, Command + R on Mac). When your Web site reloads, you will see all the images loaded in the developer console.
Summary
most of the time, pictures account for a large proportion of the page volume in WordPress sites. If there are too many pictures on the page and the size is too large, it is suggested that you should consider further optimizing the images to improve the loading speed of the page on the site. As a new generation of picture format,
WebP can reduce the file size by about 25% compared with the more classic JPEG or PNG files.
most modern browsers now support WebP (about 77% of Internet users use browsers that support WebP), but some browsers (especially Safari and IE) still do not provide WebP support or WebP images for all visitors. To solve this problem,
recommends using the WordPress plug-in to convert the pictures to WebP and provide the WebP version to visitors whose browsers support this format, while using the original images for those who do not support the format. Recommend the following three plug-ins:
- ShortPixel.
- Imagify.
- Optimole.
- EWWW Optimizer.
- SG Optimizer.
the following articles related to WordPress image optimization, refer to read:
- explains how to optimize the compression of WordPress blog pictures
- how to optimize WordPress blog pictures? How to achieve WordPress Image and Video lazy loading by
- uses imgSpider to collect link pictures outside the article

