WordPress is open source software that you can download for free from their official website. However, to start a WordPress site, you need to install a theme to help create a specific layout for your content. In addition, you may need to install some plug-ins to add other features.
The problem comes when you have to manage all these things and keep them up to date. To solve this problem, WordPress provides automatic updates, and in this article, we will explain how to enable or disable automatic updates for cores, themes, and plug-ins in your WordPress site.
About WordPress automatic updates
WordPress automatic updates is a feature of WordPress that allows you to configure Web sites to automatically check for and install updates.
For security reasons, WordPress automatically updates the core WordPress software.
It may also update plug-ins or themes to address potential security risks. If a plug-in or theme is deployed on multiple sites, the WordPress core team may release automatic updates for them.
Like any other software, the WordPress website needs to be updated for the following reasons:
- Security patches used to fix vulnerabilities
- Learn about the latest design trends in website construction
- Add additional features and remove outdated features
As mentioned earlier, the update consists of three parts– the WordPress core, themes, and plug-ins. You can choose to manage them independently as needed.
In theory, this should reduce the time and effort you spend checking and installing updates, but this is not taken seriously because it takes a long time.
On the other hand, the time you spend manually installing updates ensures two key aspects: you have control over how updates are implemented and can be resolved immediately when problems arise.
Automatic updates are not for everyone, and many WordPress administrators don’t want to believe in the automation of their websites. However, there is no right or wrong about whether automatic updates should be disabled in WordPress. Decisions must be made on a case-by-case basis and consider all the pros and cons.
Why disable automatic WordPress updates?
The most serious problem with automatic updates is that they can cause your website to crash. While this is rare, you should be aware of this possibility, especially when making major updates. If this happens, it is most likely due to incompatibility between the code of the plug-in and the theme, the WordPress core, and the code modifications you make. In this case, it is important to be able to use backups to restore your website.
Another potential problem with automatic updates is unnecessary functional changes. Automatic updates can bring some unnecessary features, which can interfere with the workflow, because it can take a lot of work to adjust each element and function to your unique vision.
If there is a problem after updating the plug-in or theme, you should ask the developer of the plug-in or theme for help. In addition, you can create a staging site and test the improvements before the actual site.
Why don’t my themes and plug-ins show automatic updates?
All free themes and plug-ins available in the WordPress repository come with automatic updates. However, third-party themes and plug-ins may or may not provide this feature. Third-party projects integrate with other plug-ins and need to be thoroughly tested. Therefore, it makes sense that developers do not provide automatic updates. Otherwise, your site layout will be destroyed when the theme or plug-in is updated. The bigger problem will be to find out which plug-ins or topics have been updated because there is no update history available in the management dashboard.
When automatic plug-in updates are disabled, you will not see any status under the automatic updates column, or there is a specific message that the developer has disabled this feature. Plug-ins like WP Rocket deliberately disable automatic updates, because if you don’t test after updating the plug-in, it can damage your site layout.
Whether or not you use automatic updates, you will see notifications in the “Dashboard & gt; updates” section as long as there are updates available to the core, themes, and plug-ins. You can update the project manually at your convenience. Keep in mind that developers can force security updates regardless of the automatic update settings in the dashboard. For example, WooCommerce recently pushed a security update for its PayPal integration to automatically update the version to the latest version. In this case, you will see a notification in the dashboard informing you that the project has been updated.

Automatically install WooCommerce security updates
How to enable WordPress automatic updates
Before we move on to disabling automatic updates for WordPress, let’s take a look at how to enable automatic updates for WordPress cores, themes, and plug-ins.
1. Enable or disable automatic updates of topics
Themes are the backbone of WordPress sites and need to work seamlessly with core WordPress files. Although you use one theme at a time, you can install multiple themes in your site. Whether you have a single theme or multiple themes, you need to enable or disable automatic updates one by one.
- Log in to your WordPress management dashboard and navigate to the “appearance & gt; themes” section.
- Here, you can view all installed themes in the site and hover over the active theme.
- You will see a topic details button and click it.

Open topic details in WordPress
- In the next pop-up window, click the enable automatic updates link to turn on the feature.

Enable automatic updates for topics in WordPress
You can do this for each topic, or use the back / front arrow in the upper-right corner of the topic details pop-up window to navigate to each topic and turn on automatic updates. Remember, you can go to the topic details section at any time and disable automatic updates.
two。 Enable or disable automatic updates for plug-ins
Unlike topics, you can bulk enable plug-in automatic updates or enable automatic updates only for selected items. This makes sense because a single site usually uses more than one plug-in at a time.
- Go to the “plug-ins & gt; installed plug-ins” section. Here, you will see a list of all installed plug-ins on your website.
- You can see the Auto Update status of each plug-in in the last column of the layout.
- By default, automatic updates for plug-ins are disabled, and you can click the enable automatic updates link to open them. You can do this for each installed plug-in without leaving the page.
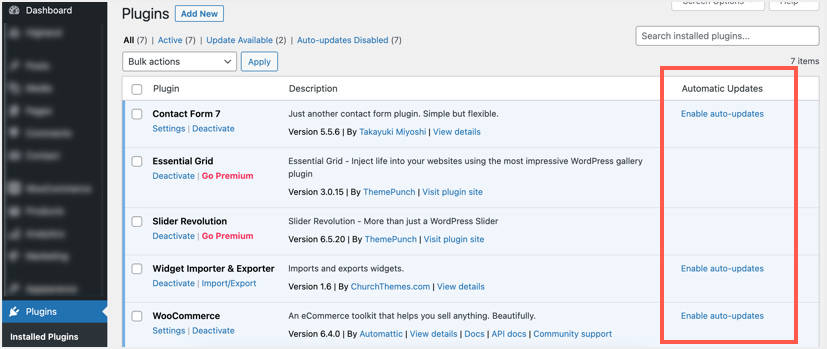
Enable automatic updates for plug-ins in WordPress
- If you do not see the automatic updates column, click the screen options button and enable it from the available columns.
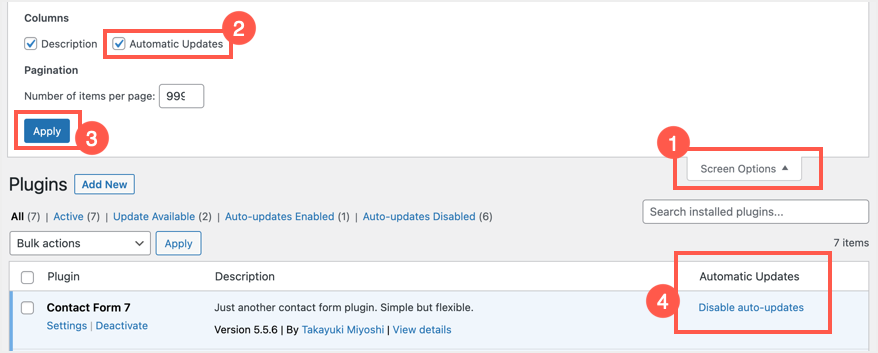
Enable automatic update columns in the plug-in page
- When enabled, you can click the disable automatic updates link at any time to turn off the feature.

Disable plug-in automatic updates in WordPress
If you want to enable automatic updates for multiple plug-ins, first use the check box in front of each plug-in to select the plug-in. You can also click the check box in the title to select all plug-ins. Now, click the batch Operation drop-down menu and select the enable / disable automatic update option. Finally, click the apply button to turn the feature on or off for the selected plug-in.
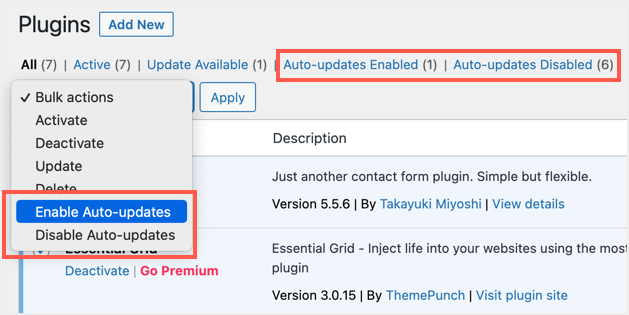
Automatic update of bulk management plug-in
You can use the summary link that appears at the top of the plug-in list to view the number of plug-ins that enable and disable automatic updates.
3. Manage WordPress core updates
Unlike themes and plug-ins, WordPress enables automatic updates of the core version by default. There are two types of core versions available-major and minor. Major versions usually bring a lot of new features, while minor versions are released for security / maintenance purposes. Starting with WordPress 5.6, automatic updates for minor versions are enabled by default. You can change the settings under the Dashboard & gt; updates section to get automatic updates for major or minor versions. Although you can switch between major and minor version updates, you cannot completely disable core updates from the settings page.
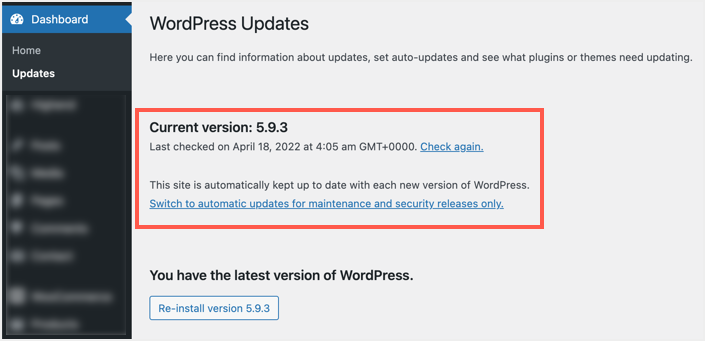
Toggle automatic WordPress core update settings
Some managed service providers also help manage automatic updates in WordPress. This may vary depending on the hosting company you use. For example, you can turn on automatic updates in SiteGround by navigating to the site tools section. This option is available under the WordPress & gt; Autoupdate menu. You can manage settings for major and minor WordPress versions and choose a schedule to automatically install updates. SiteGround also provides the option to automatically update all installed plug-ins in this section (we strongly recommend that you disable this option to avoid problems).

SiteGround automatically updates WordPress settings
Although you can delay updates for up to 72 hours, you cannot completely disable automatic WordPress updates in SiteGround. Whenever you install automatic updates, you will receive an email notification to keep you informed. In addition, if you foresee a problem with the next update, you can skip the specific updates available in the managed panel.
How to disable automatic updates in WordPress
You can disable automatic updates either manually or by using plug-ins. So let’s get started without procrastination.
Note: no matter how you update (manually, automatically, or using plug-ins), you should always back up your website.
1. Disable automatic updates using the plug-in
There are various WordPress plug-ins that can help you with updates, but we will use the Easy Updates Manager plug-in.
First, install and activate the plug-in in the “plug-ins” → “add new plug-ins” section of the WordPress dashboard.

After the plug-in is enabled, go to the Dashboard → Update options to configure the settings.
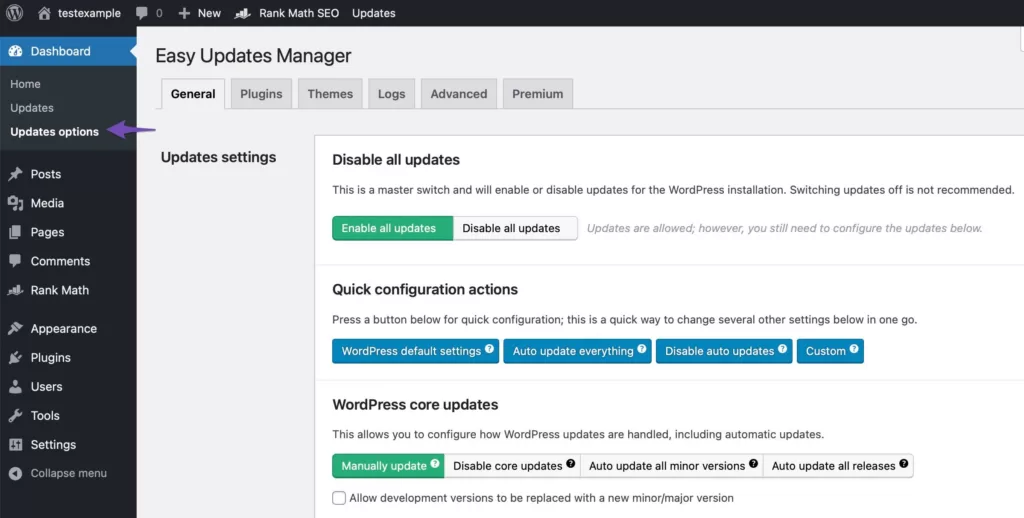
The settings page for Easy Updates Manager will pop up, and if you want to turn off all updates, please switch the “Disable all updates” option as shown below.
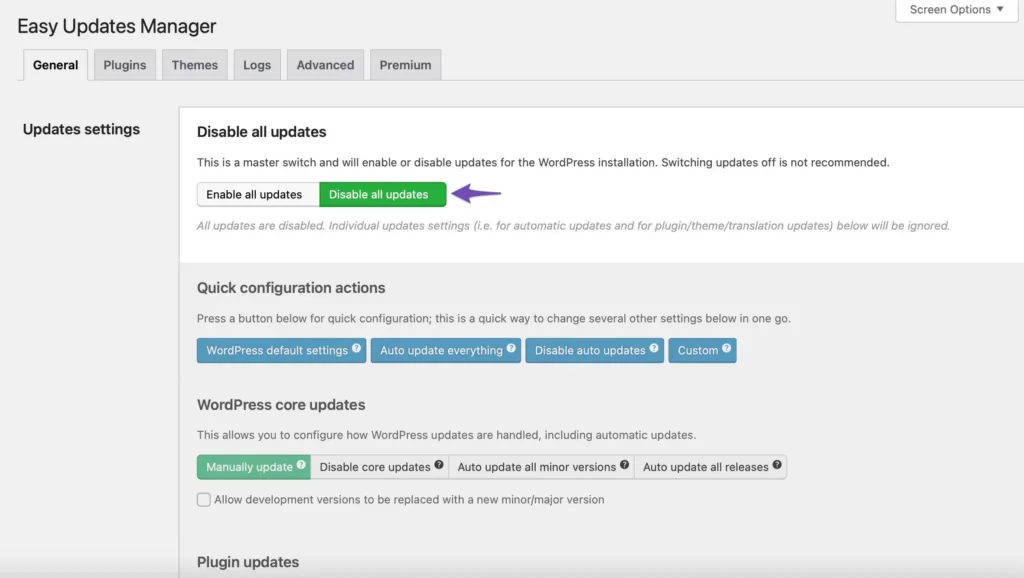
However, disabling all updates will prevent update notifications. Instead, you can choose your preferred settings. You can disable automatic updates for plug-ins and themes while enabling automatic updates for the WordPress core.
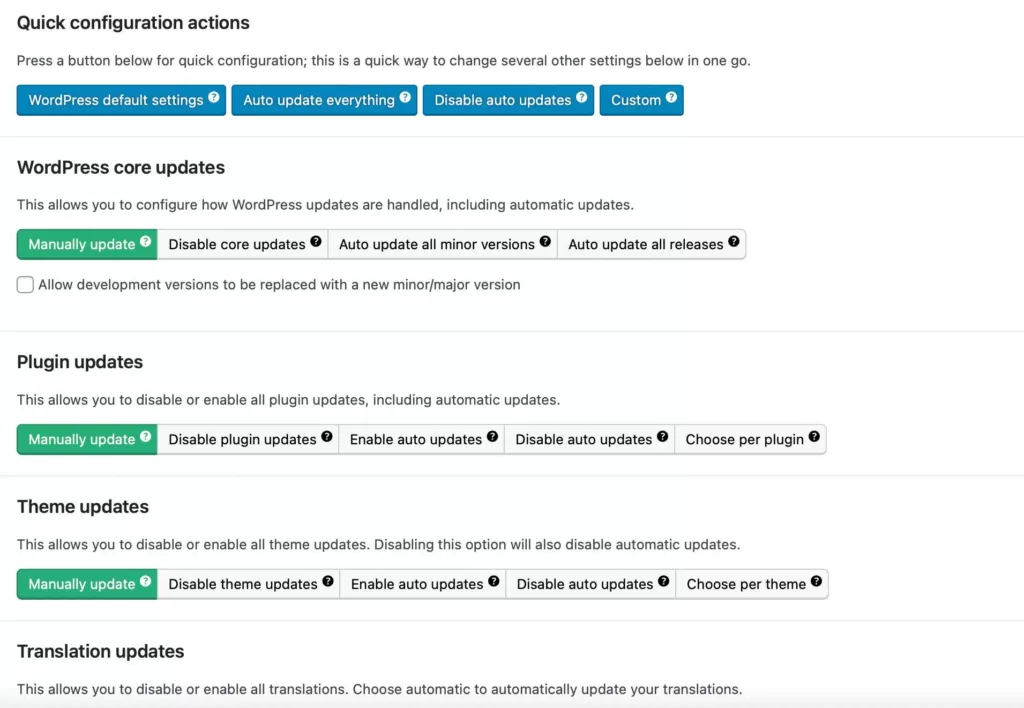
two。 Disable automatic updates without using plug-ins
To disable automatic updates, add the following code snippet to the wp-config.php file.
define( 'WP_AUTO_UPDATE_CORE', false );
Sometimes all automatic updates on your site are disabled, especially if you manually install WordPress on your site. In this case, you can enable the automatic feature by adding the following code to the wp-config.php file.
define( 'WP_AUTO_UPDATE_CORE', true );
You can change the value “true” to “minor” to receive only minor updates (this is the default). Or set the value to “false” to completely disable all core updates on your site.
To access the file, you can use the File transfer Protocol (FTP) or the file manager in the cPanel of the Web host. You can find the file in the public_html folder. Open the file, add a code snippet at the end, and write/ * That's all, stop editing! Happy publishing. * / "On top of that line.
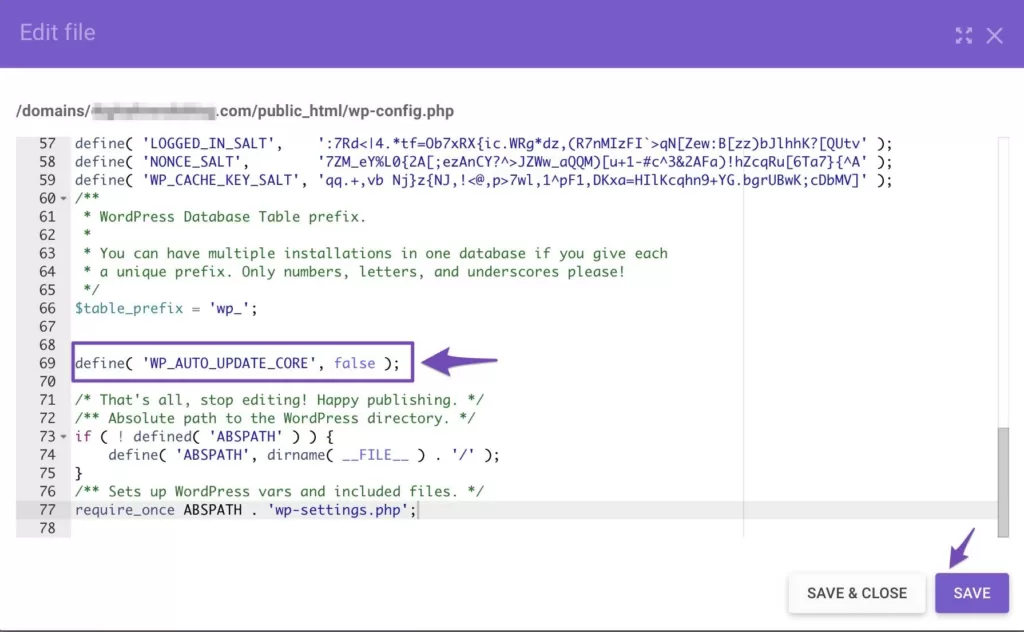
WordPress will not automatically install updates. This applies only to core installations. If you want to disable updates for plug-ins and themes, you can do so by adding the following filter to your theme’s functions.php file.
To access the functions.php file, go to skin → theme editing from the WordPress dashboard. Open the functions.php file from the list on the right. To disable automatic plug-in updates, add the following code to the bottom of the file.
add_filter( 'auto_update_plugin', '__return_false' );
To disable automatic updates of topics, add the following code.
add_filter( 'auto_update_theme', '__return_false' );
If you want to disable automatic updates for both the theme and any plug-in, add these two lines of code, as shown below.
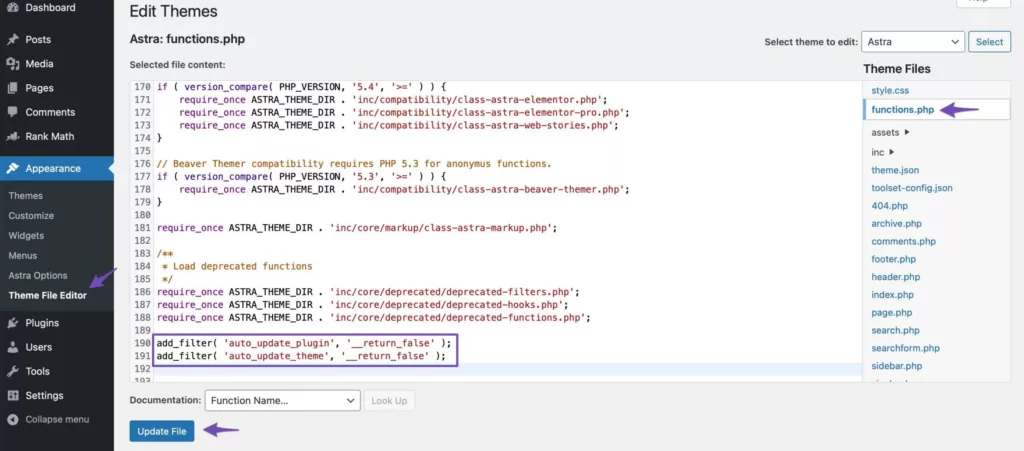
Now, automatic updates for WordPress cores, themes, and plug-ins will be disabled. You can combine the code in any order to create a solution that suits your needs.
3. Disable automatic updates for specific plug-ins and topics
WordPress allows you to disable automatic updates for specific plug-ins and topics.
To disable automatic updates for a specific plug-in, go to the plug-in → installed plug-in from the WordPress dashboard. Click the disable automatic updates option for a specific plug-in, as shown in the following figure.
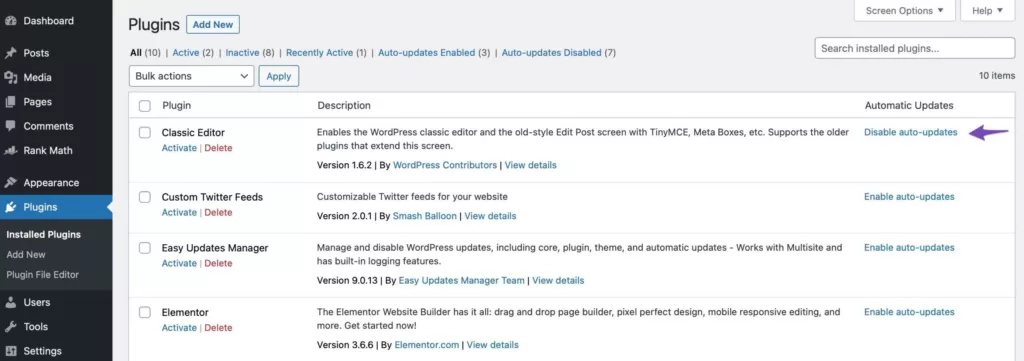
To disable automatic updates for a specific theme, go to the appearance → theme settings from the WordPress dashboard. Click the disable automatic updates option for a specific topic, as shown in the following figure.
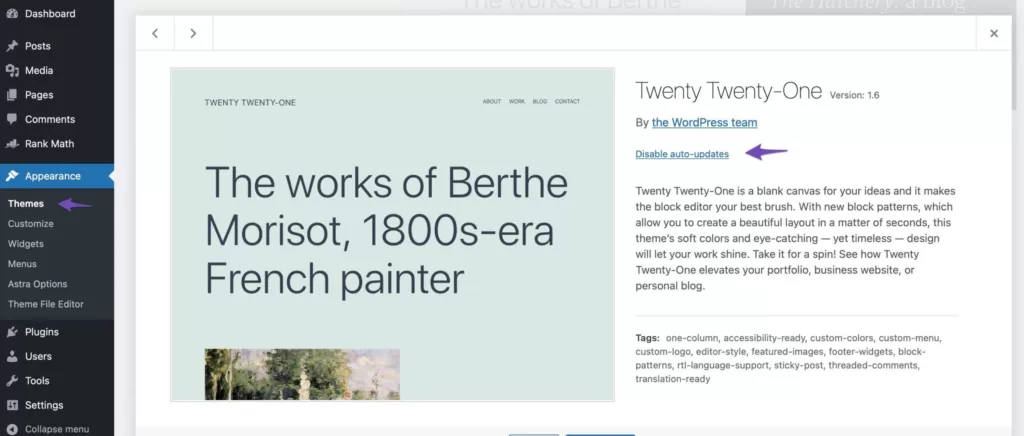
Now, automatic updates for specific topics and plug-ins will be disabled.
Summary
WordPress is a well-maintained platform, with each version improving, fixing bugs and security vulnerabilities, and adding new features. This provides a strong incentive for WordPress users to keep the site updated. By adding automatic updates, the whole process becomes easier and user-friendly.
However, because some updates may cause damage to your site, you should weigh the pros and cons before allowing WordPress to update automatically. If you want more control over your site, you can disable automatic updates. This also allows you to fully test the plug-in before installing it to ensure compatibility and maximize the uptime of the site.

