Sometimes, you will have to move or delete some pages on your site. This is the cycle of [website] life.
However, if you do move or delete a page, users may have a 404 error that prevents them from accessing your content, often resulting in an exit. If you do not set the redirection correctly, you may increase your pop-out / exit rate, which harms the user experience (and potential organic rankings).
Fortunately, it’s easy to create 301redirects in WordPress-by adding a 301redirect to moved or deleted pages, users (and search engines) will be directed to a new, updated URL. Whether you are using the redirect plugin or editing your site files, creating 301 redirects can effectively fix any broken links on your site.
In this article, we will explain what 301 redirects are and when you might want to use them. Then, we will show you four ways to create 301redirects in WordPress.
Introduction to redirection
To get started, you need to know what redirection is. In a nutshell, any redirection will send users and search engines to another URL. This will automatically redirect the requested URL to a different location.
As a website owner, you can use temporary or permanent redirects to prevent your visitors from seeing the wrong page. These “not found” errors, also known as 404 errors, interfere with the browsing experience and may cause visitors to exit your site.
There are many other different types of redirects. Each sends a unique HTTP status code from the web server to the browser. This code shows how the content is moved.
The following are the most common URL redirection types:
- Permanent redirection from one URL to another.
- Temporarily redirect to a new URL.
- 303: non-cacheable redirection, temporarily replacing content.
- 307: notify search engines that redirects may be updated regularly.
- Permanent redirection does not allow changes in the way requests are made from POST to GET.
- Meta refresh: client-side redirection, usually in the form of a refresh countdown.
By far, the most common type of redirection is 301 redirection. This will inform search engines and online users that the original resources are no longer available. Instead, it will be permanently redirected to a new page.
Every time someone clicks on the original link, they are automatically taken to a different URL. Redirection will seamlessly guide users to the correct page on your site and prevent them from seeing 404 errors.
Reasons for possible use of 301 redirection
Because there are different types of redirects, it is difficult to know which type is right for your site. Fortunately, 301 redirects are useful when performing some basic administrative tasks.
One of the most common reasons for using 301 redirects is when you delete old content. If a post is no longer relevant but still receives traffic, you will want to bring these users to an updated resource.
In this case, the 301redirect tells the search engine that you are permanently moving the URL. Since it will retain your traffic and backlinks, this redirection can improve your search engine optimization (SEO). Keep in mind, however, that search robots may take time to find new pages and associate them with the same rankings.
In addition, if you want to transfer to a new domain name, you can implement 301 redirection. If you don’t redirect your URL, you may soon lose your current audience. However, the 301 redirect will seamlessly bring visitors to your new location.
Similarly, 301 redirection is also useful when moving from a HTTP connection to a HTTPS connection. To ensure that users access the secure version of your site, it is best to redirect your content permanently.
You may also want to combine individual articles. After compiling the information into one page, you can redirect all the old links to the new location.
How to create 301 redirects in WordPress
Now that you know 301 redirects, you may want to apply them to your website. Let’s discuss some best practices when creating 301redirects in WordPress
Method 1: install a redirect plug-in
One of the best ways to extend the native functionality of WordPress is to install a plug-in. Fortunately, there are many useful plug-ins that can be used to create and manage redirects for your site.
For example, Redirection is a free tool that adds a redirect manager to your site. You can use this plug-in to set 301 redirects, track broken links, migrate fixed links, and more:

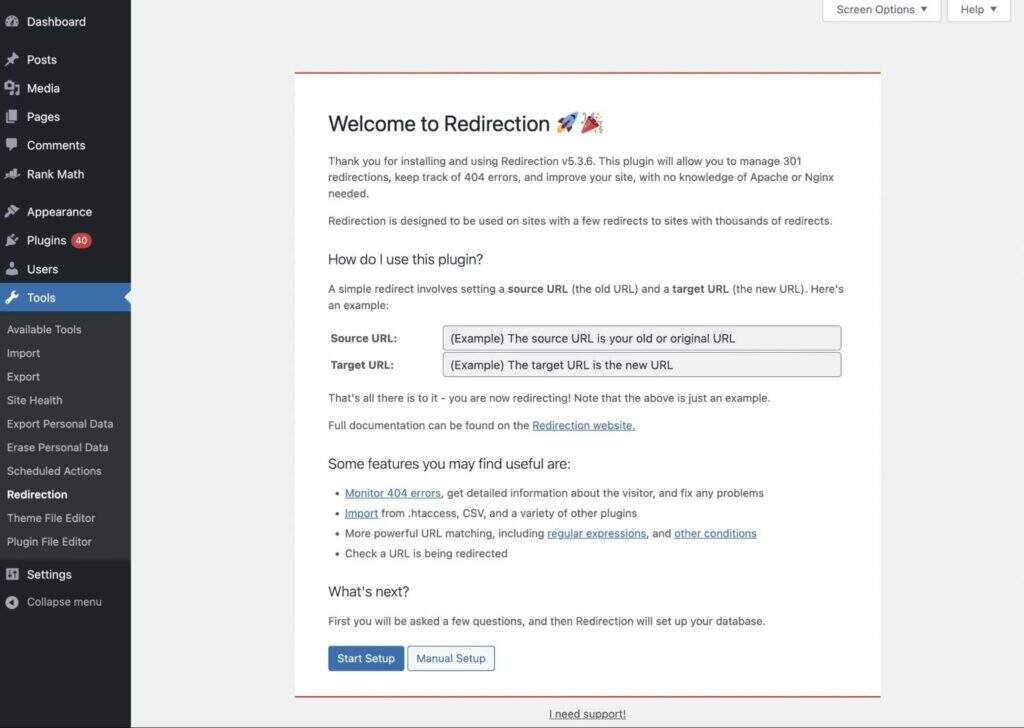
To get started, install and activate the redirection in WordPress. Then, navigate to the tool & gt;Redirection. On the welcome page, click Start Setup.
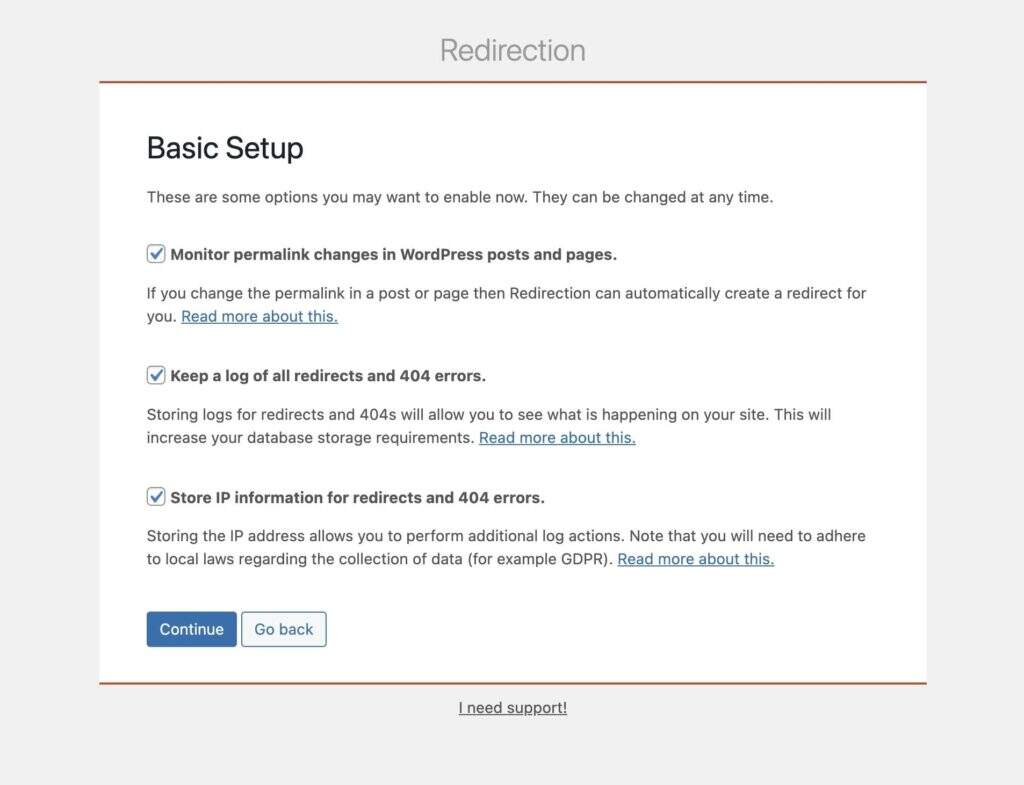
Next, you need to decide whether you want “Redirection” to monitor your site for permalinks, redirects and 404 errors. If so, enable these options and select Continue:
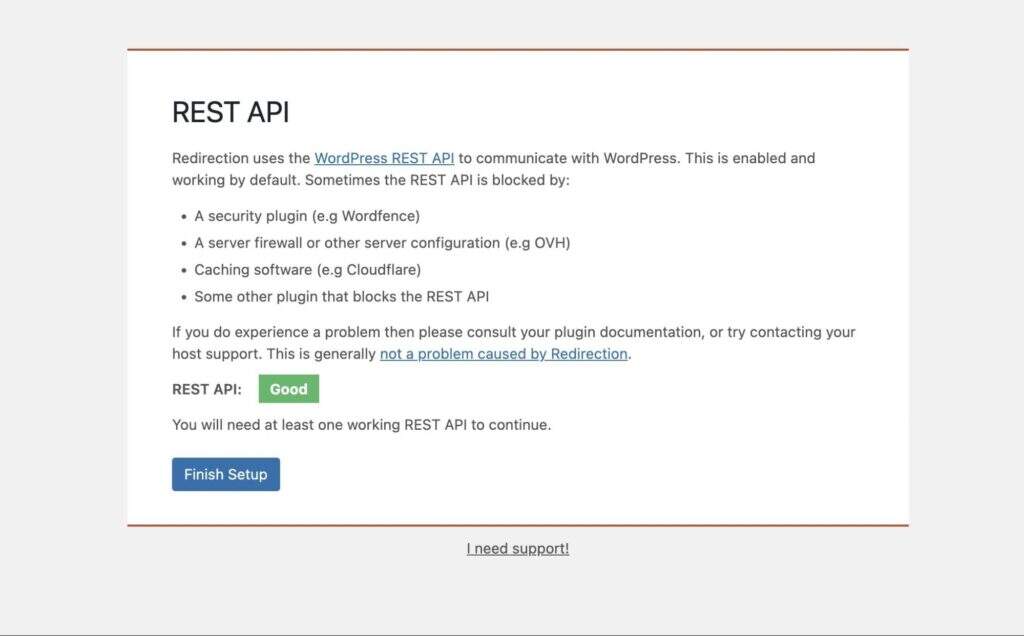
After that, the plug-in will test your REST API to see if it can communicate with WordPress properly. Once you get a “good” comment, you can click Finish Setup.
Now you will be able to create a 301 redirect! To do this, find the tool & gt;Redirection>Add New. Then, add your source URL and target URL.

Finally, click the gear icon to open the other settings. Be sure to select HTTP code 301-Moved Permanently:
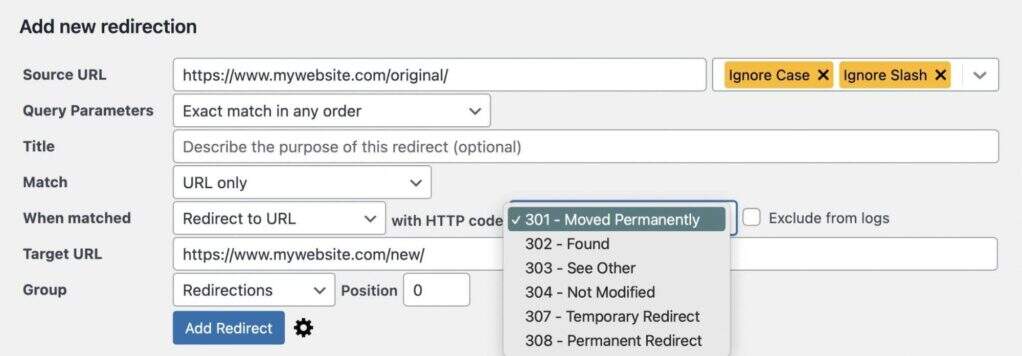
When you are finished, click Add Redirect. Now, whenever users visit the old URL, their browsers will automatically redirect to the new resource!
Method 2: use your SEO plugin
Although you can install new redirect plug-ins, such as Redirection or Simple 301 Redirects, you may already have all the tools you need to create redirects on your site. Typically, the SEO plug-in provides search engine optimization capabilities as well as the redirect manager.
Rank Math is a free SEO plug-in with built-in redirection tools. With this tool, you can enable, disable, and delete any redirects on your site. In addition, it can even import information from the redirect plug-in:

After you install and activate Rank Math, open the dashboard. Then, locate the Redirections tool and enable it:
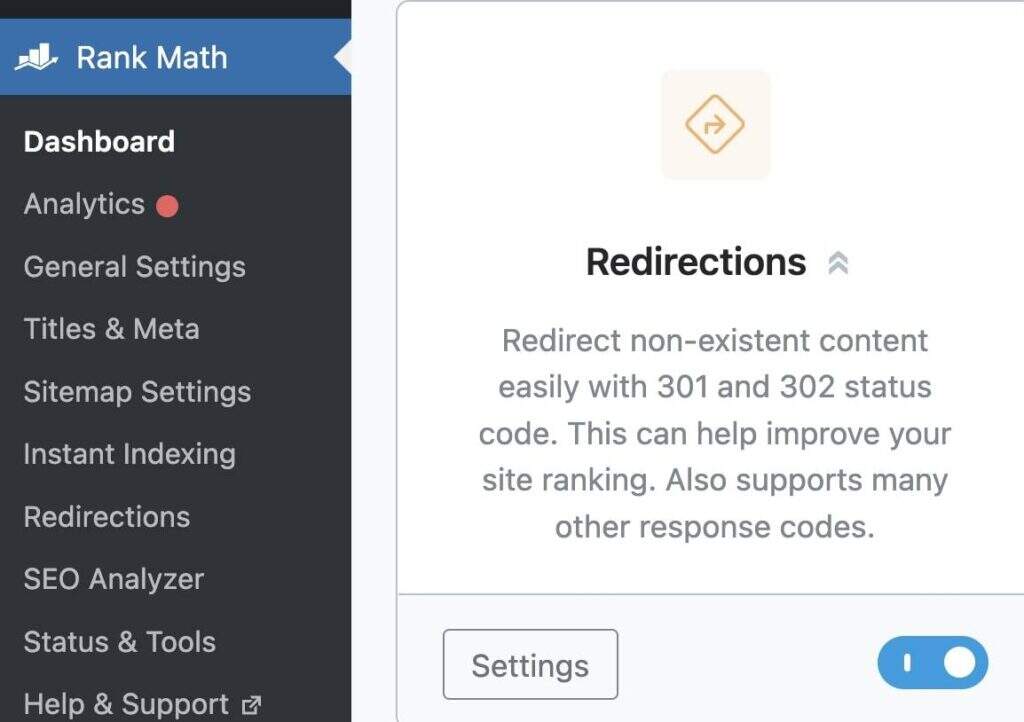
Now you will have a new Redirections tag. On this page, click Add New:

First, you can add your original source URL, which will be the content you redirect. You can paste URL in bulk by clicking add another. This can be an effective way to merge multiple pieces of content into one source:
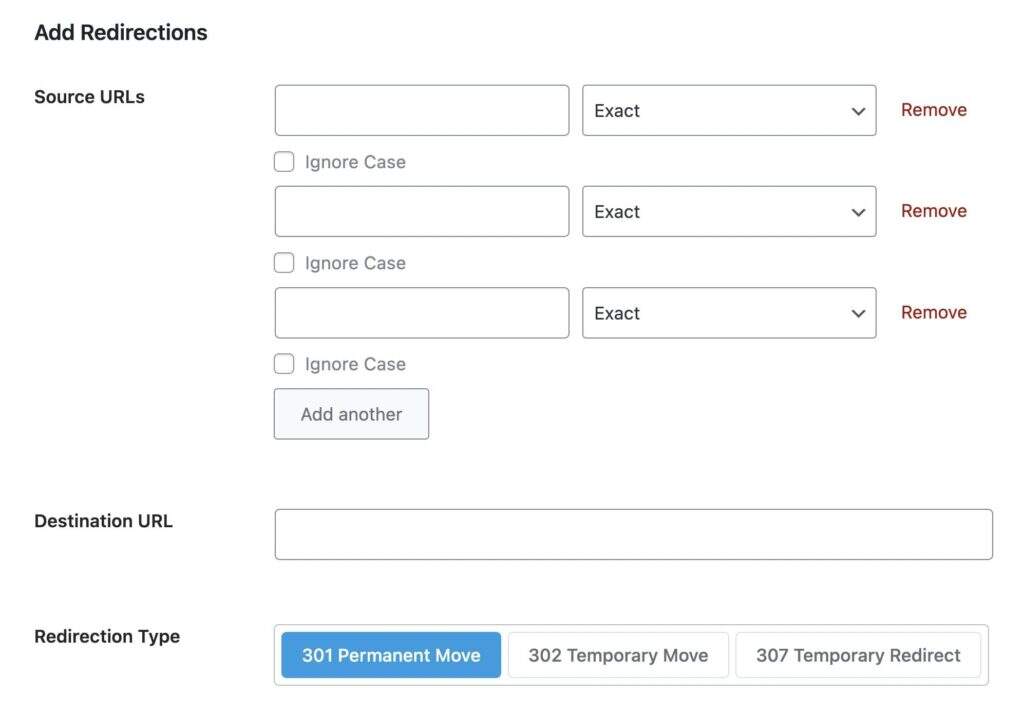
Next to each URL, if you want to redirect this exact link, please select Exact Match. However, you can also enter a broader term. By selecting “Contains”, each page with this keyword will be redirected:

Under Destination URL, insert the link you want the user to visit. Before clicking Add Redirection, make sure that 301 Permanent Move is also selected as the redirection type.
Method 3: edit your .htaccess file
If you want to avoid installing another plug-in, you can also manually create a 301 redirect. Since this involves editing your website files, be sure to back up your website first. This will save a copy of your current website so that it can be restored in the event of any problems.
Next, you need to connect to a File transfer Protocol (FTP) client or your host’s file manager.
Here, you need to find the .htaccess file in the root directory:
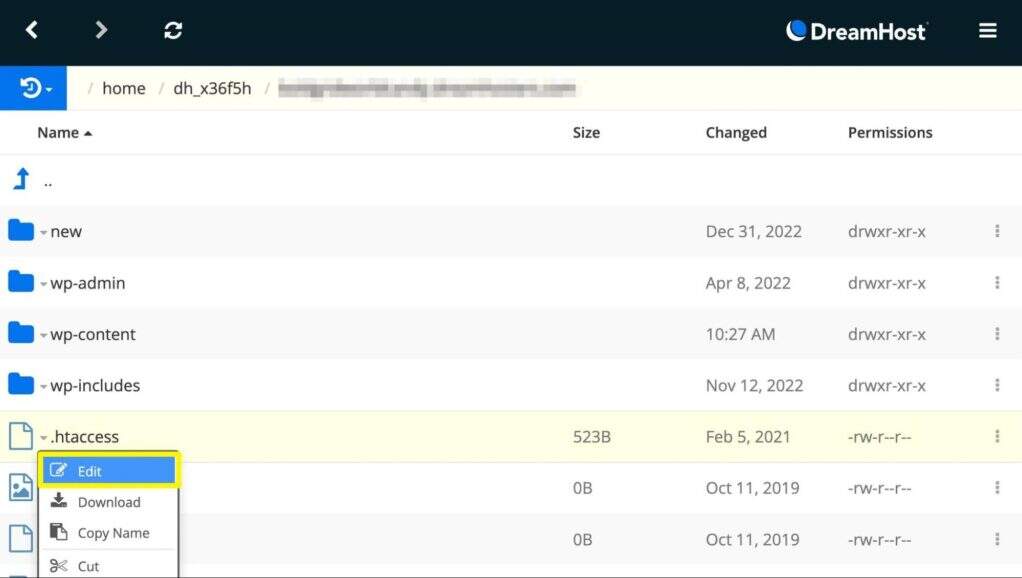
If you don’t want to back up your entire website, you can download the original file directly. If you encounter any problems, you can upload it back to the server:
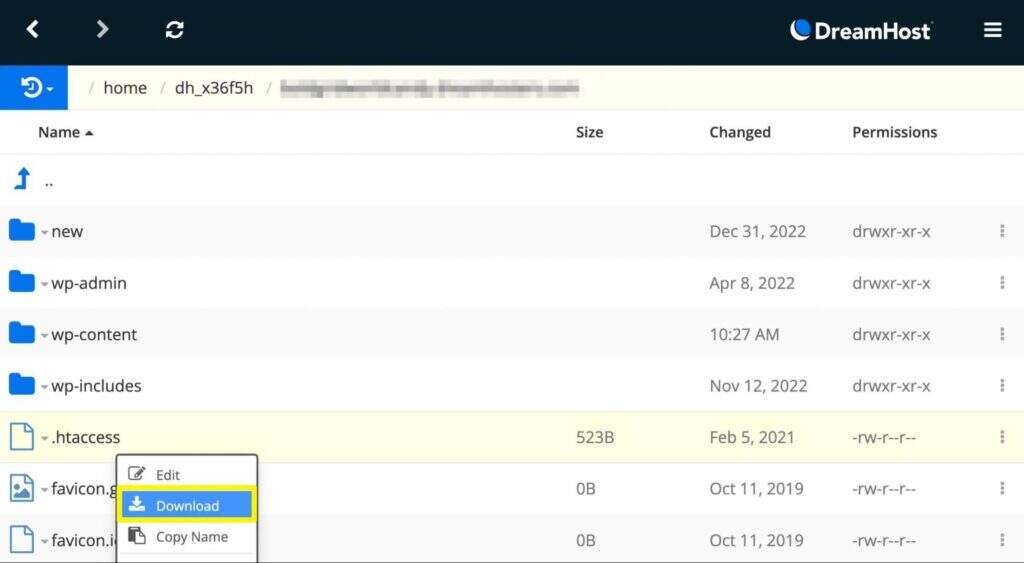
Once you have found the .htaccess file, right-click it and select Edit. If you use the File Manager, you can open and edit it through a text editor:
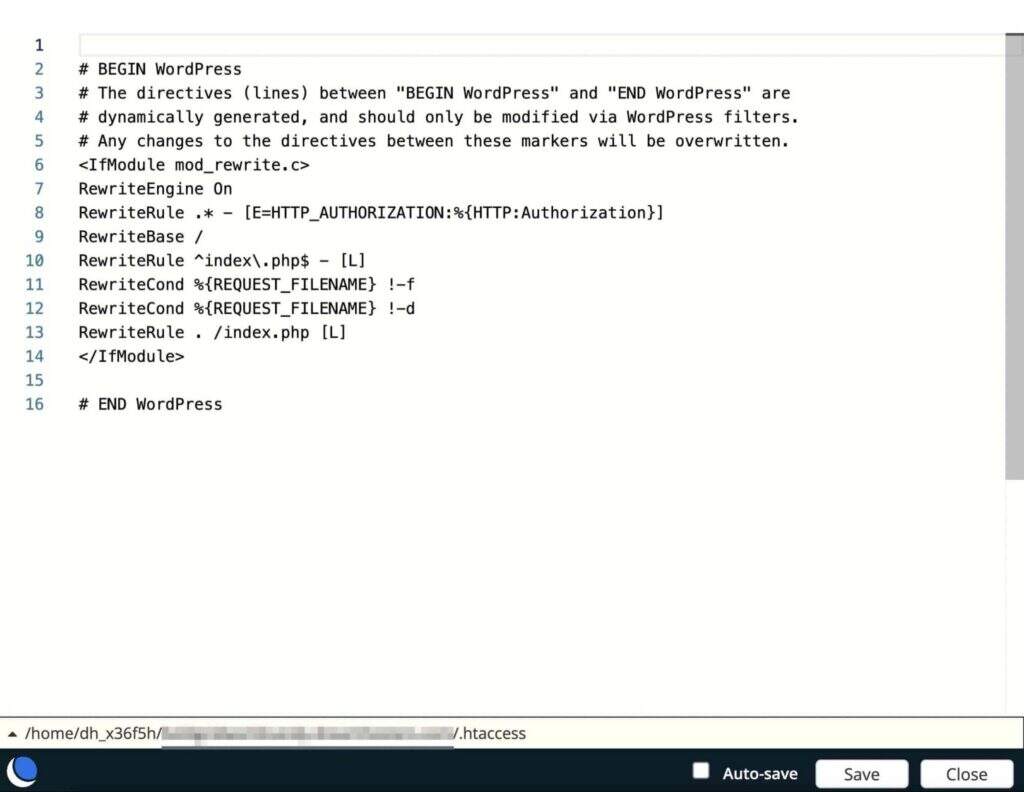
Just below the line “# END WordPress”, add this new code to create a 301 redirect:
RewriteEngine On Redirect 301 /new-content/ https://mywebsite.com/new-content/
Be sure to update these two URL to make them unique to your site. Remember, if you have turned on Rewrite Engine in the encoding of your .htaccess file, you don’t need to repeat it. You can simply copy and paste the redirection code.
As we mentioned earlier, you may want to redirect your entire site to a new domain name. In this case, you can use the following code instead:
RewriteEngine on RewriteCond %{HTTP_HOST} ^olddomain.com [NC,OR] RewriteCond %{HTTP_HOST} ^www.olddomain.com [NC] RewriteRule ^(.*)$ https://newdomain.com/$1 [L,R=301,NC]
If you want to migrate your site from HTTP to HTTPS connections, you can also do so in your .htaccess file. Just paste this code:
RewriteEngine On RewriteCond %{HTTPS} off RewriteRule ^(.*)$ https://%{HTTP_HOST}%{REQUEST_URI} [L,R=301]
After that, save the file and close it.
Method 4: create a server-side redirect
As an alternative, you can also create 301redirects in PHP. This will be a server-side redirection using the header () function.
PHP redirects are server-oriented, so they can usually be faster and more secure. However, this is a considerable technical process and is easy to make mistakes. Before you begin, make sure you have some knowledge of PHP coding.
To redirect correctly in PHP, you need to write a header () function. In the location response-header field, define the URL you want to send to search engines and users:
header('HTTP/1.1 301 Moved Permanently'); header('Location: https://www.example.com/newurl'); exit();
Be sure to include a die () or exit () function at the end of the title. Without it, search engines such as Google may process the original page and ignore your new redirection.
How to solve the problem of 301 redirection
After you create a 301 redirect, it may not execute correctly. Sometimes it becomes a redirect chain or loop. This occurs when there are multiple redirects between the original URL and the target URL.
If your site has a redirect chain, visitors will see a “Too many redirects” error. Basically, the browser will not be able to complete the redirection and display the correct page.
As a website owner, you may not notice the redirect chain. To check for any errors, you can type URL into a redirect checker like HTTP Status:
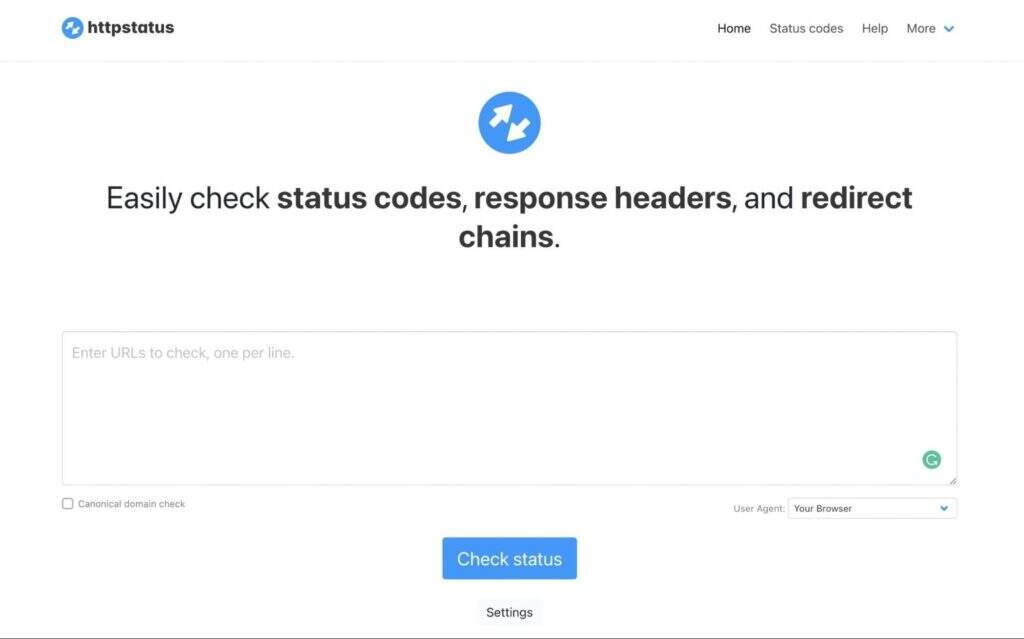
You will be able to paste up to 100 URL in the text box. Then, click Check status. At the bottom of the page, you will see the HTTP status code and the number of redirects:

If the page loads correctly, you will see a HTTP status code ‘200’. You should also make sure that there is only one redirect per URL. Otherwise, you may have a redirect chain.
Common redirection errors
A common mistake when establishing site redirects is to confuse 301 and 302 redirection types. Although both will be redirected to a new page, they communicate with search engines in different ways. Since this may have a negative impact on your search engine, it is important to understand the difference.
As we mentioned earlier, the 301 redirection is permanent. This tells the search crawler to stop indexing the original content because it has been permanently moved. In this case, the new content will get the linked assets of the old page.
On the other hand, 302 redirection indicates that the redirection is temporary. If you are testing a new redesign, you can temporarily redirect visitors to another place during the development process. The redirect tells the search engine that the original content will be returned, so its PageRank and index need to be maintained.
In addition, you should track any redirects you create on a regular basis. If you don’t, your site may end up with unlimited redirection loops, increasing your bounce rate. Eventually, you’ll want both search crawlers and online users to access the right content easily and quickly.
Finally, make sure you redirect to the latest content related to the original page. Now that the visitor has clicked on the original link, you need to provide useful information.
This will ensure a smooth transition and prevent users from leaving quickly and looking for your competitors. In addition, this will ensure that the crawler continues to know your content so that you can rank higher in search results.
Summary
If you try to integrate your online content or transfer to a new domain name, you need to set 301 redirection. This can help you maintain steady traffic and avoid losing your high Google search rankings. In addition, redirection prevents visitors from clicking on broken links.
Recall how the301redirection was created in WordPress.
- Install the Redirection plug-in.
- Use a SEO plug-in, such as Rank Math.
- Edit your .htaccess file.
- Create a server-side redirection with PHP.

