
Lead generation is an important part to consider when creating a WordPress site for your business. In addition to excellent design and search engine optimization, you must also consider what visitors will do when they arrive. Attracting visitors to your site is not as valuable as turning them into qualified prospects.
If you already use Salesforce as your customer relationship management (CRM) software and like the idea of using prospects to generate forms, you need to check out the WordPress plug-in Salesforce Web-to-Lead. It couldn’t be easier to use, and it’s perfect.
About Salesforce and online prospects

Salesforce is a CRM (customer relationship Management) service that uses cloud-based software to help enterprises find and transform potential customers and provide customer service. The entire Salesforce product suite, called Customer 360, contains tools for business, IT, marketing, sales, and service.
Web-to-Lead is Salesforce’s strategy to transform visiting users into prospects (that is, customers, subscribers, etc.). To do this, Salesforce will help you create a form in which visitors will fill in information such as their demographics and interests. The following is the definition on their website:
Online lead: the process of using a site form to capture visitor information and store that information in Salesforce as a new lead.
After visitors fill out the form, you can take other actions, such as automatically directing them to the relevant pages on your website. Once you have the customer information, you can store it in Salesforce and annotate it as needed, such as rating prospects based on their likelihood of making a purchase. You can then follow up on potential customers via email, have your sales team contact them, or do anything that belongs to your marketing funnel.
There is also a dedicated plug-in so that you can use this policy on the WordPress website. Brilliant Web-to-Lead will integrate Salesforce with WordPress. When someone fills out a form on your WordPress site, this information is stored in your Salesforce CRM account.

How to use the WordPress plug-in Salesforce Web-to-Lead
Let’s look at how to set up online lead plug-ins, create forms, add them to your site, and synchronize entries with your CRM.
Install the online lead plug-in
Log in to your WordPress account. In the left sidebar, click Plugins & gt; Add New. Enter “Salesforce” in the search box in the upper right corner of the page. The correct plug-in should be the first search result. Click install now. When the installation is complete, the button becomes enabled.

Salesforce Web-to-Lead plug-in Settings
Next, you will be taken to your plug-in page. Under the new Salesforce plug-in, click Settings.

Salesforce Organization ID
To start using plug-ins, you must add your Salesforce organization ID. First click the Settings tab, where you will enter ID (see instructions below).

Next, log in to your Salesforce account. Click the gear icon in the upper-right corner of the page and select Settings.

On the left, scroll down to the Settings section. Select Company Settings>Company Information. Your Salesforce.com Organization ID will be in the right column.
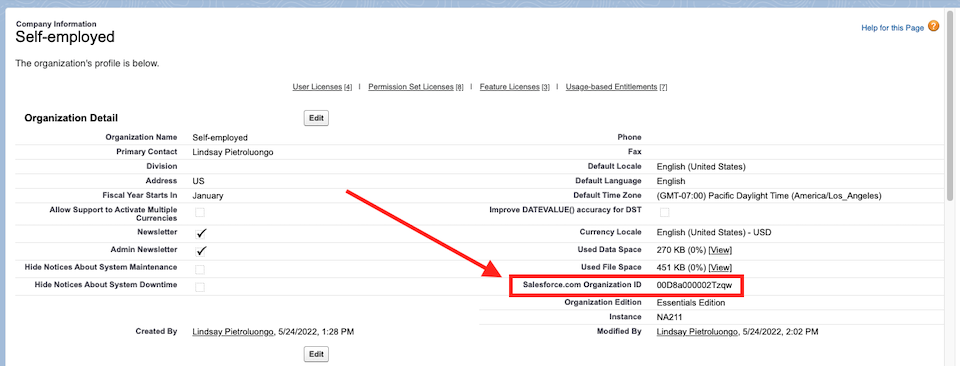
Copy and paste it into the specified space in WordPress, then scroll to the bottom of the WordPress page and click Save WordPress-to-Lead Settings.
Forms
Click the first tab, Forms. You will have a form that is automatically created for you, or you can choose Add a New Form.

Clicking an existing form for editing will automatically take you to the form Editor tab, which will open for you. Here you can select which form fields are enabled, required, or deleted. You can select a form type, such as a check box, email, or text, and set a label name, such as an email or phone. You can also add options and change the order of the form fields.
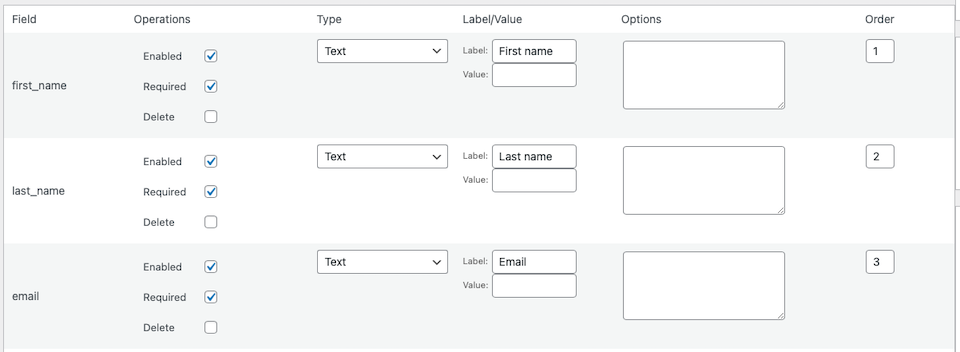
Scrolling down takes you to the “Form Settings” section. Here, you can name the lead source, write success messages, enable CAPTCHA, and so on. When you are finished, click Save form at the bottom. If you want to create more similar tables, you can also choose Copy this form.
More Settin
There are also two tabs: Styling and Import. The Styling tab allows you to add CSS to change the default form style. In the Import tab, you can copy and paste the HTML of the lead form that you generated using Salesforce instead of in the WordPress plug-in.
Add an online lead form to your site
Now that you have created a form, it’s time to add it to your site. There are two ways to do this. You can add a short code to an article or page, or you can include a form in a gadget. Let’s look at these two options.
Add a form using a simple code
In WordPress, return to the setting & gt; Salesforce & gt;Forms, and then click the form you want to use. On the right side of the page, copy the short code.

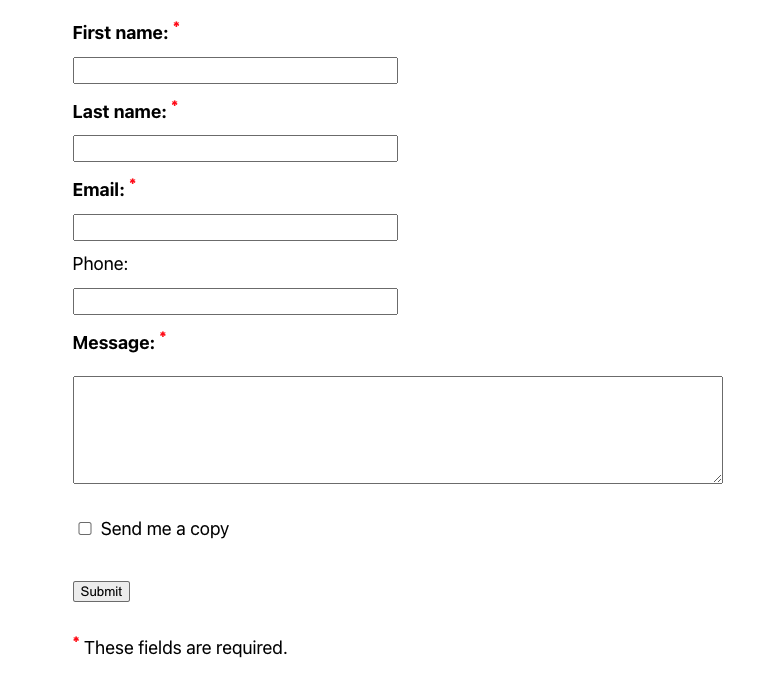
Go to the WordPress article or page where you want to add the form. Whether you are using a classic editor or Gutenberg, you can simply paste the code wherever you want the form to go. The editor will continue to display the code, but if you preview the page, it will look like this:
Add a form using a gadget
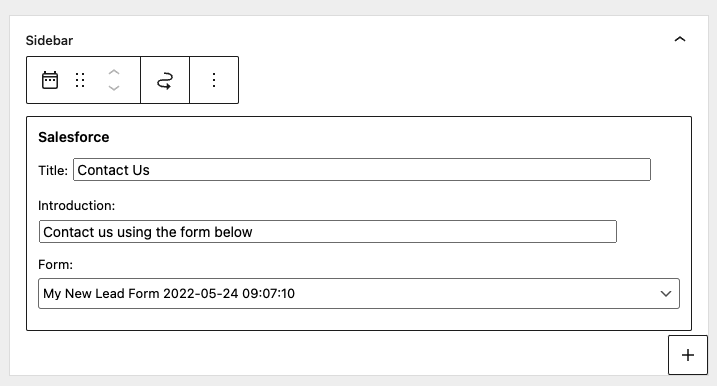
If you use a theme that allows gadgets, you can add the form in this way. In the left sidebar of the WordPress dashboard, click the appearance & gt; gadget. Determine where you want to add the form, and then click to add a gadget.

Start typing “Salesforce” and select the associated gadget. You can then update the title and profile of the form and select the form to embed from the drop-down menu.
Synchronize form submission with Salesforce
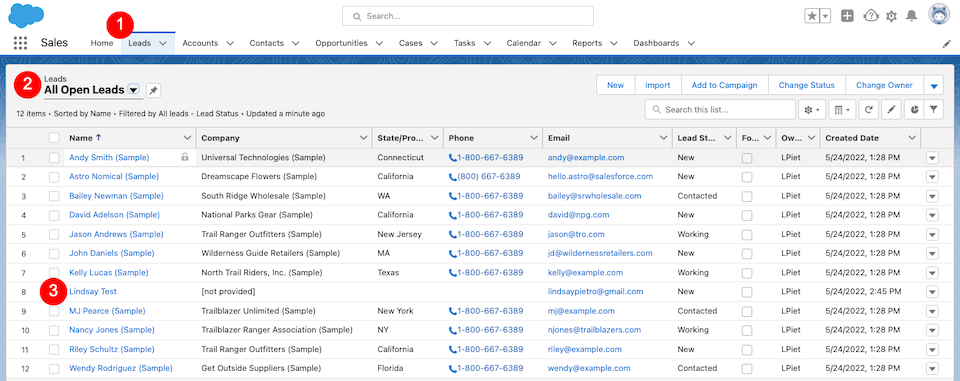
Now, when someone fills out a form on your website, the information will be synchronized with your Salesforce account in a few seconds. You don’t really need to do anything else to make it work. It has been set up for you. I tried this by entering test information into my new form, and within seconds it appeared in the Leads section of my Salesforce.
Summary
Few plug-ins are as easy to use as Web-to-Lead, and we are impressed that entries can be seamlessly synchronized with our Salesforce account immediately. Rarely has any type of website update been so simple. With some plug-ins, even seemingly simple changes can require several unexpected steps.
If you need a simple form, you can use an automatically created form, or at least when you spend some time designing a new form. In addition, no matter which method you choose, embedding the form is foolproof. We can’t help falling in love with productive tools-they give creative types more time to focus on what really matters, such as designing content that our new (and existing) customers, fans, and subscribers will appreciate.

