
The WordPress sidebar can be populated with the same information on each web page, or it can be customized according to the page it is on. Either way, it’s a great way to raise awareness of other content on your site, encourage social sharing and even generate revenue through advertising. This
article will show you how to create WordPress sidebars, discuss the best place to place them, and explain what functions they should perform. We will also share the 10 best WordPress sidebar plug-ins.
- what is the WordPress sidebar?
- uses site editor to create WordPress sidebar
- uses gadgets to create WordPress sidebar
- uses WordPress customizer to create WordPress sidebar
- WordPress sidebar-left and right
- best WordPress sidebar plug-in
- sidebar area practical use
what is a sidebar in WordPress? The
WordPress sidebar is an area next to the main content on the WordPress site that displays additional information or navigation menus. It is usually a vertical column on both sides of the page, but it can also be found in other locations, such as below the footer.
uses the site editor to create a WordPress sidebar
the easiest way to add a WordPress sidebar is through the site editor. However, this approach can only use WordPress 5.9 and block-based themes. There are two possible ways for
to add sidebars using the latest side editor-using prefabricated block templates or creating them from scratch.
uses a block template
WordPress block template is essentially a layout template made up of predefined blocks that you can edit to suit your content.
to add a block template to your WordPress site, navigate to Appearance-& gt; Site Editor to open the site editor.

on the site editor, click the plus (+) icon in the upper left corner of the screen and select the Patterns tab.
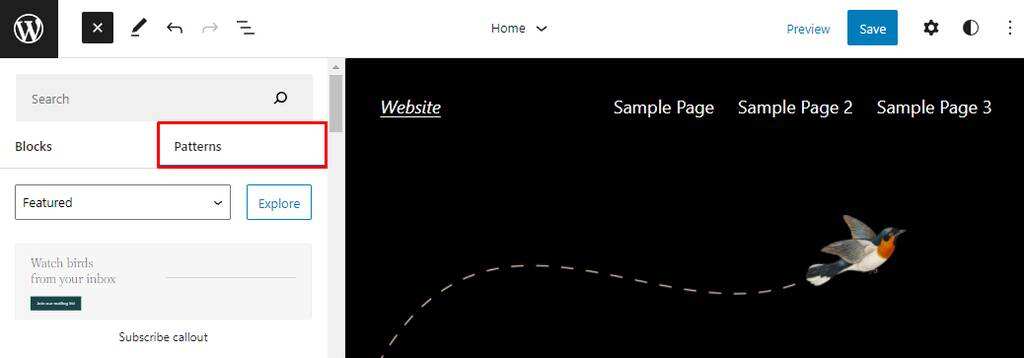
type the sidebar in the search box to find the pattern that contains it. Alternatively, click Browse to view all available modes.
Click the template you want to add to the page.

to move the pattern, open the list view from the upper left corner of the screen.
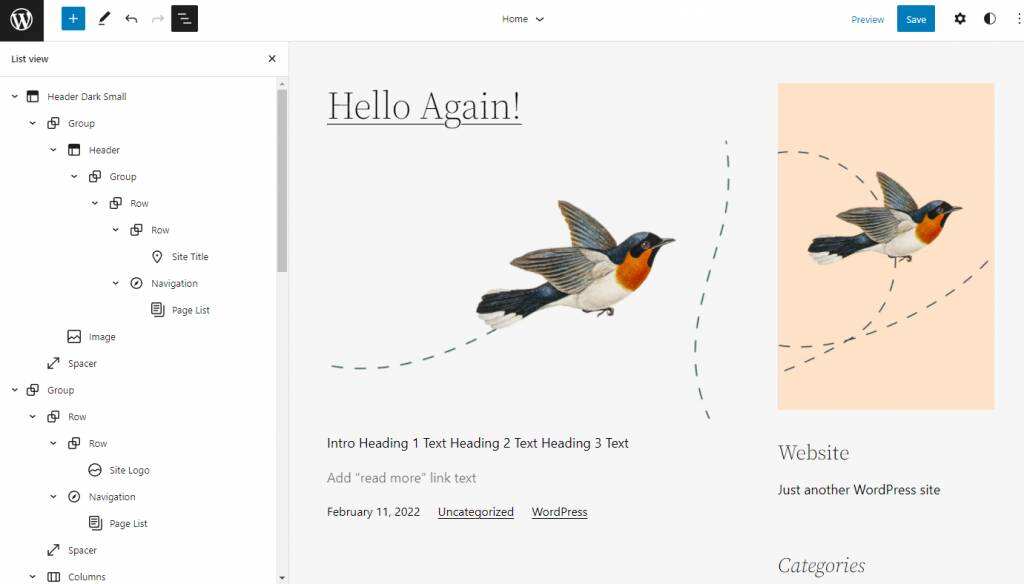
finds the group block that represents the pattern and drags it to the correct location. After
finishes setting up the template, you can start customizing it by adding or removing blocks from the sidebar.
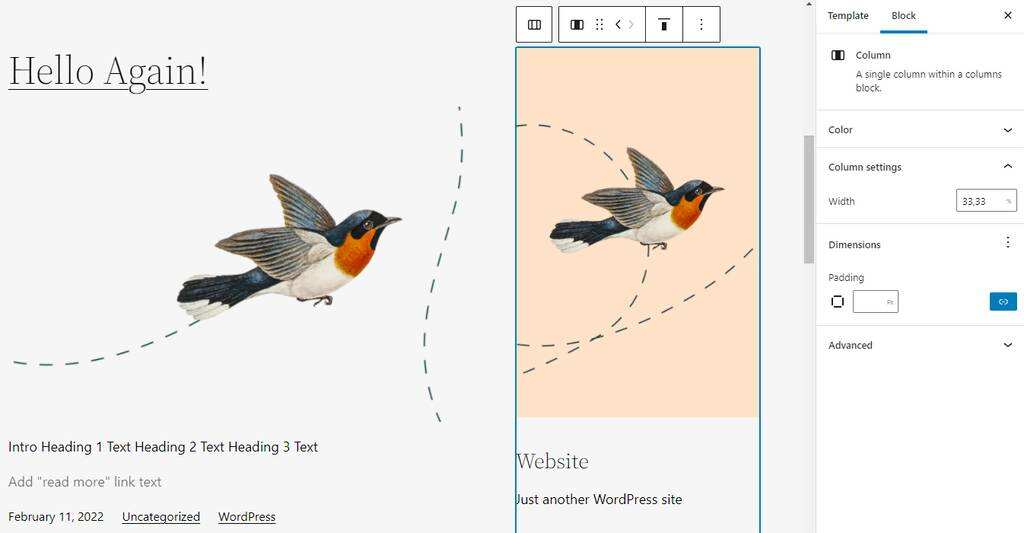
creates a sidebar from scratch another way to add a sidebar using the Block Editor is to set up all individual blocks manually. This method involves creating a set of blocks consisting of query loops and columns in the sidebar.
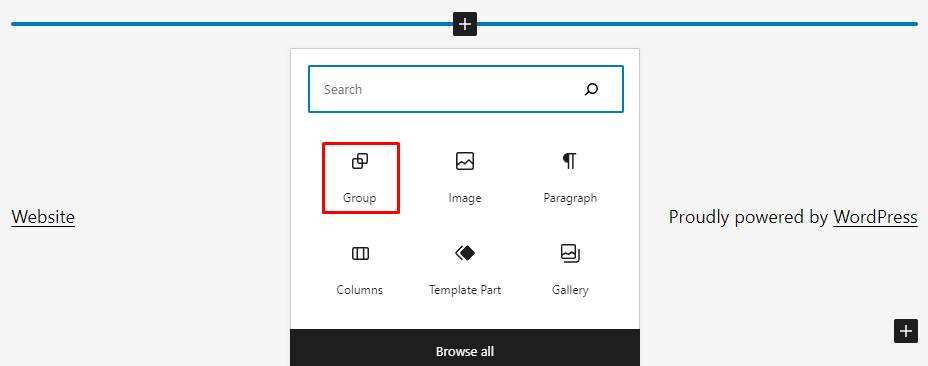
opens the site editor and goes to the area of the page where you want to add query loops and sidebars. Click the plus sign (+) icon that appears when you hover over the area, and then select a group to add a group block.
an empty group block will appear in that location. Click the plus sign (+) icon within the block and select the column.
you must select one of the column variants. For the sidebar, we recommend that you select 30 for the left sidebar or 70 for the right sidebar. After
, you will see two empty columns.
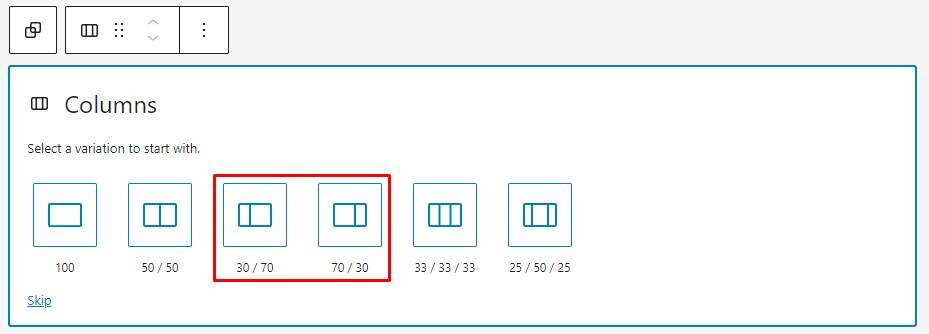
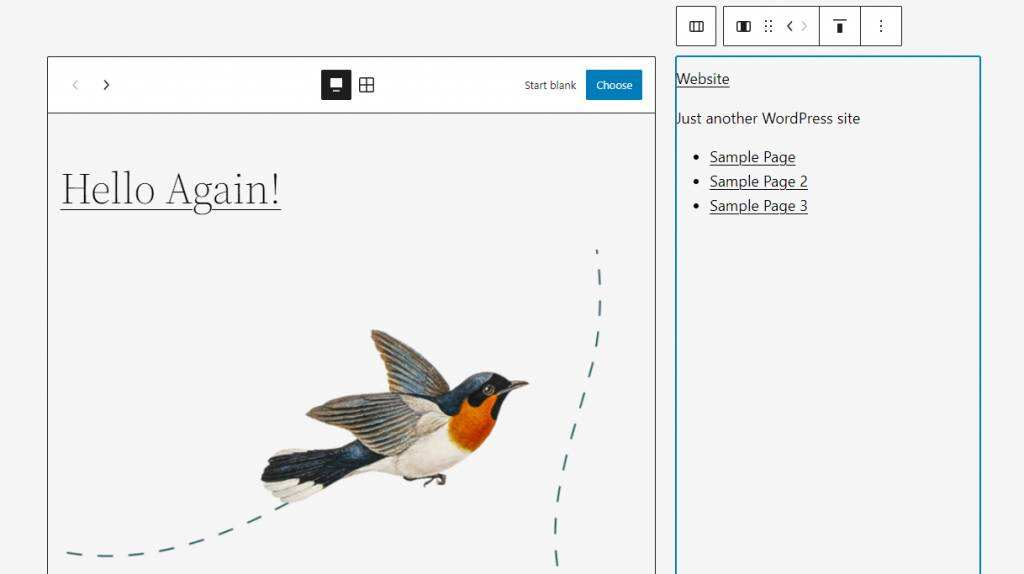
you can add query loop blocks and sidebar items, such as site titles, page lists, or tag clouds.

uses gadgets to create WordPress sidebars
using gadgets to create WordPress sidebars is a convenient choice for non-technical users because you don’t have to deal with code.
WordPress gadgets provide an easy-to-use way to add content and functionality to gadget areas that are designated locations for gadgets on your site. The
gadget area may vary from one WordPress theme to another. They can be placed in the header area, footer area, or sidebar.
to create a WordPress sidebar using the Widgets menu, open the WordPress dashboard and navigate to the appearance-& gt; gadget.
you will see a list of available WordPress gadgets on the left panel, while the right panel contains the gadget area block.
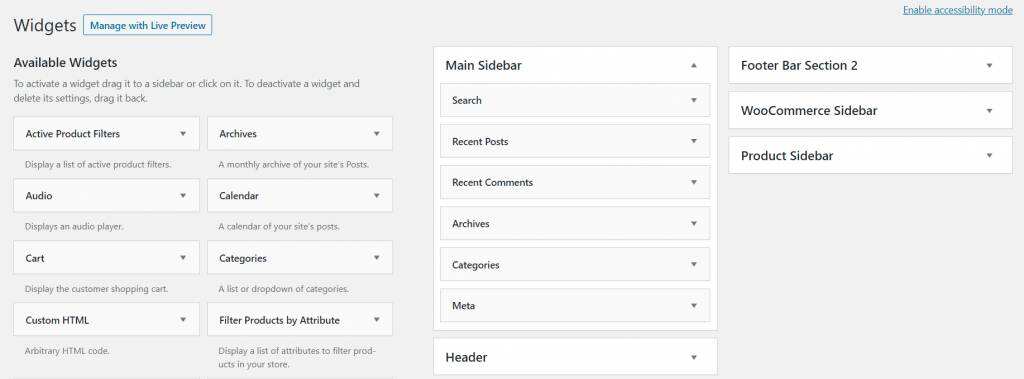
in this example, we use the free Astra theme, which has six gadget areas. Drag and drop the required gadgets from the left to the main sidebar block on the right, and then arrange the order. In addition to using the drag-and-drop method,
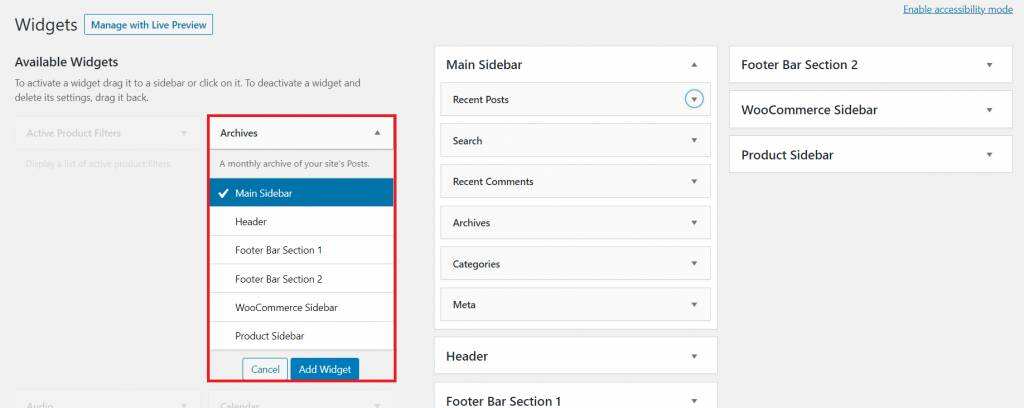
can add gadgets to the gadget area by clicking and expanding the location option.
select Main Sidebar, and then click the Add Widget button.
to customize or remove gadgets, click the gadgets section in the main sidebar column.
WordPress also provides accessibility mode. Click the enable accessibility mode link in the upper-right corner of the page and you will immediately see a menu of gadgets with add and edit buttons. The

sidebar has many useful WordPress gadgets, such as social media buttons, search bars, or gadgets that display recent blog posts. The

sidebar can also contain multiple gadgets. For example, a sidebar can display both navigation links, search bars, and ads.
remember to set up the sidebar only with gadgets that add value to your site. Otherwise, it may confuse your site, resulting in a poor user experience.
uses the WordPress customizer to create a WordPress sidebar
WordPress Customizer that allows you to customize elements of WordPress themes, such as menus, home page settings, and sidebar gadgets.
The degree of customization and the number of gadgets available depend on the theme. It determines whether your site can have a sidebar and which part of the site it can be located in.
some WordPress themes allow you to display multiple sidebars on the same page, while others do not.
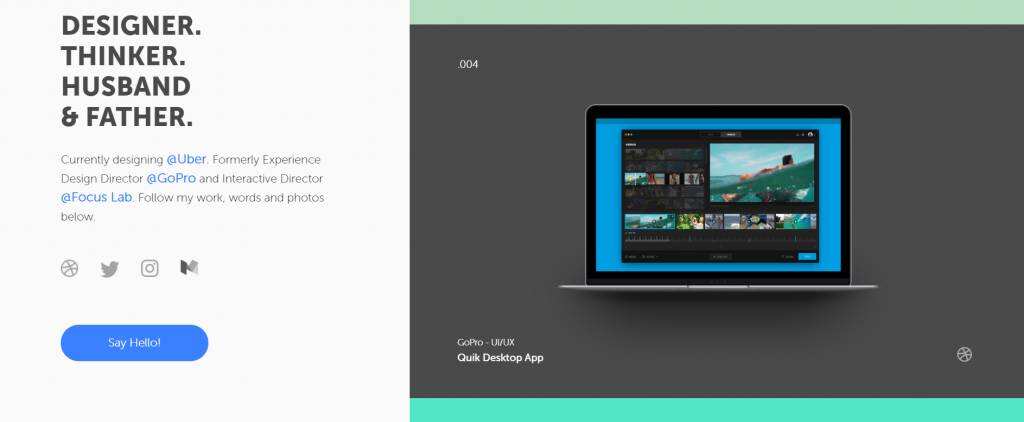
for example, the following Austin Kleon website has a left and right sidebar.
, however, if you don’t want to rely on the limitations of the theme, you can use the Custom Sidebars plug-in to create a custom gadget area on your site at any time.

if your theme has the sidebar as one of its gadget areas, use WordPress Customizer to adjust your sidebar. Open your WordPress dashboard and navigate to the appearance-& gt; customization.
go to the left panel and select Widgets. It will show you a list of gadget areas for your site.
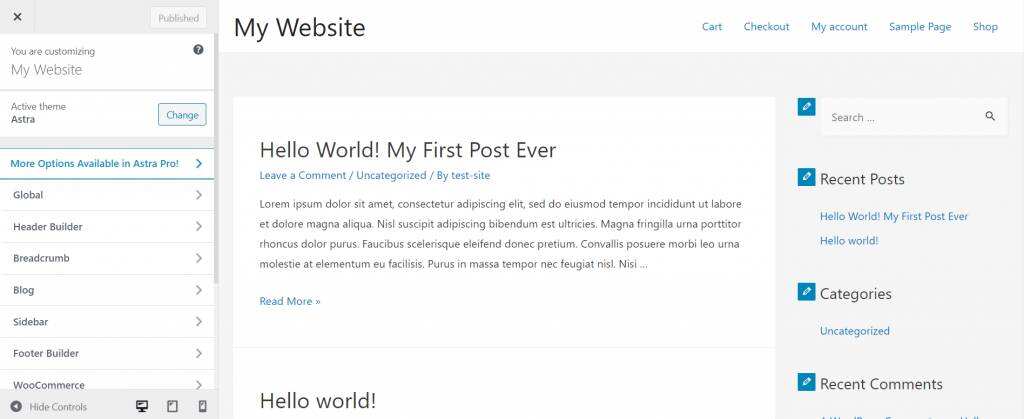
selects the main sidebar. The name may vary depending on the WordPress theme, but it usually includes the word “sidebar”.

you will see a list of all the sidebar gadgets you currently have. Click any gadget section to expand custom options.

you can reorder the gadgets, delete any sidebar gadgets, and change the gadget title in this panel.
starts typing in the available title section, and you will immediately see the results in the sidebar. Once you are satisfied with the changes, click finish.
if you need another custom sidebar gadget, click add Gadget and browse the list of available WordPress gadgets.
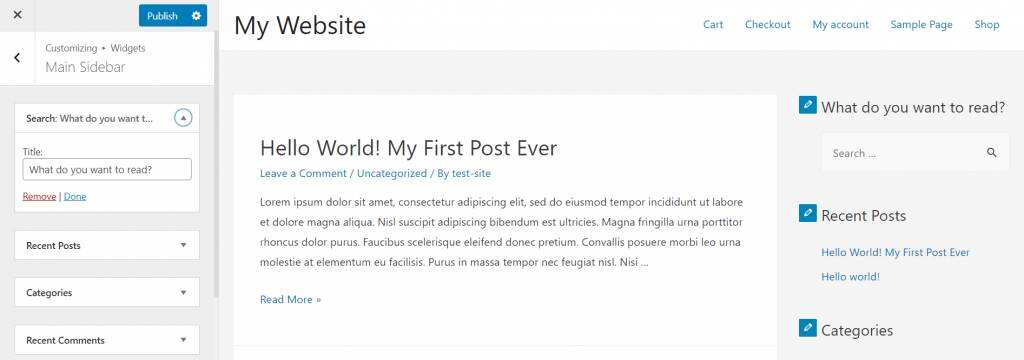
Click the gadget you want, and then make the necessary adjustments, such as ordering or naming the gadgets.
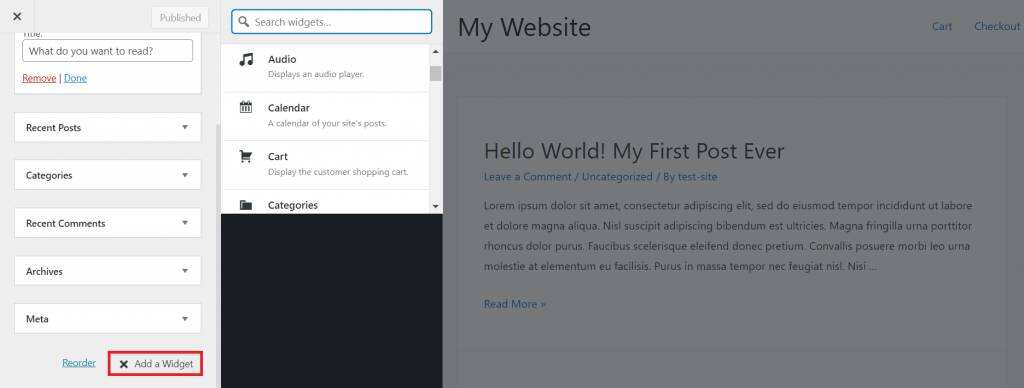
in this example, we added a calendar gadget without any title. If you want to leave it as is, click finish. After
has finished customizing the gadget, click the publish button in the upper left corner of the customizer.

WordPress sidebar-left and right
some people think it’s best to put the sidebar on the right, because most people read from left to right. Our natural habit of reading makes us look at the upper-right corner of the page before scrolling down.
for example, suppose your WordPress site is a blog. In this case, using relevant or recommended articles as custom sidebar content on your right may encourage visitors to read more of your content.
, on the other hand, e-commerce sites would be better off with a navigation sidebar on the left.

categories and filtering are the key functions of e-commerce websites. You can immediately attract the attention of visitors by placing a custom sidebar with a navigation structure on the left side of the product page.
runs the A

B test on your WordPress site to see if the left sidebar or the right sidebar suits you better:
- launches two versions of the same site-one with a sidebar on the left and one on the right.
- tracks user behavior on both sites until you collect enough data.
- checks which site performs better and which sidebar gets more clicks. Use the Amob B test calculator to help you.
Best WordPress sidebar plug-in
now that you know how to create a sidebar, it’s time to add some functionality. Fortunately, there are many gadget plug-ins in WordPress’s catalog that have a variety of features to improve your custom sidebar functionality.
the following are our recommended installation recommendations for the best WordPress sidebar plug-in for any topic:
1.SiteOrigin Widgets Bundle

SiteOrigin Widgets Bundle provides a gadget library that provides a wide range of functions, from CTA buttons to price lists.
all the gadgets in this plug-in are built on the same framework, ensuring consistent design and functionality. To better optimize the performance of your site, enable only the gadgets you want to use.
SiteOrigin Widgets Bundle is a free plug-in. Upgrade to SiteOrigin Premium to access additional add-ons and quick email support. The
Advanced Program starts from $29 per site per year to $99 per year for unlimited sites.
2.Recent Post Widget Extended

Recent Post Widget Extended enables you to display recent blog posts on the sidebar. It encourages people to read more about you while reducing the bounce rate. The
plug-in is an extension of WordPress’s built-in gadget for recent articles. Your most recent article will show thumbnails, article excerpts, and release dates.
‘s recent article gadget extension provides the option to display content based on a specific article type, category, or tag.
also allows more advanced users to customize the style of the gadget through its built-in mini CSS editor.
3.Maps Widget for Google Maps

Maps Widget for Google Maps helps to display physical locations on a map. It has customizable map sizes and zoom levels that allow you to create custom pushpins. The
plug-in uses Google Maps static Map API, which requires only one HTTP request and can be loaded quickly.
Premium provides advanced features, such as customizing the map color scheme to match your WordPress site design and Google Analytics event integration to understand how people use your map.
offers three advanced programs. The annual plan applies to a site at a cost of $29 per year. The lifetime plan includes $49 / license for a personal site and $79 / license for an unlimited number of sites. The
4.Content Aware Sidebars

Content Aware Sidebars sidebar allows you to customize the sidebar gadget to accompany specific content viewed by visitors. This means that a specific category of articles will display a sidebar with a specific set of gadgets.
the plug-in also provides full control over the sidebar part of the design and the option to change the HTML and CSS classes. The
Content Aware Sidebars plug-in is free, but it also provides an advanced program that includes the sticky sidebar feature of your site. The program ranges from $49 per site to $199 per year for 100 sites.
5.Compact Archives

Compact Archives provides a tighter way to display your content archives, thanks to its block design.
by default, the built-in WordPress archiving gadget will display your content archive in a long list. If you have years of site content, it will take up a lot of space and make your sidebar look messy.
Compact Archive addresses this issue by displaying content archives in a clean and easy-to-navigate manner. The plug-in
also supports further CSS styles. By modifying the stylesheet, you can adjust the archive style to match your page and site design.
6.Widget Options

Widget Options allows you to create custom sidebars by showing or hiding gadgets on different categories, such as pages, articles, or categories. The
plug-in also allows you to control the display of gadgets on different screen sizes, including desktops, tablets, and other mobile devices. It displays fewer gadgets on a smaller screen and applies custom gadget alignment, so your visitors can easily browse your site.
this is a free WordPress plug-in with paid versions ranging from $19 per site per year to $149 per year for unlimited sites.
7.Ninja Forms

Ninja Forms can help you create a form that increases your mailing list and generates prospects. It comes with different form options, such as subscription, registration, and donation forms, which can be easily integrated into your sidebar. The
plug-in also allows you to create more complex forms with excellent design to match the look and feel of your site. It provides many customization options and supports advanced features such as file upload.
in addition, Ninja Forms allows you to accept payments through a variety of secure payment gateways. You can set whether you want to accept a single payment or a regular subscription, or ask for a fixed or variable amount of donation.
is a free plugin, but it also offers personal premium add-ons ranging from $29 to $129 per license and membership programs ranging from $49 to $249 per year.
8.Contextual Related Posts

Contextual Related Posts creates a list of blog posts with thumbnails designed to attract people’s attention. It discovers relevant articles based on your article title and content algorithm and shows them to visitors who may find them interesting.
context-sensitive articles also provide options for editing CSS styles, providing more flexible design options for more advanced users. It also has a built-in cache to reduce the load on the server.
9.Smash Balloon Social Photo Feed
Smash Balloon Social Photo Feed allows you to display images from your Instagram account. It allows you to customize many elements, such as the number of photos, image size, and background color, so that you can match them to your website design style. The
Smash Balloon Social Photo Feed also comes with a follow Instagram button to help raise awareness of your Instagram account. In addition to the free version of
, Smash Balloon offers advanced programs, ranging from $49 per site per year to $299 per year for unlimited sites. The
Advanced Plan includes advanced features, such as options to hide or show specific articles, that allow you to customize how Instagram Feed is displayed on the sidebar.
10.Meks Smart Author Widget

Meks Smart Author Widget helps you create an author profile for the gadget space of your site, including the sidebar. By displaying your resume or contributor’s resume, you can encourage people to better connect with your brand.
this plug-in is suitable for websites with one or more authors. It can also automatically detect the authors of articles and automatically display their resumes. The actual use of the
sidebar area
now that you know how to create the WordPress sidebar, where to place it, and what gadgets to put in it, let’s discuss the practical use of the sidebar itself.
We have carefully selected five practical uses of the sidebar area for any type of website. Let’s take a look at them one by one.
1. Read recommended

do not let your visitors leave after reading only one article-direct their attention to your hot or related articles. This will benefit SEO and drive more traffic.
should also remember that the longer visitors stay, the more likely they are to become customers or repeat customers.
recommended plug-ins: WordPress Popular Posts and Jetpack
2. Email subscription

if your visitors like your content, they will probably want to hear more about you. Place a newsletter subscription form on the sidebar so that they can quickly register for new updates on your site.
briefly describes what readers can get from your newsletter and includes the number of subscribers to your newsletter as social recognition.
this is also a good way to add email lists to your future marketing activities.
recommended plug-ins: OptinMonster and MailChimp
3. The social media feature

places social sharing buttons on your sidebar to allow people to spread your content to their networks.
if you have multiple social media channels, please add additional gadgets to direct your visitors to your social profiles. It will also increase the chances of increasing the social media audience.
recommended plug-ins: Simple Social Icons and Easy Social Share
4. Social recognition

Social proof increases the credibility of your site. For example, your statistics on the number of social media followers, subscribers, or letters of recommendation indicate that your business and brand are legitimate.
showing social credentials can help you win the trust of people, especially if they are new to your site.
Recommended plug-ins: Social Count Plus and Testimonials Widgets
5. Fixed sidebar
if you have many long articles, fixed sidebar works best. It allows visitors to easily access the sidebar menu at any time, even if they have scrolled down a long way.
recommended plug-ins: Q2W3 Fixed Widget and Sticky Menu (or Sticky Header) on Scroll
summary
sidebar is a great way to display other information that people might want to know, such as links to related articles, authors’ resumes and registration forms. You can add a sidebar in three ways-through the new site editor, the gadget menu, or the WordPress customizer. There are many gadgets and gadget plug-ins for sidebars on the
market, but keep in mind that you should only install useful gadgets.
first, we recommend that you install these plug-ins:
- SiteOrigin Widgets Bundle-includes all the gadgets you may need on your site.
- Recent Post Widget Extended- helps visitors see more of your content.
- Ninja Forms-helps set up email lists, provide subscriptions, or provide member registration.
adds more plug-ins only if they can make a significant contribution to your site. Keep in mind that the fewer gadgets and plug-ins you install, the better your site will run. In addition, a simple sidebar will automatically improve the user experience.
your ability to add sidebars to WordPress also depends on the theme you use. Although default WordPress themes usually do not contain sidebars, many third-party themes support them.


