One aspect that should not be forgotten when publishing WordPress articles is its classification. This is because ignoring this component may damage the site’s traffic and ranking in search results.
The WordPress classification organizes or groups content and articles based on shared topics, projects, or features. It is also one of the default WordPress classifications.
In addition, classification can help visitors browse the site to find the content they need and make it easier for search engines to crawl.
As a beginner, managing a list of categories can be confusing at first. Therefore, this article will show you how to add, edit, and delete categories in WordPress. In addition, we include some best practices for website classification.
- How to add a new category to WordPress
- Through the classification panel
- Through the WordPress editor
- Set the default classification in WordPress
- How to edit a classification in WordPress
- Through Quick Edit option
- By editing option
- How to delete a WordPress classification
- Delete a specific category
- Batch deletion
- Best practices for WordPress classification
- 1. Create site structure and classification strategy
- two。 Use correct keywords and avoid unnecessary classification
- 3. Fill in the classification instructions
- 4. Remove / category/ from article URL
How to add a new category to WordPress
For WordPress site owners, it is important to have a classified list to group articles. It will not only improve the structure of the site and simplify navigation, but also promote search engine optimization (SEO) of the site.
Adding a category does not require any technical experience, and the process is very simple. There are two ways to add categories to WordPress– through the categories panel and the page or article editor.
Through the classification panel
Adding new WordPress categories to articles through the classification management interface is a very simple process. The following is a three-step guide to how to create article classifications:
- Open your WordPress management dashboard, hover over the article, and select the category.
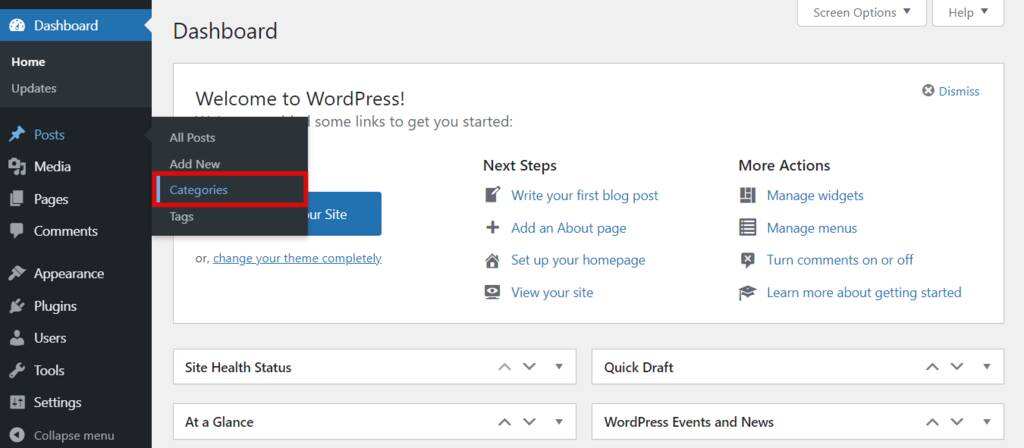
- Complete the required fields:
- Name-the title of the WordPress category, such as lifestyle or news.
- Slug-create a permalink for the classified page. If it is left blank, WordPress automatically sets it based on the category name.
- Parent classification-A classification that contains subcategories in a hierarchy. For example, news can be the parent of subcategories of local and international news.
- Description-outlines the content of the classification. It is hidden by default, but some WordPress themes may show it.

- Click add New Classification.
When you are finished, the new category is displayed in the list.
To create an article hierarchy in WordPress, it is necessary to create the main article categories– parent categories– as well as subcategories or subcategories. Keep in mind that you must add a parent classification before the child classification.
For example, first add classified motion. Then, create a classified football and set the motion as its parent category. Football will automatically become a sub-category.
Through the WordPress editor
Another way to add categories to WordPress is through the article editor. It’s convenient when you’re writing or editing a new article, and it’s not classified yet. In this tutorial, we will use the Gutenberg editor.
- From the WordPress administration interface, go to Posts-& gt; All Posts.
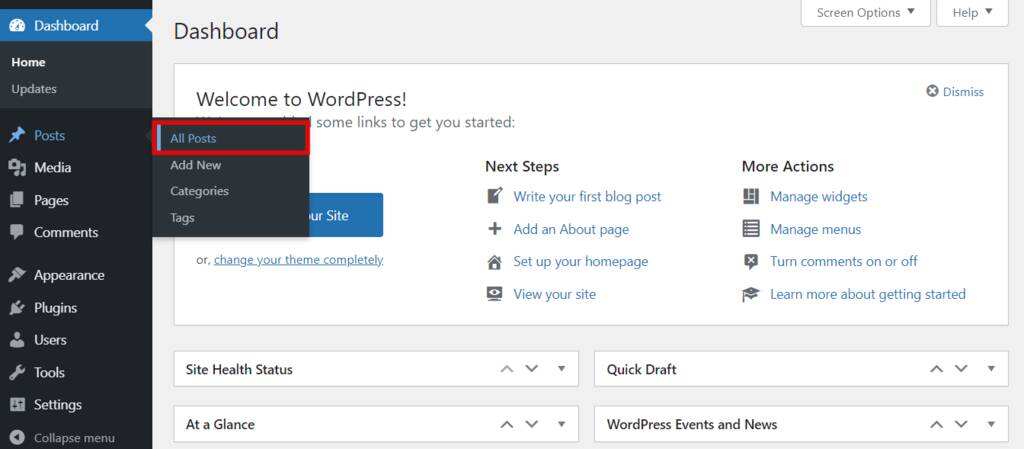
- Click the article you want to edit.
- Press the Settings button and select the publish tab.
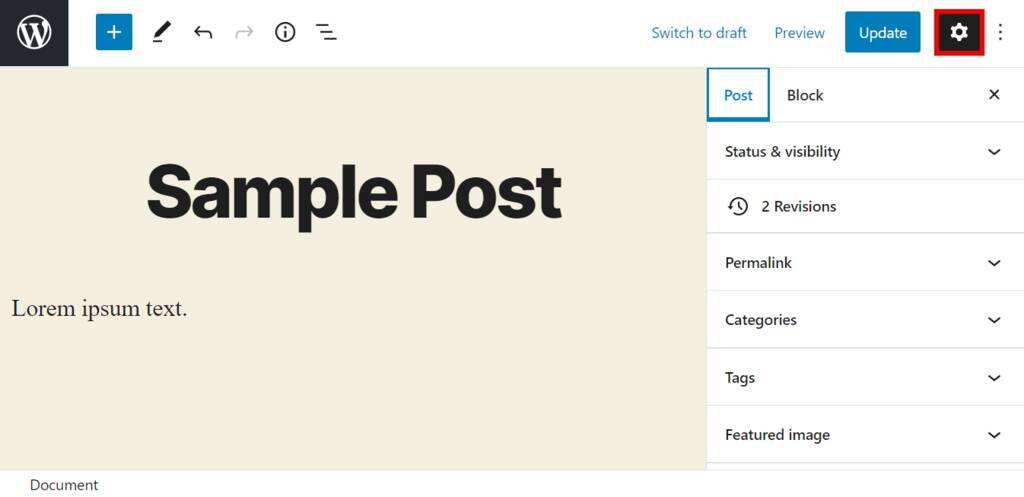
- Locate the categories section and click add New Category.
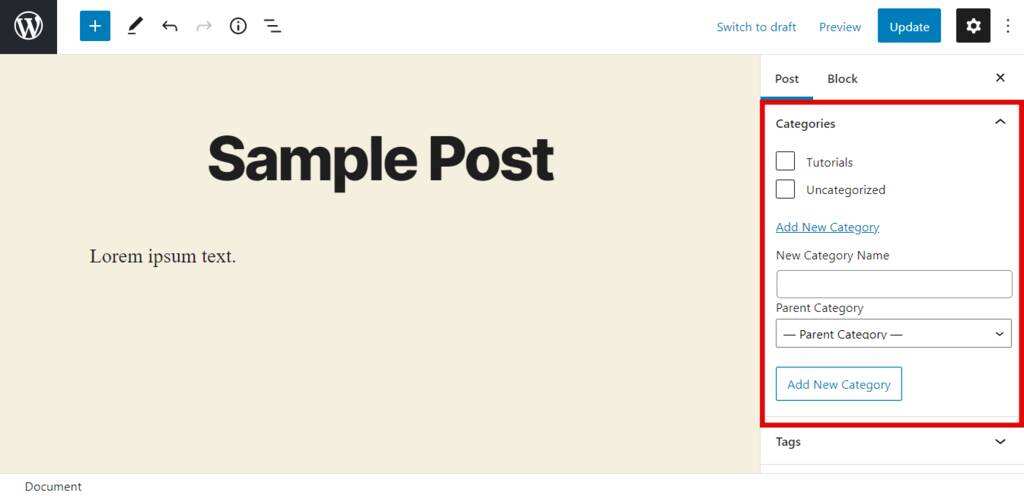
- Fill in the new category name and select the parent category, if applicable.
- Press the add New category button and click Update.
Set the default classification in WordPress
If you do not assign a category to a blog post or page, WordPress automatically sets the default category Uncategorized.
If there are no other classification options, the unclassified classification cannot be deleted, but it can be renamed. However, make sure that the site is not running, because you will also change the slug. This means that the URL of the classification page will also change.
Editing slug on a real-time website may result in a 404 error. Visitors will not be able to access your blog posts and will need to redirect the old links to the new URL.
Here is how to rename an unclassified classification in WordPress:
- Navigate to the article-& gt; category from the WordPress administration panel.
- Hover over Uncategorized and click Edit.
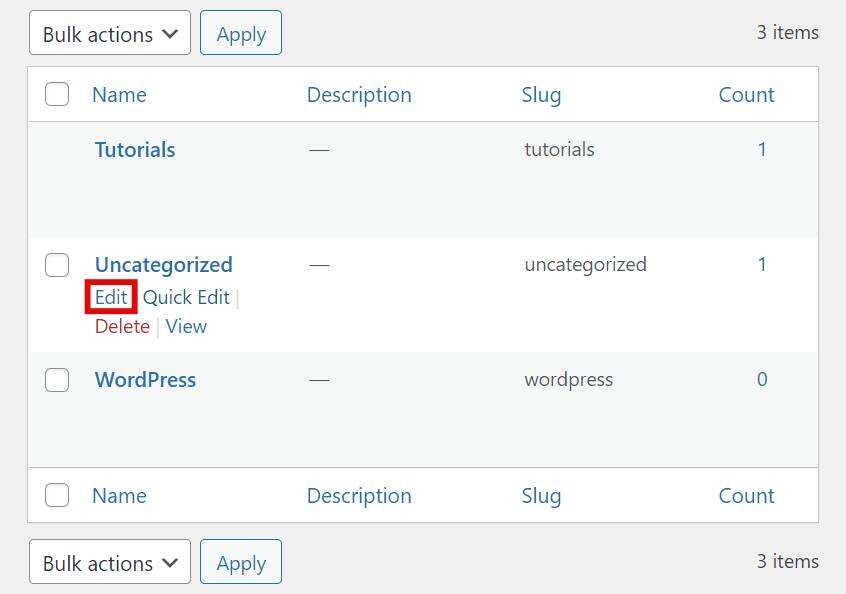
- Change its name and Slug to the category you want to set as the default.
- Press Update.
If the site has added categories, here is how to set one of them as the default category:
- On the WordPress administration panel, hover over the settings and select write.
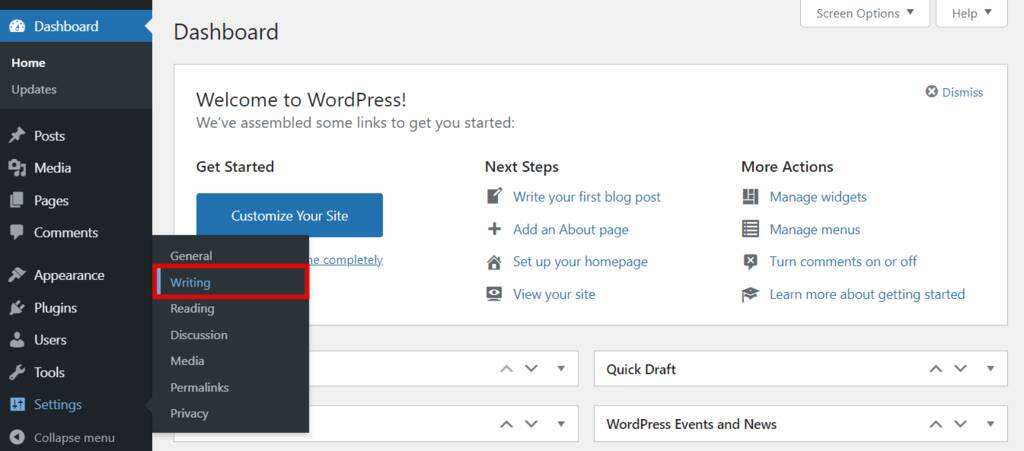
- Locate the default article category and click the drop-down menu.
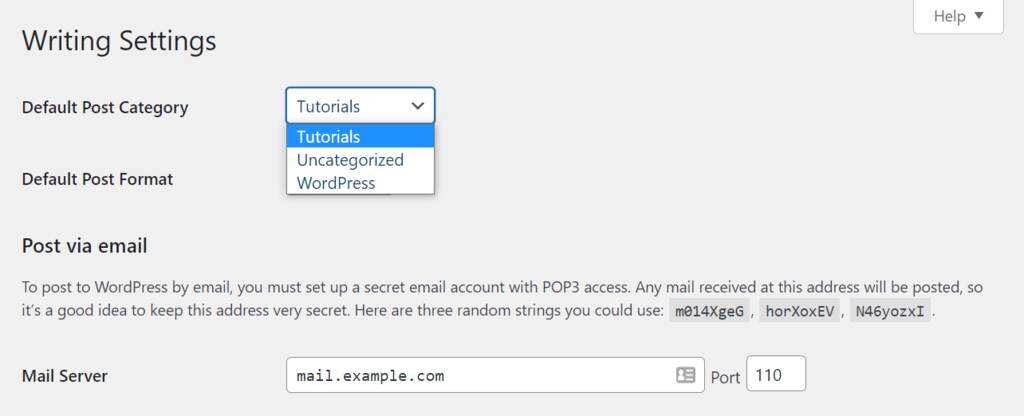
- Select the category you want to set as the default, and then press Update.
Once you have set a new default classification, you can delete the unclassified classification. You can keep it, but we recommend renaming it to use the classification page.
How to edit a classification in WordPress
For users who already have a classified list, you sometimes need to make some changes. You do not need to delete a classification and create a new classification because you can rename it, change the classification label, or describe it.
To edit a classification in WordPress, use the Quick Edit or edit options.
Through Quick Edit option
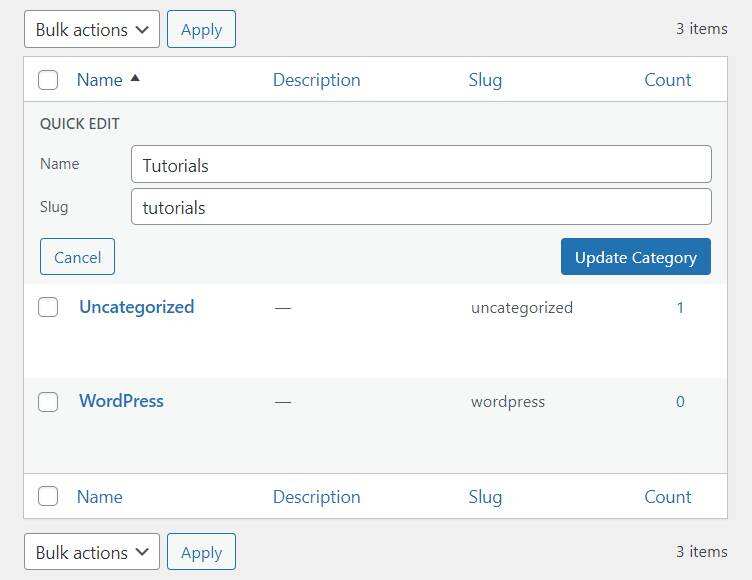
If you only want to edit the category name and slug, follow this tutorial:
- In the WordPress administration panel, go to Posts-& gt; Categories.
- Hover over the category you selected and select Quick Edit.

- Change its name and slug, and then press Update Category.
By editing option
The following are the steps for users who need to edit the parent classification and description:
- Click the article-& gt; category on the WordPress Management sidebar.
- Hover over the category you want to configure and select Edit to direct to its page.

- Change or add details-Name, Slug, Parent Category, Description.
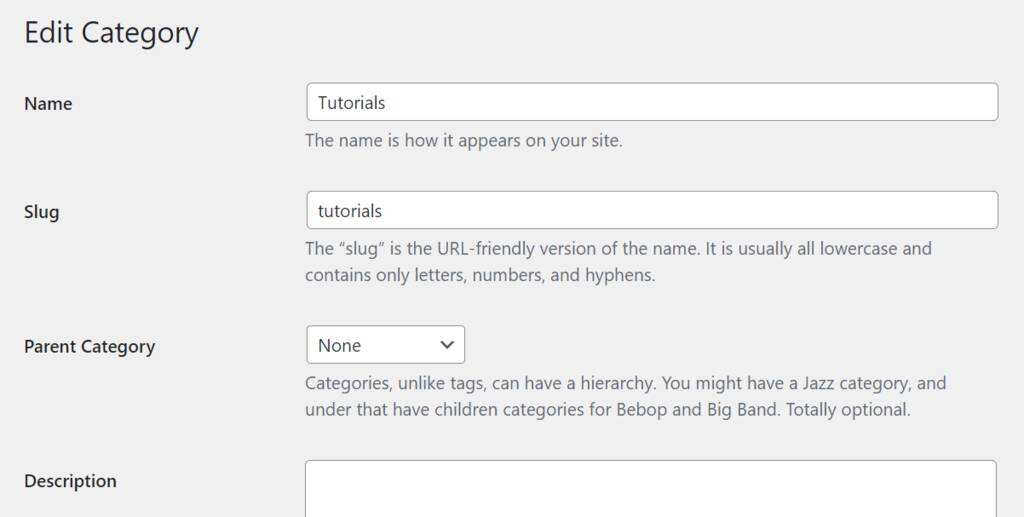
- Press Update to save the changes.
How to delete a WordPress classification
When managing classifications in WordPress, you may need to delete an unused category. The process of deleting a classification is very simple. You can delete one or more categories at a time.
Delete a specific category
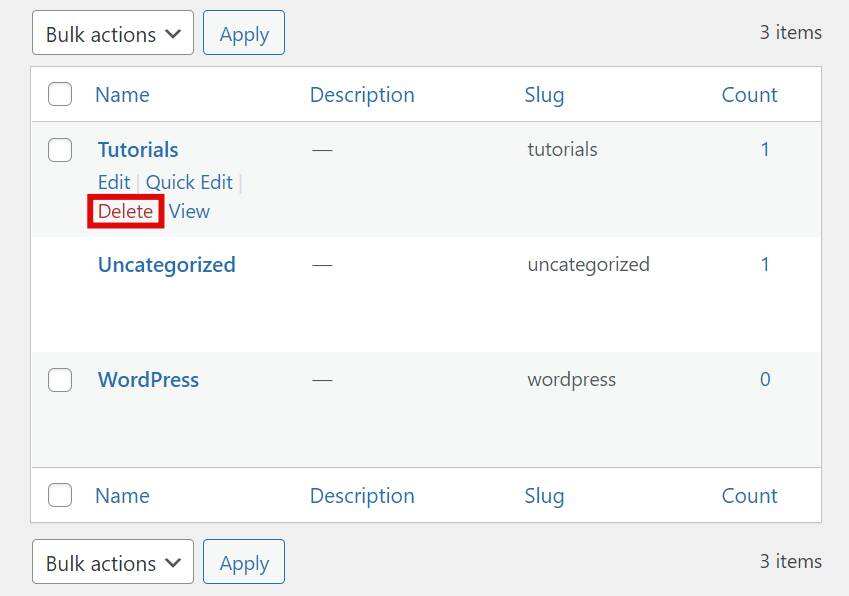
To delete a single classification, follow these tutorials:
- Access the WordPress dashboard and navigate toArticle-& gt; classification.
- Hover over a category and click the Delete button when it appears.
Batch deletion
If you want to delete categories in bulk, the method is as follows:
- In the WordPress dashboard, go toArticle-& gt; classification.
- Check the box next to the category you want to delete.
- Click the bulk Action drop-down menu and select Delete.
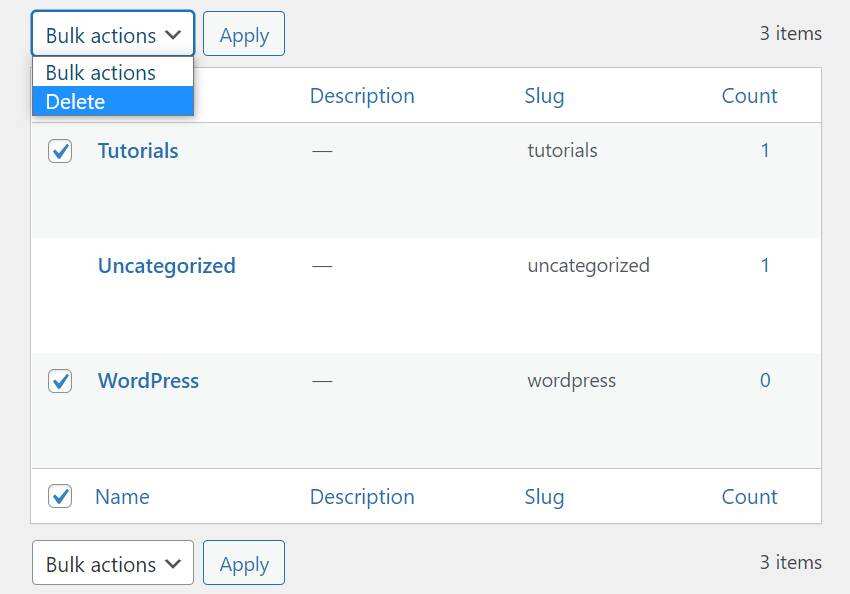
- Press apply.
Best practices for WordPress classification
The correct use of classification can help improve the ranking of articles on the search engine results page (SERP). Because classification helps provide structure for your site, search engine crawlers will be able to view them to easily move from one page to another and find out the content of that site.
Here are some of the best actions you can follow:
1. Create site structure and classification strategy
Before you start adding all the categories you think of, make sure that the site structure is ready. The blueprint will help determine the number of classifications required and whether subclassifications are needed. In addition, it will prevent duplication of content.
Try to keep the structure simple because it is easier to propose a classification strategy or hierarchy.
two。 Use correct keywords and avoid unnecessary classification
Search engines can also rank WordPress classified pages. Be sure to include keywords related to content and site niches. Avoid using irrelevant, unnecessary or inappropriate classifications to reduce the risk of punishment.
To do this successfully, do keyword research and pay attention to the classifications used by competitors.
3. Fill in the classification instructions
Do not leave the description field blank when adding a new category. High-quality classification descriptions will help to classify the SEO of the page. Explain what the classification is about or what it represents, and insert relevant keywords.
If you publish multiple articles under a category, the classified archive is also likely to rank well on SERP. Classified files can also be used as login pages because they guide visitors and search engine crawlers through the site.
4. Remove / category/ from article URL
The link structure for articles that belong to the WordPress category is usually as follows:
www.yoursite.com/category/postname
Implement simpler, shorter permanent links for SEO purposes. Omit / category/ from URL and use only / postname as WordPress slug. Although the article does not appear on its permanent link, it still belongs to this category.
Summary
WordPress classification is a predefined classification element that helps to classify articles, usually by topic or content type. Therefore, when managing WordPress sites, it is important to make sure that all articles are classified.
Categories define the content hierarchy and help visitors navigate through articles. They also help search engines find out the content of the site in the crawling process.
Dealing with classification does not require much technical knowledge. Just follow the tutorials above:
- Add a new category to WordPress through the categories page or the Gutenberg editor.
- Edit the classification with the Quick Edit or Edit options.
- Delete the classification in WordPress.
Since WordPress classification is an important part of site navigation and SEO, be sure to implement the best practices we have listed.

