One of the website performance testing tools we mentioned in the article “website Speed performance testing tutorial [with 15 commonly used website Speed testing tools] is Google PageSpeed Insights, which is one of the online development tools often used by front-end developers.” Google PageSpeed Insights can comprehensively test all aspects of the website, evaluate and give corresponding suggestions, so as to facilitate technical development to optimize the website pertinently.
for a perfect WordPress webmaster, he expects his site to get a higher Google PageSpeed Insights score, and the higher the score, the better your site is optimized.
Today, we will share with you some tips and strategies to help your WordPress site get higher scores in Google PageSpeed Insights.
the core content of this article includes: the importance of
- “1 Google PageSpeed Insights”
- # 2 how to achieve full score in Google PageSpeed Insights test
- 2.1 enable Gzip compression
- 2.2 optimize picture volume
- 2.3 remove blocked rendering resources
- 2.4 enable browser cache
- 2.5 reduce server response time
- 2.6 minimize JavaScript
- 3 other PageSpeed improvements
hide
Google PageSpeed Insights is a summary of the importance of
1 Google PageSpeed Insights A website performance testing tool developed and designed by Google It can help you to perform all-round optimization of the website according to the best optimization recommendations.
as of 2018, the speed score is now calculated through Lighthouse (Lighthouse), Lighthouse is an open source automation tool created to improve the quality of web pages. Lighthouse can actually check the front end of the site, such as performance, accessibility, progressive Web applications, and so on.
Google PageSpeed Insights website
, but one of the very important things to remember is that you shouldn’t always be obsessed with a perfect score of 100. Because for some websites, this perfect goal is almost impossible. For example, very powerful and complex themes, e-commerce and member sites, these sites are relatively complex, and getting full marks is like going to the sky.
we should focus more on the speed of the site than on the score. The scores of speed tools such as Pingdom,GTMetrix and Google PageSpeed Insights can sometimes lead you astray. What really matters is to make sure that your site loads quickly and that the perceived performance is up to standard. Perceived performance refers to the loading speed felt by users of your site.
- in addition, the website loading speed has also become one of the criteria for search engines to rate websites, so this part of the operation can not be ignored if website SEO optimization is to be effective. About WordPress website SEO, you can also follow our series of related plug-ins:
- Smart SEO Tool-easy-to-use WordPress blog SEO optimization plug-in
- Baidu search push management WP plug-in Pro version-improve Baidu collection efficiency
- Spider Analyser-WordPress search engine spider statistical analysis plug-in
popular keyword recommendation plug-in Pro-WP search keyword recommendation plug-in
Google will use PageSpeed Insights? Does
use PageSpeed Insights in terms of SEO and page speed ranking factors or pure response speed? Gary Illyes, a trend analyst for Google webmasters, responded: “I would choose both.” Part of the reason for
is that in most cases, when your site is slow, you are likely to receive a lot of warnings in Google PageSpeed Insights. Many suggestions are closely related to their relationship to pure response time. They are not always 100% relevant, but Gary also mentioned that if your site is slow, it can affect your ranking.
Google further enhanced website loading speed on site ranking weights in 2018. Previously, page speed rankings were measured by the speed at which your site loads on the desktop system. But as of July 9, 2018, page speed has also become a ranking factor in mobile search. This means that optimizing your WordPress mobile device is more important than ever!
this tutorial we will take WordPress default theme Twenty Seventeen as an example, install Google Analytics,Akismet,Yoast SEO, etc., and then use PageSpeed Insights to perform analysis and evaluation, optimize them one by one based on scoring recommendations, and finally achieve 100 points for both desktop and mobile devices using WordPress website PageSpeed Insights. Although
is a small website, it can at least help you understand how Google PageSpeed Insights works and how to complete various optimizations based on PageSpeed Insights recommendations, so that the site can get a satisfactory score, and the most important thing is to improve the loading speed of the website.
testing 2 how to achieve full Google PageSpeed Insights test score
- Yoast SEO
- Akismet
our test site is installed on the Apache host and uses WordPress’s default theme template Twenty Seventeen Theme, the website is configured with SSL and installed the following plug-ins.
We also insert the Google statistics code Google Analytics into the
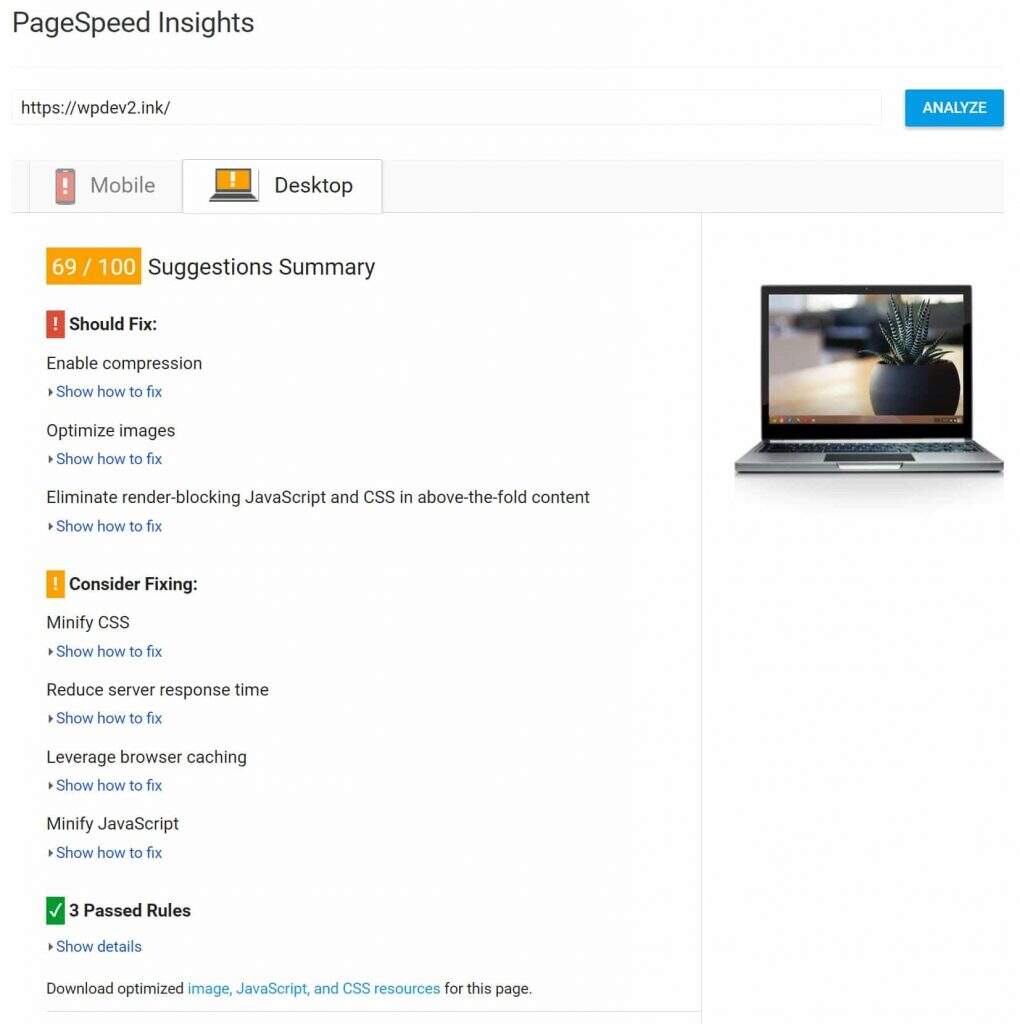
of the header.php file. The only change we have made is to add feature images to the default “Hello world!” In the article. We ran our test site through Google PageSpeed Insights and got 69 desktop scores and 58 mobile scores, with a pitifully low default score. Let’s take an in-depth study of each optimization point and get the highest evaluation score possible.
Screenshot of Google PageSpeed Insights evaluation score before optimization
2.1 enable Gzip compression
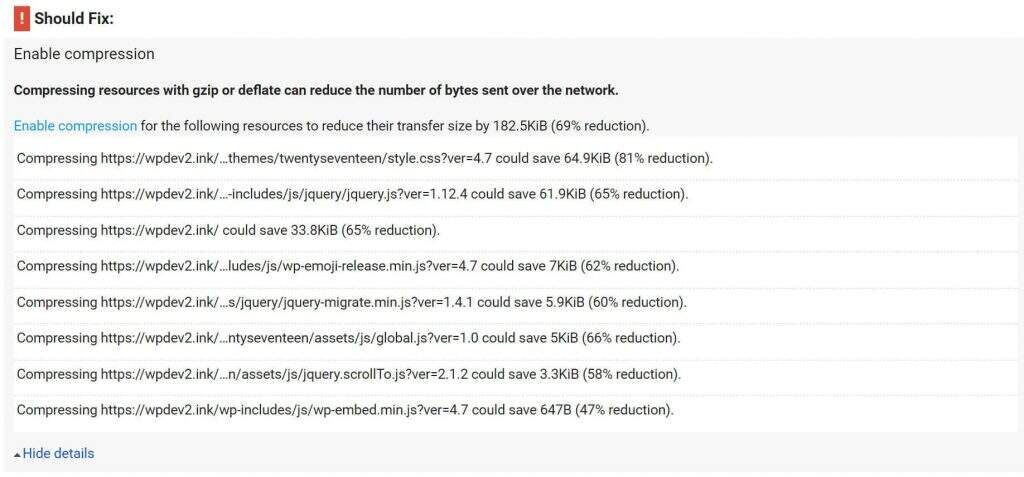
We will start with the desktop program optimization point recommendations, because many of the optimization point recommendations also apply to mobile devices. We can see that the first point that Google PageSpeed Insights recommends that needs to be fixed is to enable compression warnings.
enable Compression recommendation
according to Google, in order to solve this problem, we need to enable Gzip compression. Some server management backend provides the enable option, otherwise we must do this manually.
all modern browsers support and automatically negotiate the use of Gzip compression for all HTTP requests. Enabling Gzip compression reduces the size of transmitted responses by up to 90% which can significantly reduce the time it takes to download resources reduce data usage on the client and shorten the time it takes to render a page for the first time.
you can achieve Gzip compression in several ways. The first and simplest one is to use a caching plug-in that supports enabling Gzip. For example, the WP Rocket plug-in uses the mod_deflate module to add Gzip compression rules to the .htaccess file. The W3 Total Cache plug-in can also be enabled for you through the performance section settings. The second way for
  # Compress HTML, CSS, JavaScript, Text, XML and fonts
  AddOutputFilterByType DEFLATE application/javascript
  AddOutputFilterByType DEFLATE application/rss+xml
  AddOutputFilterByType DEFLATE application/vnd.ms-fontobject
  AddOutputFilterByType DEFLATE application/x-font
  AddOutputFilterByType DEFLATE application/x-font-opentype
  AddOutputFilterByType DEFLATE application/x-font-otf
  AddOutputFilterByType DEFLATE application/x-font-truetype
  AddOutputFilterByType DEFLATE application/x-font-ttf
  AddOutputFilterByType DEFLATE application/x-javascript
  AddOutputFilterByType DEFLATE application/xhtml+xml
  AddOutputFilterByType DEFLATE application/xml
  AddOutputFilterByType DEFLATE font/opentype
  AddOutputFilterByType DEFLATE font/otf
  AddOutputFilterByType DEFLATE font/ttf
  AddOutputFilterByType DEFLATE image/svg+xml
  AddOutputFilterByType DEFLATE image/x-icon
  AddOutputFilterByType DEFLATE text/css
  AddOutputFilterByType DEFLATE text/html
  AddOutputFilterByType DEFLATE text/javascript
  AddOutputFilterByType DEFLATE text/plain
  AddOutputFilterByType DEFLATE text/xml

  # Remove browser bugs (only needed for really old browsers)
  BrowserMatch ^Mozilla/4 gzip-only-text/html
  BrowserMatch ^Mozilla/4.0[678] no-gzip
  BrowserMatch bMSIE !no-gzip !gzip-only-text/html
  Header append Vary User-Agent
to enable Gzip compression is to edit the .htaccess file. If your WordPress host uses an Apache server, you just need to add the following code to the .htaccess file. You can find the .htaccess file in the root directory of the WordPress site through FTP.
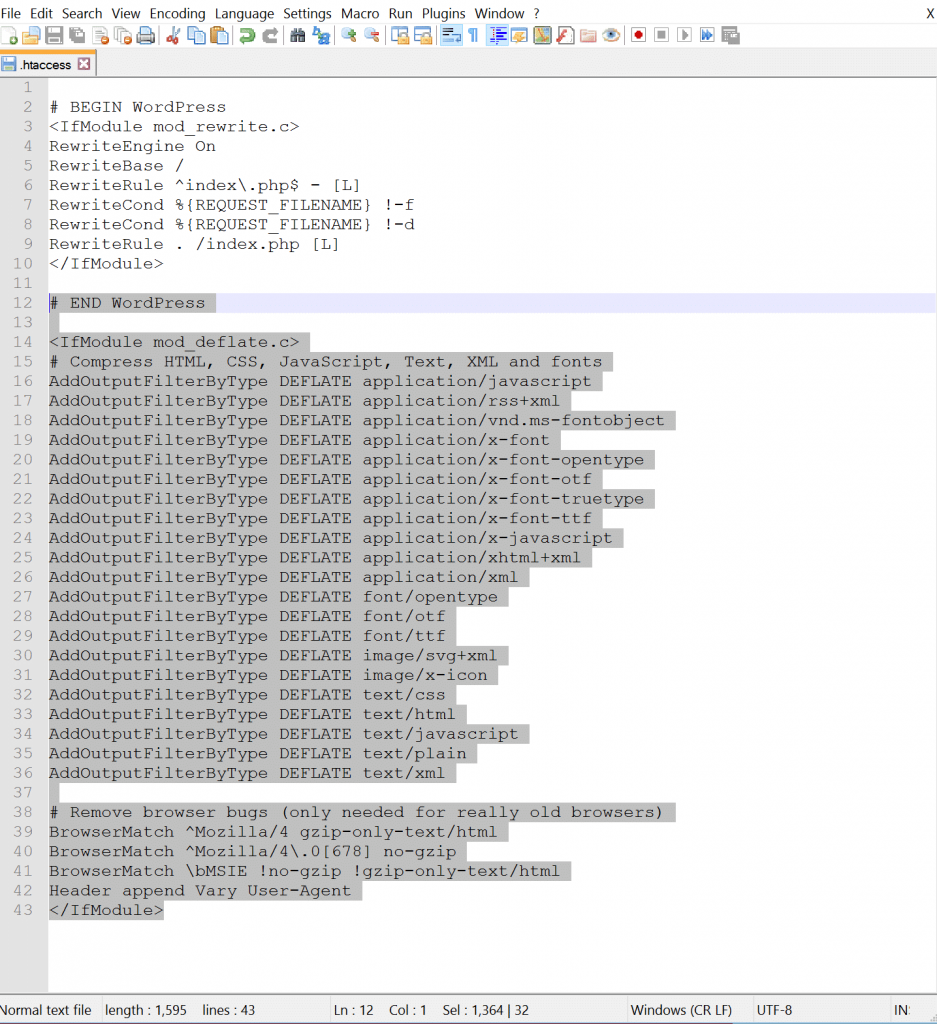
is sure to add it under the current contents of the .htaccess file. The example is as follows:
add GZIP compression code
gzip on;
gzip_disable "MSIE [1-6].(?!.*SV1)";
gzip_vary on;
gzip_types text/plain text/css text/javascript application/javascript application/x-javascript;
if your WordPress site is running on a NGINX server, simply add it to your nginx.conf file.
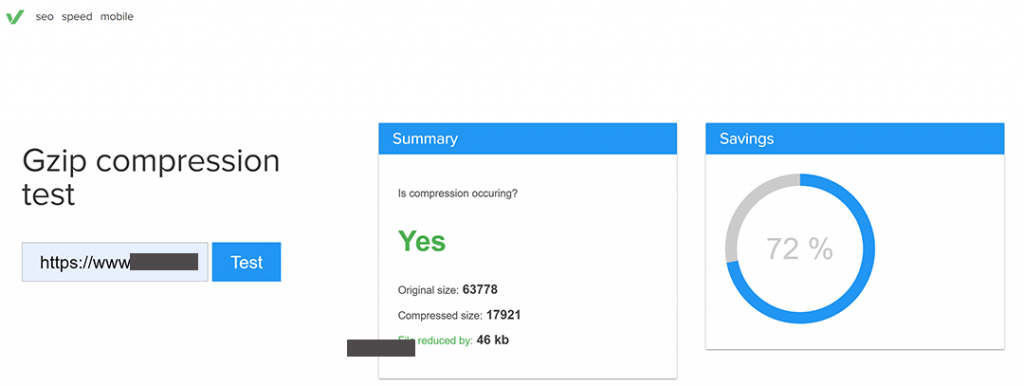
if you want to check whether your website Gzip compression is turned on successfully, you can use the varvy gzip detection tool. The following is a screenshot of our test site with Gzip compression enabled:
GZIP Compression enabled status Detection
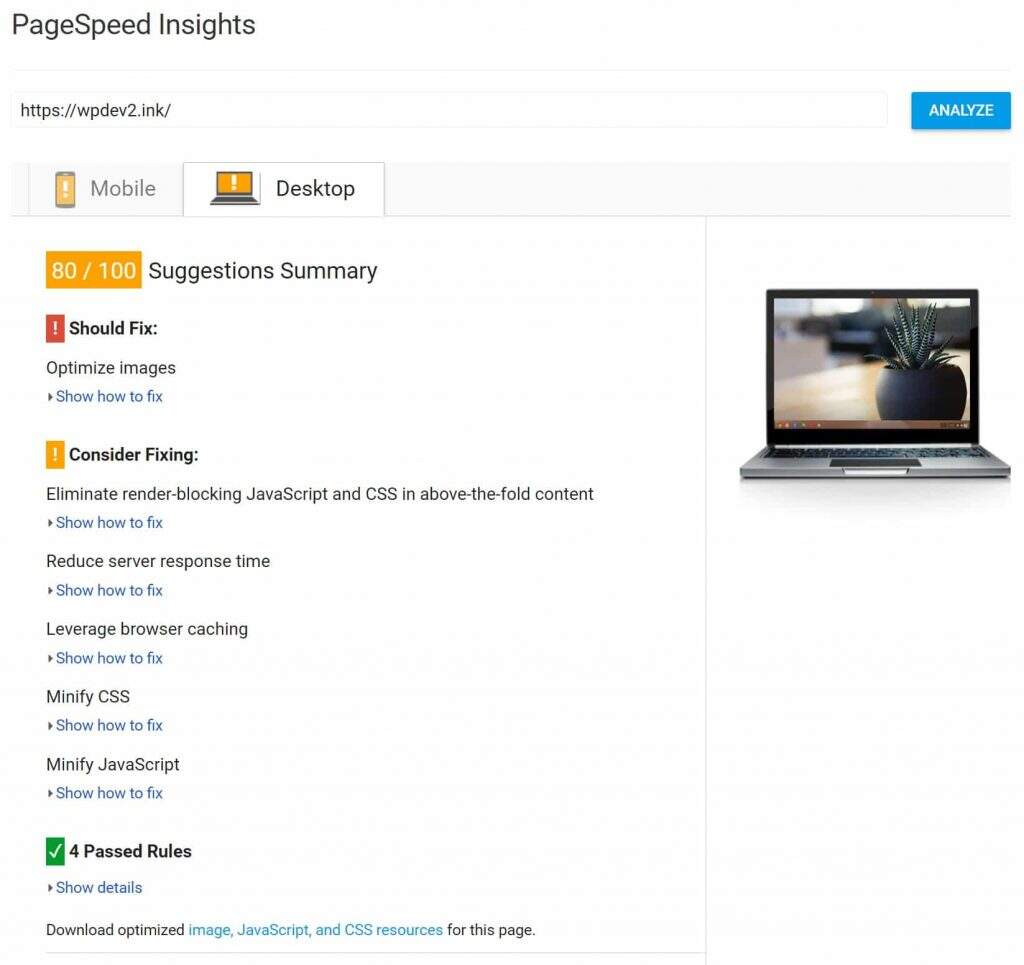
if we run our test site detection through Google PageSpeed Insights again, we can see that the warning that Gzip compression is on has disappeared, and the desktop device score has increased from 69 to 80, and the mobile device score has increased from 58 to 67.
enables GZIP compression after PageSpeed Insights scores
2.2 optimize picture volume
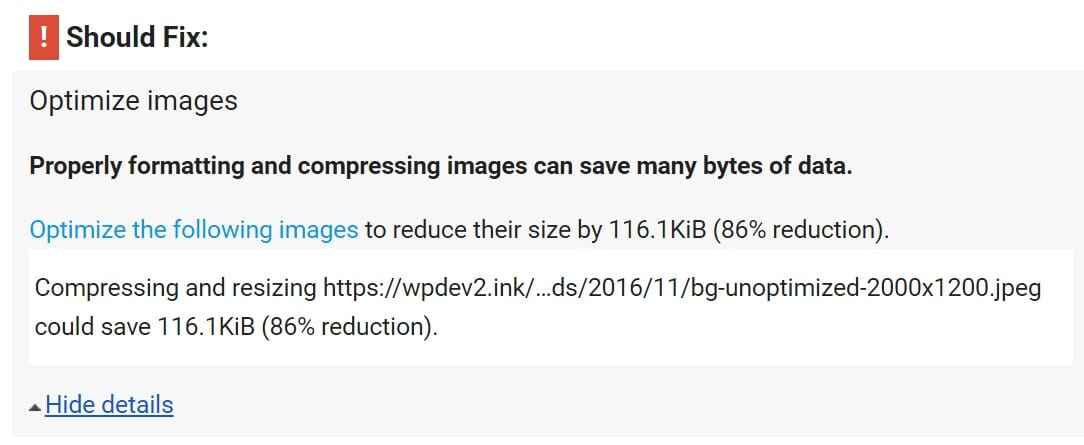
the next Google PageSpeed Insights recommendation we need to fix is a warning to optimize images. Earlier we mentioned the default “Hello world!” for WordPress themes The article added a feature picture, there will be such a hint.
optimized Picture warning
this is a very important and useful warning. As of December 2018, pictures accounted for an average of 50% of the page’s total volume, according to HTTP Archive. Optimizing images may be one of the easiest ways to improve the performance of WordPress sites.
- Imagify Image Optimizer
- Optimus Image Optimizer
- ShortPixel Image Optimizer
- WP Smush
- TinyPNG
has several ways to solve this problem. One of them is to use the WordPress image optimization plug-in. Plug-ins can actually optimize the entire WordPress library in batches and automatically optimize them when uploading. Here are some popular image optimization plug-ins: plug-ins such as
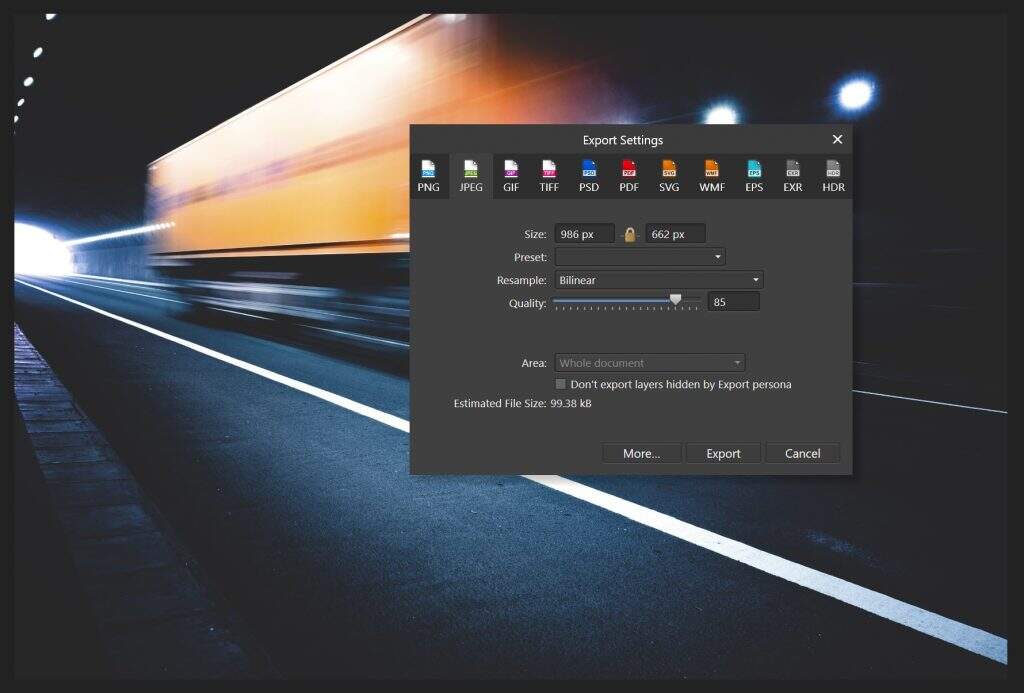
will solve the problem of too large images, or you can use tools such as Adobe Photoshop,Gimp or Affinity Photo to compress them before uploading them. Here are the feature pictures that triggered the warning. We can pre-compress it by shrinking and reducing the quality. It is best to keep the image as small as possible. The initial volume of this image is 2.32 MB. After reduction and compression, the volume can be compressed to 99.38 kB. Keep in mind that it is best to resize the image to the best size and volume before uploading, rather than relying on CSS to resize the image. Otherwise, this will slow down your website.
uses Affinity Photo to compress images
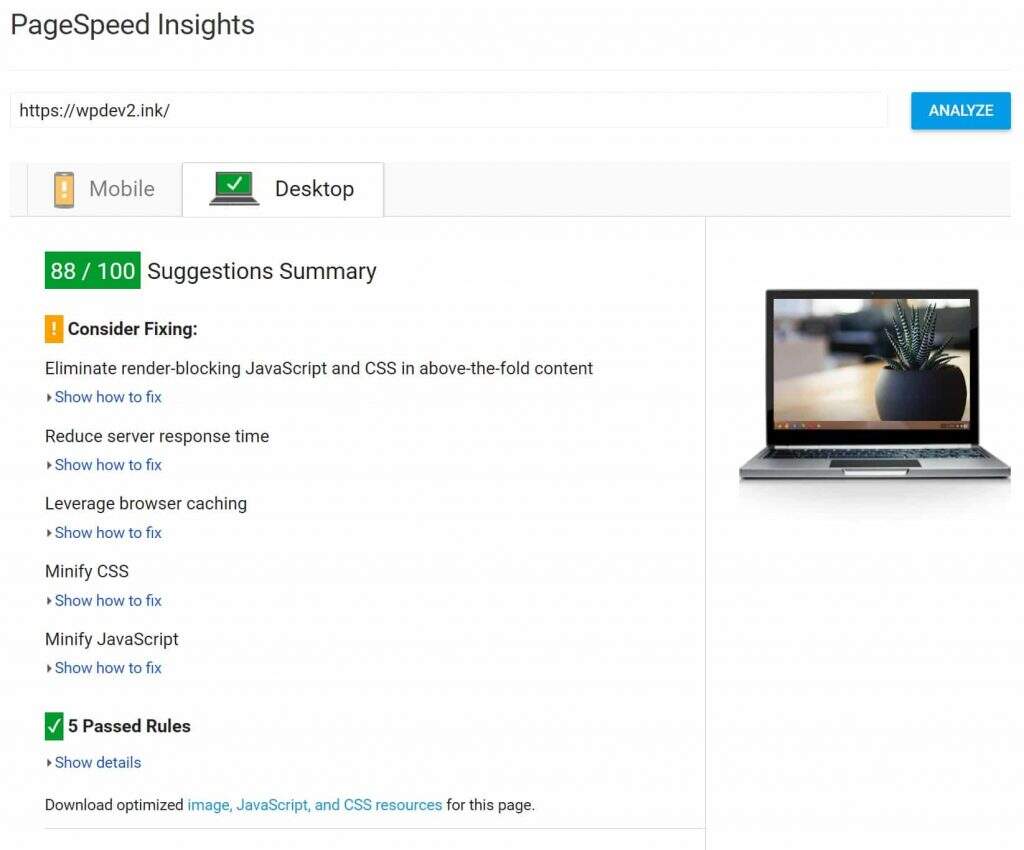
if we run the test site through Google PageSpeed Insights again, we can see that the optimized image warning has now disappeared, and the desktop score has increased from 80 to 88 and the mobile device score has increased from 67 to 73.
compressed image evaluation score
recommended reading: WordPress webmaster essential image capture and download plug-in and library network
2.3.remove blocking rendering resources
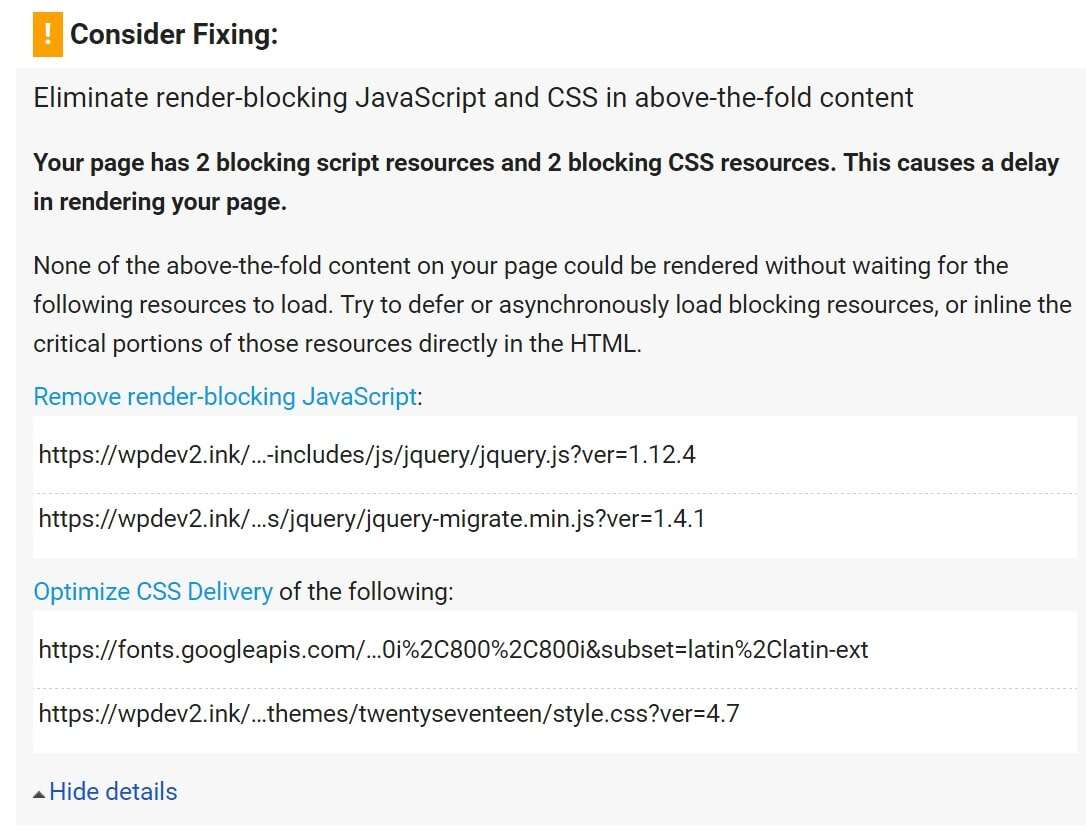
. Next, the next Google PageSpeed Insights recommendation that we need to fix is to remove blocking rendering resources JavaScript and CSS in the first drawing page.
removes resources blocking rendering warning
when a browser loads a web page, JavaScript and CSS resources usually prevent the web page from being displayed before the browser downloads and processes it. Before you can display anything, you need to download and process some resources. However, many CSS and JavaScript are not needed when drawing a page for the first time. To provide the fastest experience for users, you should try to remove resources that block rendering.
- has three suggestions for removing the blocking rendering resource Javascript,Google:
- if the page does not have a lot of JavaScript and is relatively small, you can solve this problem inline. You can use plug-ins such as Autoptimize to inline JavaScript. However, this actually applies only to very small sites. Most WordPress sites have more than three JavaScript, which is generally applicable. The second type of
- is to load JavaScript asynchronously. Asynchronous Javascript essentially downloads the file during HTML parsing and pauses the HTML parser to execute it after the download is complete. The third is delayed loading of
JavaScript. The defer property also downloads the file during HTML parsing, but it executes only after the parsing is complete. In addition, scripts with this property are executed in the order of appearance on the page. Read the article about the difference between asynchrony and latency
in our example, we will load JavaScript asynchronously. To do this, we will use a free plug-in called Async JavaScript. You can download it from the WordPress plug-in library or search for installation under “plug-ins & gt; installation plug-ins” in the WordPress dashboard. As of this writing, it currently has 8w + valid installations with a star rating of 4.5. In essence, the plug-in uses WordPress’s wp_enqueue_script function to add “async” or “defer” attributes to all JavaScript. The developer also provides an advanced version that allows you to select scripts to be asynchronous or delayed.
Asynchronous loading exampl
Delayed loading exampl After the
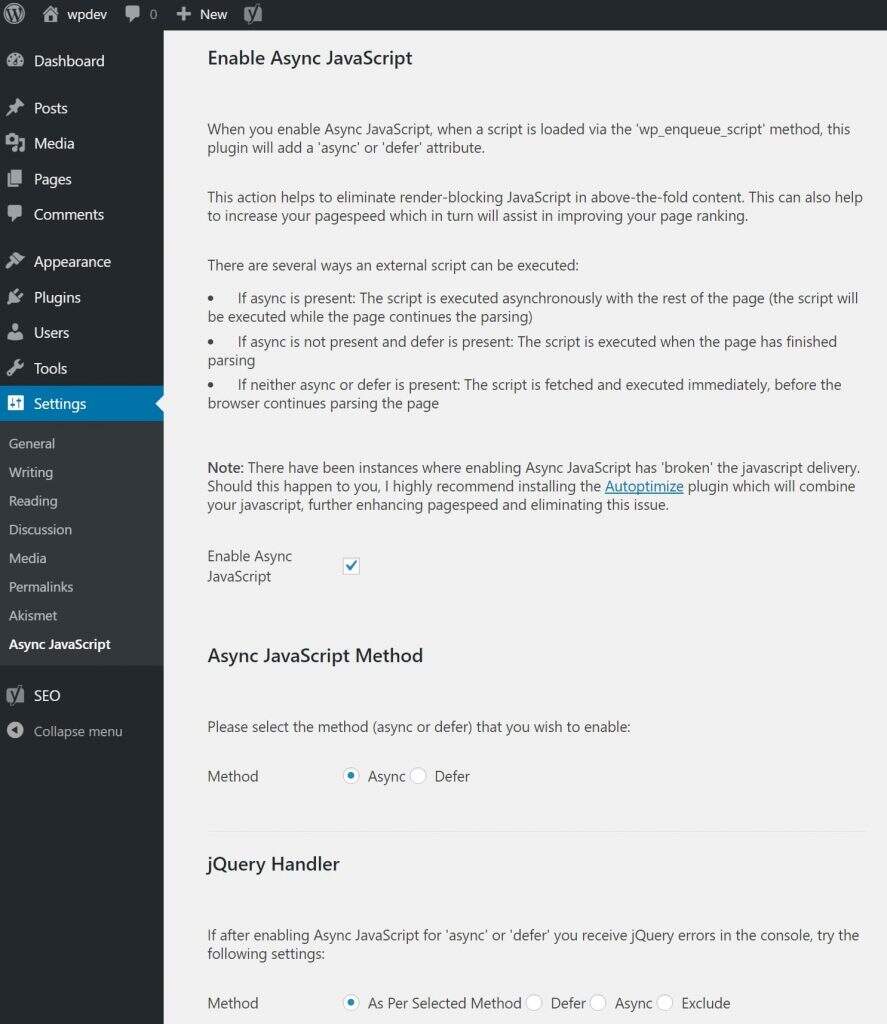
installation is complete, simply enter the setup and enable Async JavaScript.
asynchronously loads JavaScript

Async exclusions
for larger websites, script exclusion can come in handy. Or get an advanced version of the plug-in. We don't need it in this optimization example, but if you have a site with a lot of JavaScript, simply setting the JS file to Async or Defer may outweigh the gain. In this case, you need to prescribe the right medicine and optimize different JS scripts separately.
/*function to add async to all scripts*/
function js_async_attr($tag){
 # Add async to all remaining scripts
 return str_replace( ' src', ' async="async" src', $tag );
}
add_filter( 'script_loader_tag', 'js_async_attr', 10 );
if you do not want to use plug-ins for this, you can also do so by modifying the code. For example, add the following code to the functions.php file.
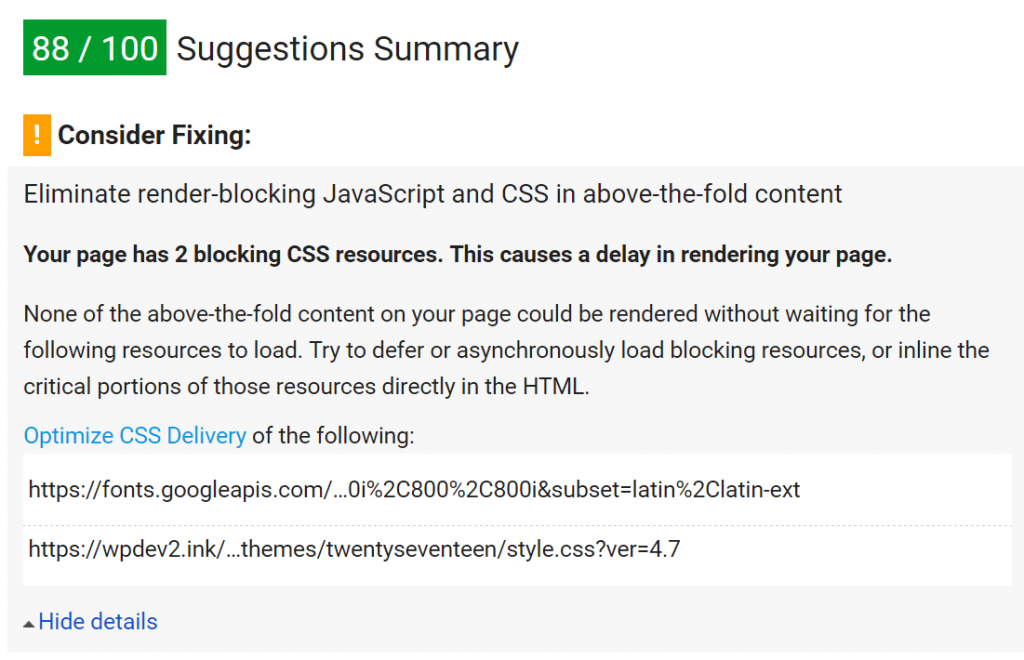
We run the website test again through Google PageSpeed Insights, and we can see that the problem of preventing rendering of JavaScript has been fixed, and the next step is to optimize CSS delivery.
optimized CSS delivery prompt
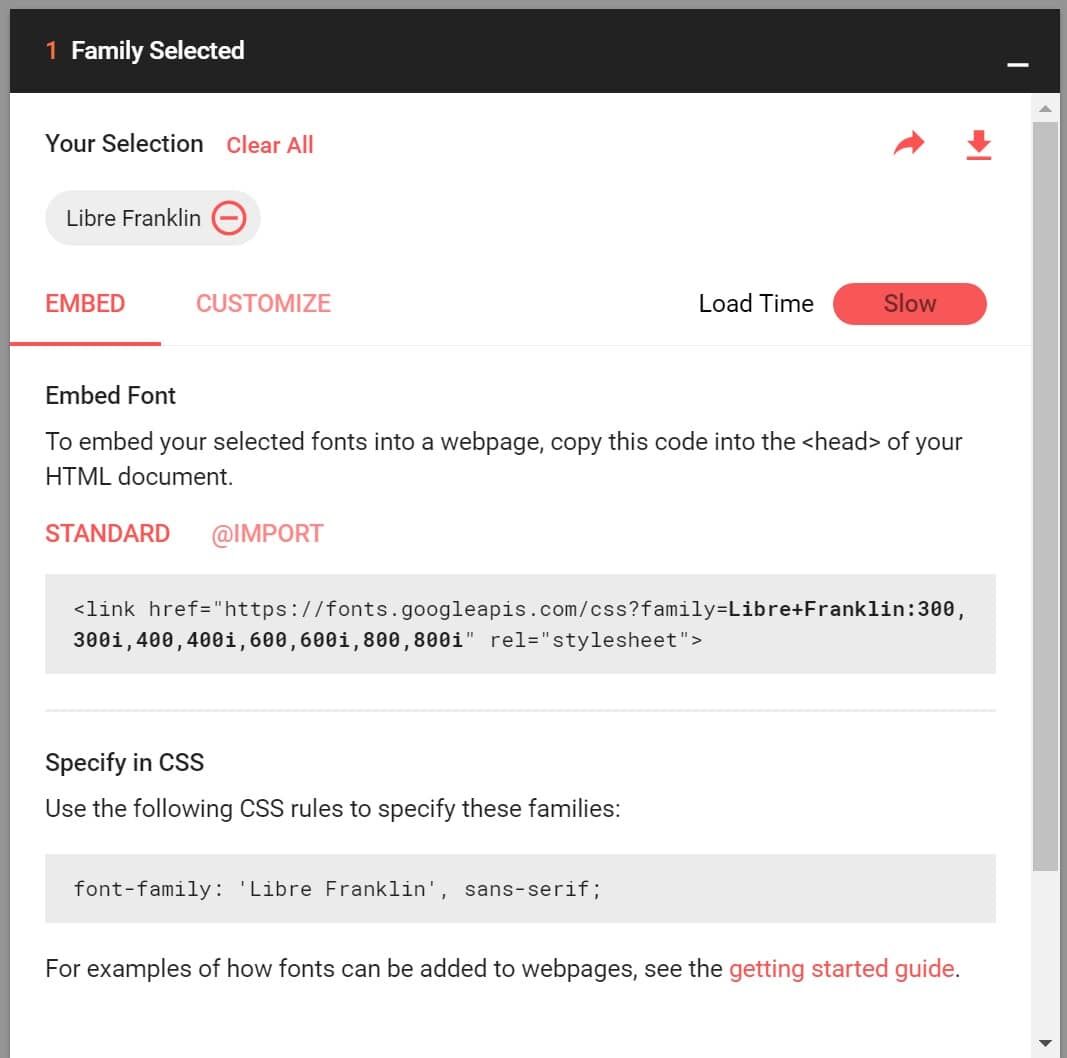
you can see that the first CSS we need to optimize is the Google font (fonts.googleapis.com). CSS is the resource that blocks rendering by default, including CSS from Web fonts. To fix this problem, we will install the free plug-in to disable Google fonts. After installing the plug-in, your Google font will obviously break. Therefore, you need to access the Google font and get the embedded code manually. We chose the same font by default for the Twenty Seventeen theme.
Google fonts are embedded in
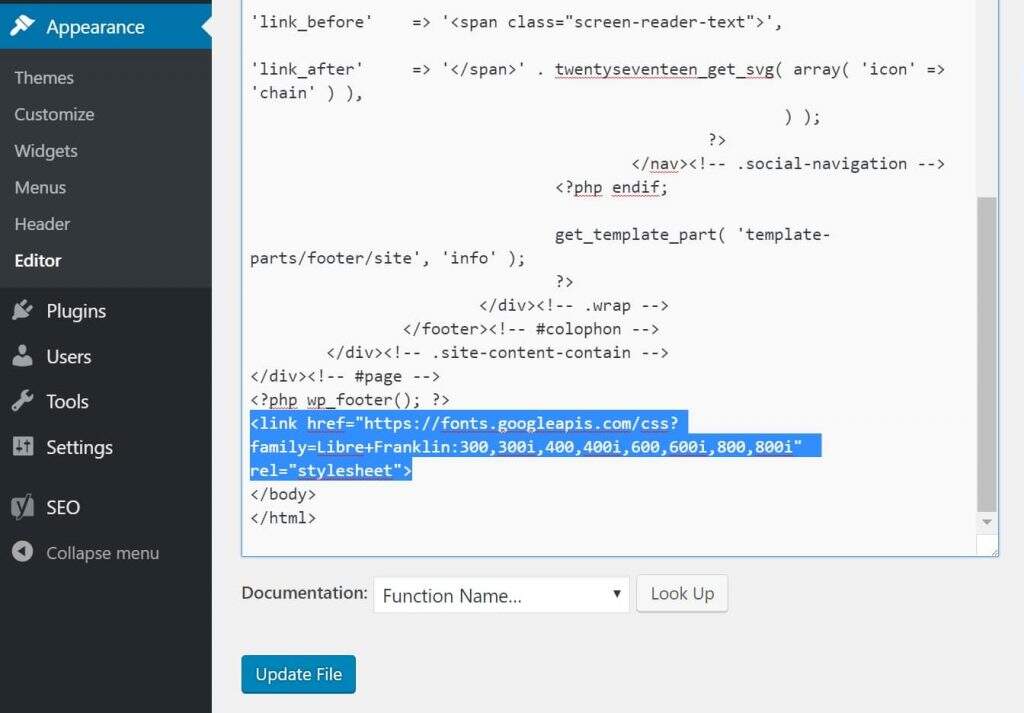
and then you need to add them to the footer.php file, just before the body> tag. Note: doing so produces FOUT, which is what they call styleshless content flashing, which refers to the situation in which Web fonts display unstyled text briefly before downloading and rendering. But it will also get rid of the rendering blocking problem. You need to think about whether FOUT is an acceptable user experience for your visitors. You can also use Google's Web font loader. The Google font
in the footer of
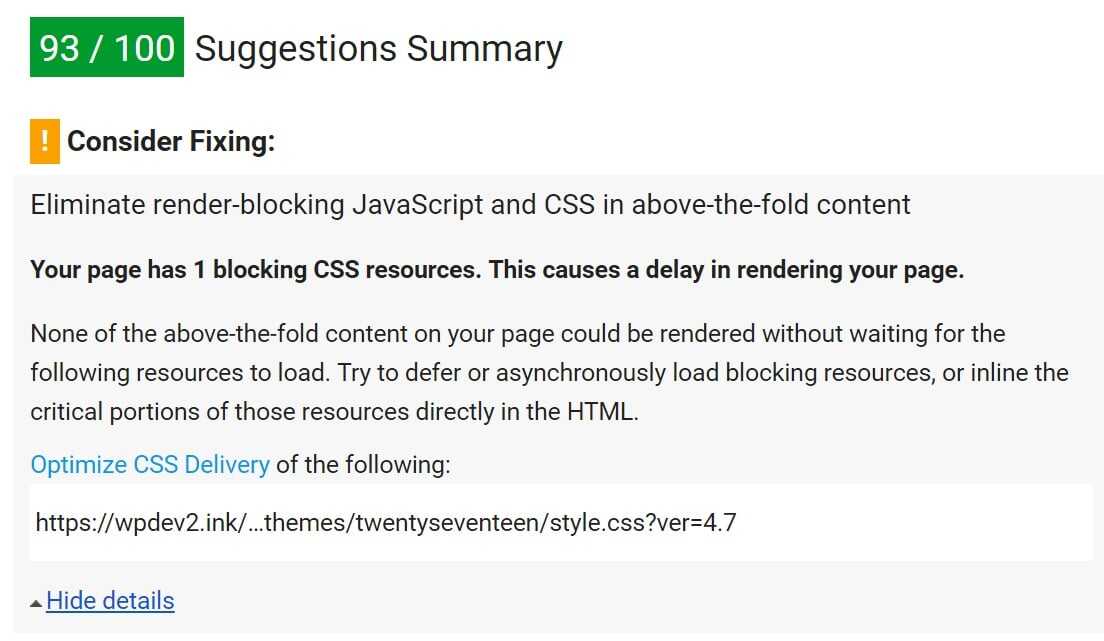
WordPress We ran our test site again through Google PageSpeed Insights and found that there was only one warning left to optimize the CSS sending process, and that is the style.css file.
optimizes the CSS sending process one of the easiest ways to solve this problem is to use a free WordPress plug-in called Autoptimize developed by Frank Goossens.

WordPress plug-in-Autoptimize
is a very lightweight plug-in that is less than 200KB. As of this writing, it currently has more than 1 million valid installations, with a rating of 4.5 stars. The plug-in can help you connect scripts, compress files, out-of-date headers, and move styles to headers and scripts to footers. This plug-in is fully compatible with the previously used Async JavaScript plug-in. After
installs the plug-in, click Settings and select optimize CSS Code. Then click the Advanced tab and enable aggregate inline CSS and inline all CSS. Note that depending on the topic in which you are doing this, it may not recommend using this method. Inline does not apply to large websites, in which case it is actually better to simply ignore specific Google PageSpeed Insights warnings. Keep in mind that with HTTP/2, connections sometimes actually slow down your site.
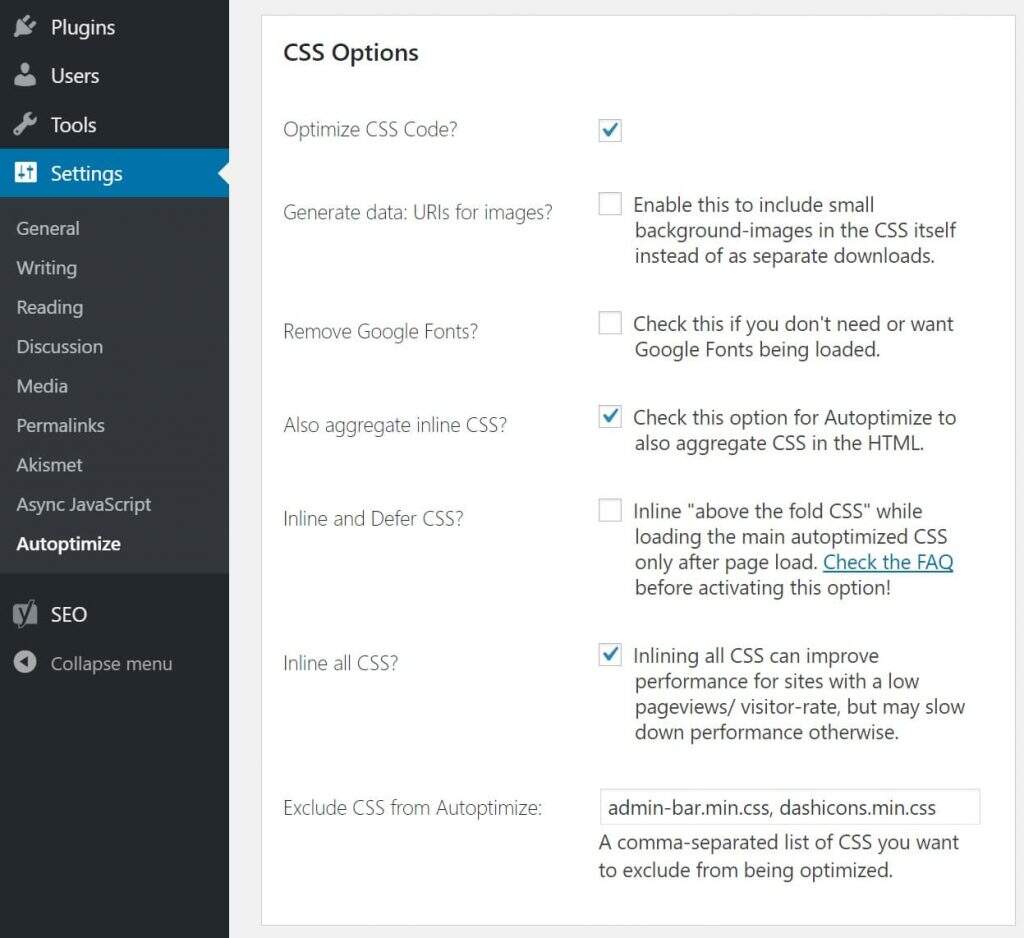
optimize CSS code
We also recommend that you enable the optimize HTML code option.
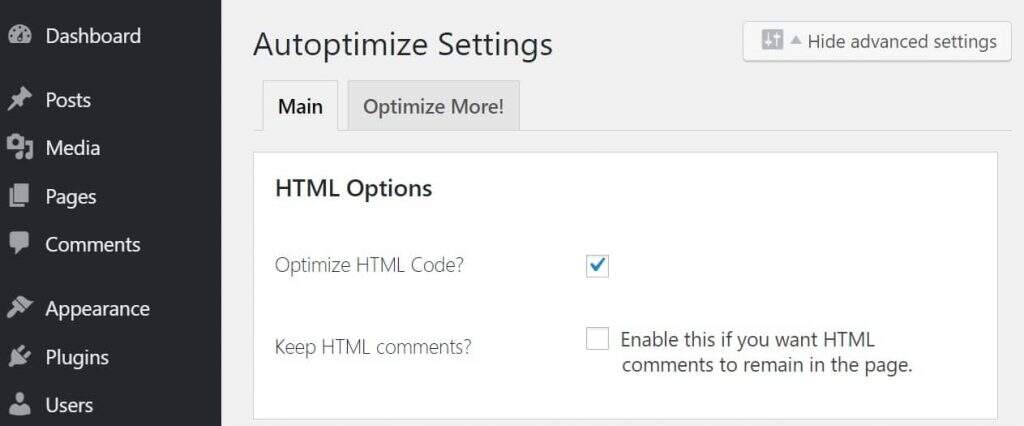
optimizes HTML code
if we run our website through Google PageSpeed Insights again, we can see that the JavaScript and CSS warnings that eliminate render blocking are gone, and it also fixed the Minify CSS warning. So far, we have raised the score for desktops from 88 to 92 and for mobile devices from 73 to 89, and we are getting closer and closer to the goal.
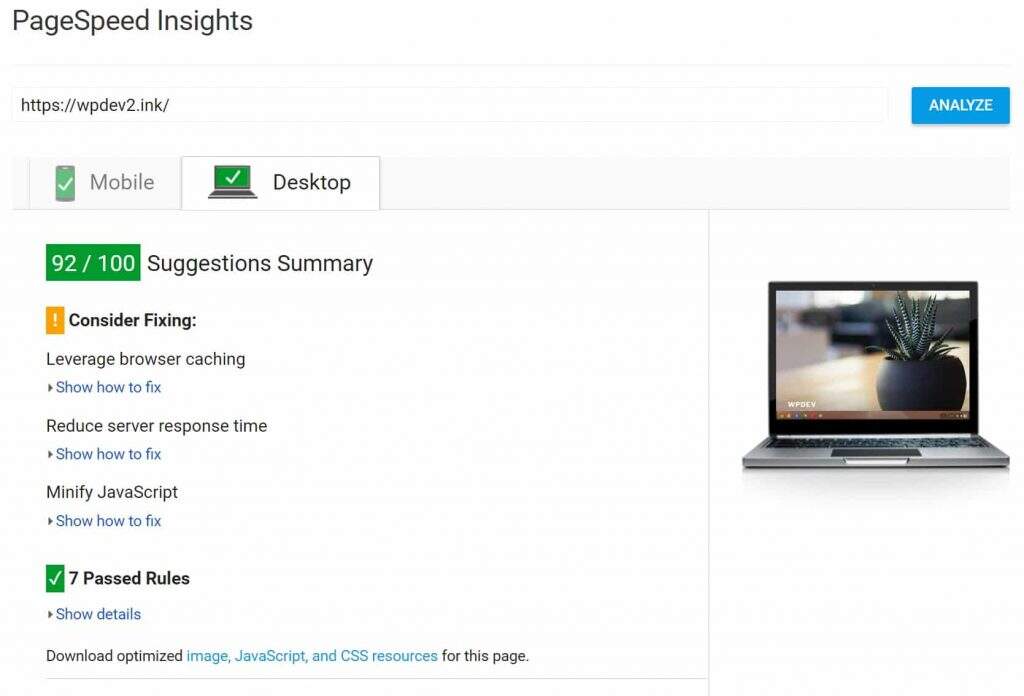
JS and CSS optimized PageSpeed Insights results
2.4 enable browser caching
next Google PageSpeed Insights recommendation, we need to address the site does not configure browser cache warning. In fact, we wrote a previous article on browser caching-"how to use plug-ins / no plug-ins to optimize WordPress site browser caching". The most common reason
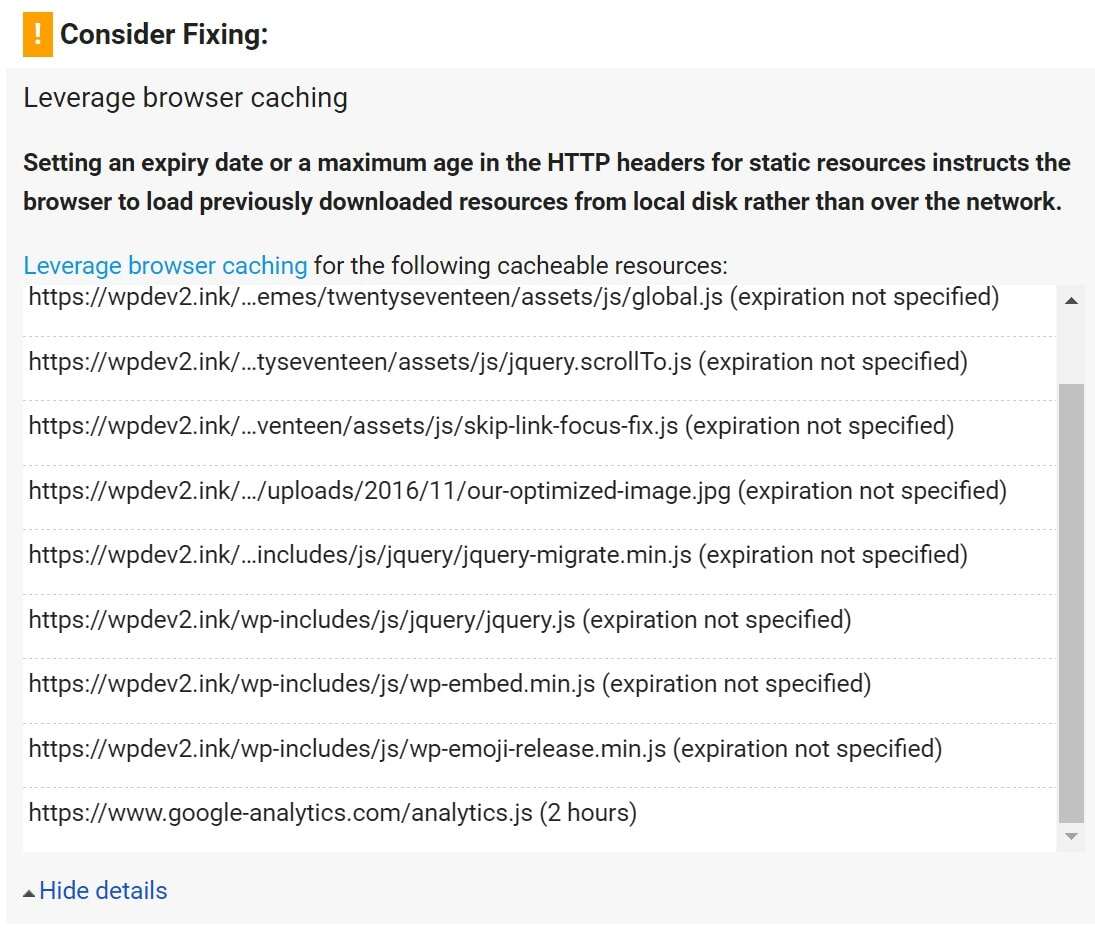
does not use browser cache warnings
to trigger browser cache warnings is that your Web server does not have the appropriate headers. In the screenshot above, you can see that none of our internal scripts have an expiration date warning. In terms of caching, two main methods are used: Cache-Control headers and Expires headers. When the Cache-Control header enables client caching and sets the max-age of the resource, the Expires header is used to specify that the resource is no longer valid at a specific point in time.
you don't necessarily need to add two headers, because it's a bit redundant. Cache-Control is a relatively new and usually recommended method, but some Web performance tools, such as GTmetrix, still check Expires headers. These are examples where you can change the file type, expiration time, and so on as needed. Here are some options. We will simply add the expire header to the Apache on the host of the WordPress website for this tutorial.
adds cache control headers
to Nginx you can add Cache-Control headers by adding the following to the server Nginx configuration file.
location ~* .(js , css , png , jpg , jpeg , gif , ico)$ {
expires 2d;
add_header Cache-Control "public, no-transform";
}
add Expires headers
to Nginx you can add Expires headers by adding the following to the server Nginx configuration file. In this example, you can learn how to specify different expiration times depending on the file type.
location ~* .(jpg , jpeg , gif , png)$ {
expires 365d;
}

location ~* .(pdf , css , html , js , swf)$ {
expires 2d;
}
adds cache control headers
to Apache you can add Cache-Control headers by adding the following to the .htaccess file of the Apache server.
Header set Cache-Control "max-age=604800, public"
add Expires headers
to Apache you can add Expires headers in by adding the following to the .htaccess file of the Apache server.
## EXPIRES HEADER CACHING ##

ExpiresActive On
ExpiresByType image/jpg "access 1 year"
ExpiresByType image/jpeg "access 1 year"
ExpiresByType image/gif "access 1 year"
ExpiresByType image/png "access 1 year"
ExpiresByType text/css "access 1 month"
ExpiresByType application/pdf "access 1 month"
ExpiresByType application/javascript "access 1 month"
ExpiresByType application/x-javascript "access 1 month"
ExpiresByType application/x-shockwave-flash "access 1 month"
ExpiresByType image/x-icon "access 1 year"
ExpiresDefault "access 2 days"

## EXPIRES HEADER CACHING ##
Remember when we enabled Gzip compression? Here's what the .htaccess file looks like after we added the expired header, we just put it under the compression module.
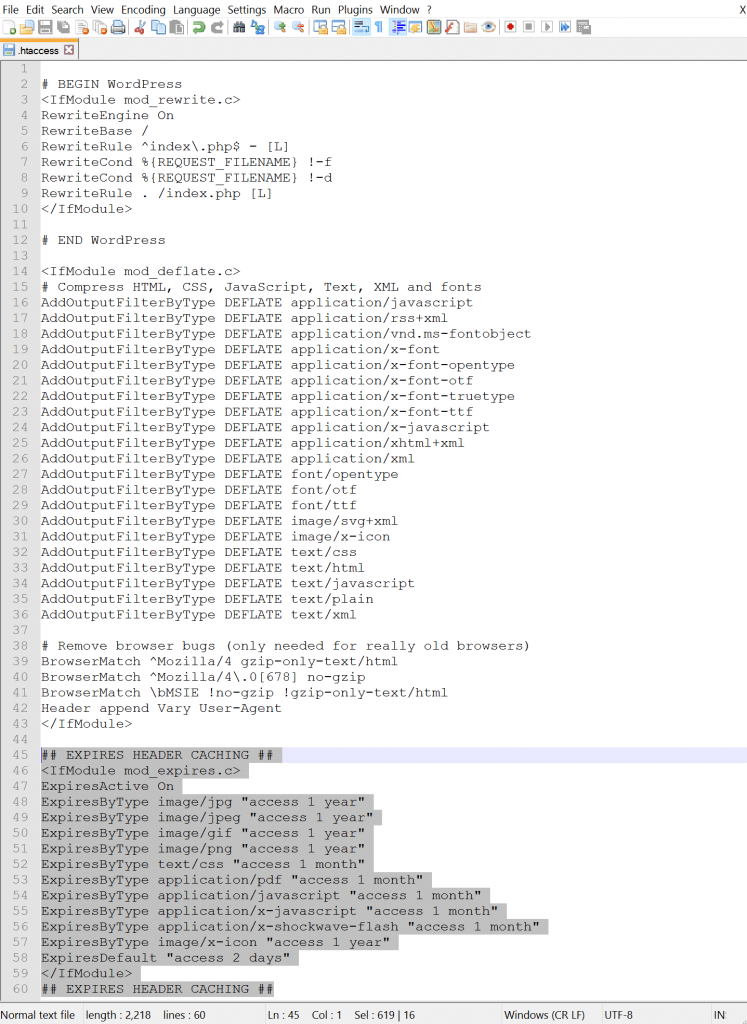
expiration header code
We once again run our test website through Google PageSpeed Insights, and there is only one Google Analytic script left in the browser cache warning. Ironically, after all, this is a script provided by your Google. You should know that Google has officially set a cache time of only 2 hours for this resource, as shown in the screenshot below. The reason why Google sets such a short cache time should be so that when they update the script code, the client can get the latest version as soon as possible. However, there is a solution to this problem, which is to host Google Analytics scripts locally. Note that this is not recommended by Google. The
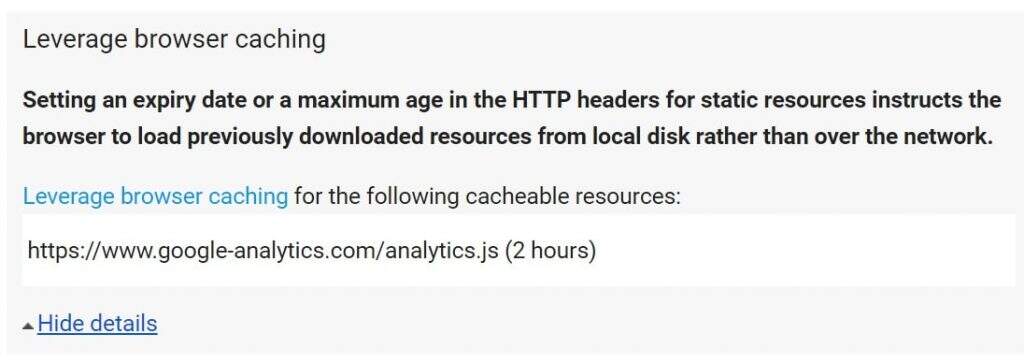
Google Analytics statistical code script cache
has a free plug-in called Complete Analytics Optimization Suite, created and developed by Daan van den Bergh, that allows you to host Google Analytics locally on WordPress websites.

WordPress plug-in-CAOS
you can download Complete Analytics Optimization Suite from the WordPress website, or you can search for installation under the "plug-in-install plug-in" plug-in in the WordPress dashboard. As of this writing, the plug-in currently has 1w + valid installations with a full score of 5 stars. The plug-in allows you to host your Google AnalyticsJavaScript file (analytics.js) locally and keep it updated using the WordPress function wp_cron (). Other features include the IP address of easily anonymous visitors, setting the adjusted bounce rate, and the location of scripts (headers or footers).
simply installs the plug-in, enters your Google Analytics tracking ID, and the plug-in adds the necessary tracking code for Google Analytics to your WordPress website, downloads and saves the analytics.js file to your server, and maintains updates using the scheduled task script in wp_cron (). We recommend that you set it to load in the footer. Note: this plug-in is not compatible with other Google Analytics statistics code WordPress plug-ins.
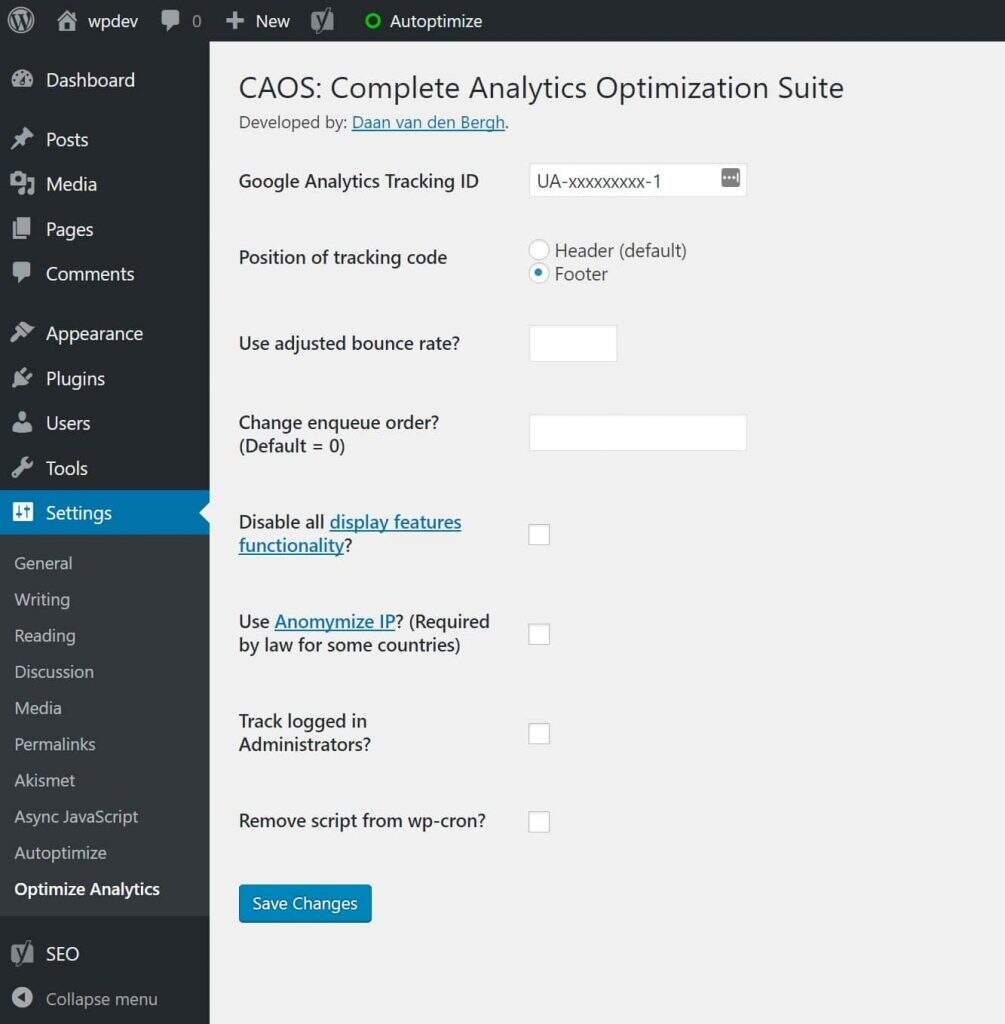
locally stores Google Analytics script code
if we run our website through Google PageSpeed Insights again, we can see that the warning about the browser cache is gone! And the desktop and mobile device scores have risen to 97 and 96 respectively, which is almost perfect.
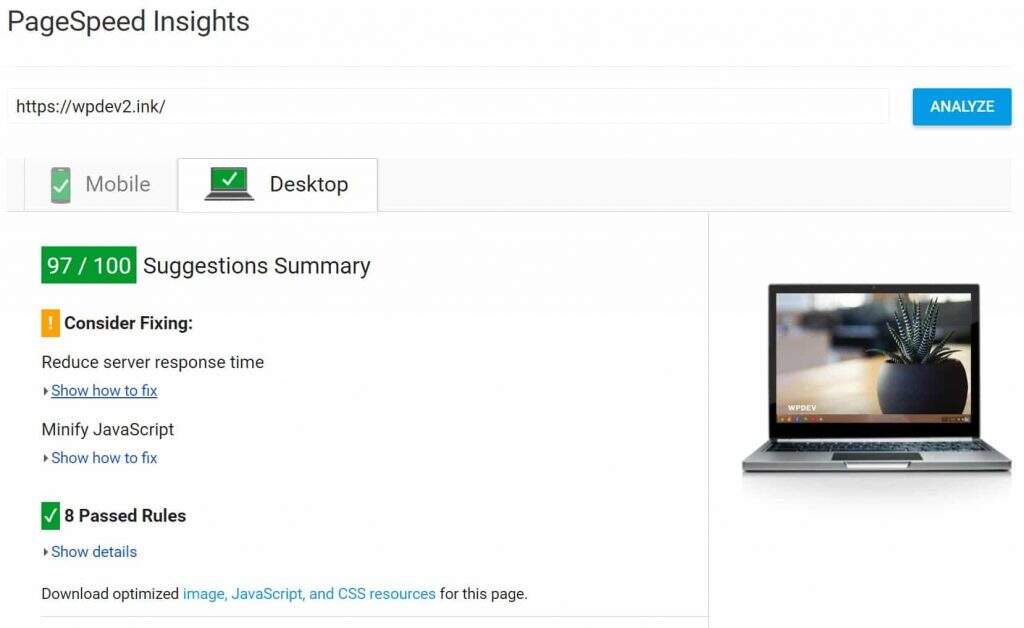
browser cache warning fixed PageSpeed Insights score
2.5 reduce server response time
the next Google PageSpeed Insights recommendation we need to fix is to reduce server response time warning. In many cases, this is generally due to the slow response time of the server, that is, the host server used. Therefore, we need to use the cache plug-in to speed up. This example uses Cache Enabler, a free plug-in developed by KeyCDN.

WordPress caching plug-in-Cache Enabler
as of this writing, Cache Enabler has 40, 000 + valid installations and a 4. 5 star rating. It is a lightweight caching plug-in for WordPress that increases site loading speed by generating static HTML files and WebP. There is no need for any settings, just install and enable. This plug-in is fully compatible with the previously used Async JavaScript and Autoptimize plug-ins. If you want faster, we recommend that you also add advanced code snippets to bypass PHP to retrieve static HTML files created by the WordPress Cache Enabler plug-in. When
runs our website through Google PageSpeed Insights again, you can see that the Reduce server response time warning is gone! Both desktop and mobile devices are close to a peak score of 99. At this point, is there a high-five? After the
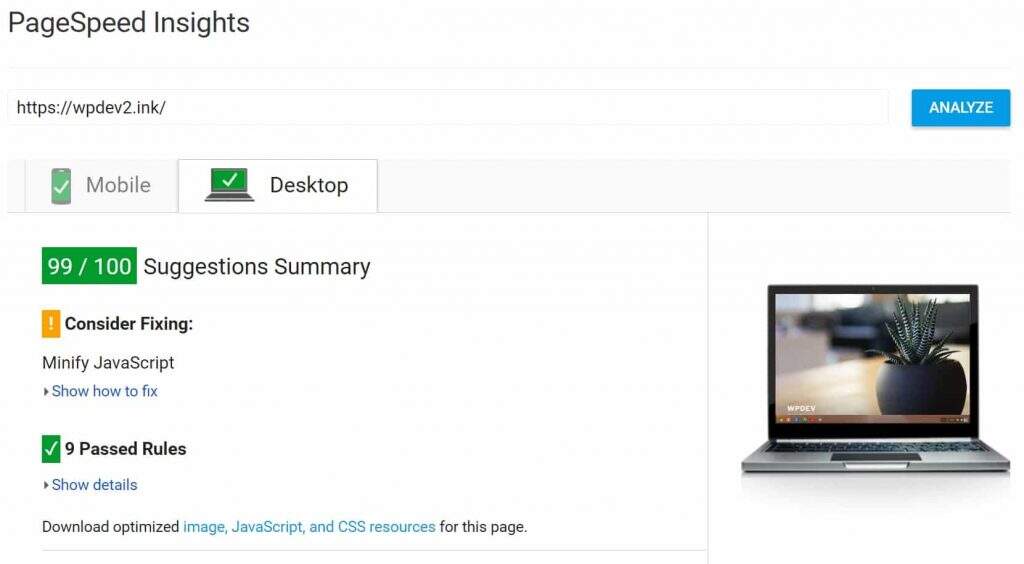
response time problem is fixed, PageSpeed Insights scores
, but it should be noted that there are many potential factors that may slow down the response speed of the server, including plug-ins, frameworks, libraries, CPU or insufficient memory, which lead to slow database queries.
2.6 minimize JavaScript
the last Google PageSpeed Insights recommendation we need to fix is the Minify JavaScript warning.
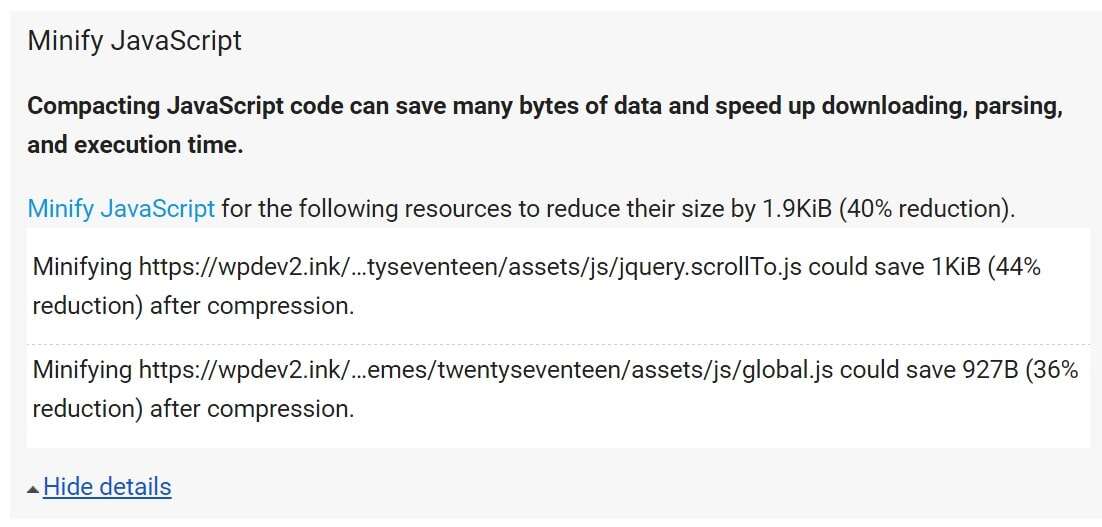
minimizes JavaScript warns
that in order to solve this problem, we will actually go back to the Autoptimize plug-in setting to enable the Optimize JavaScript Code option. Because you install the cache plug-in, you may also need to clear the cache after doing so to see the results.
if you use the Autoptimize plugin as the main means of WordPress optimization, it is recommended to read the "WordPress site Optimization plugin Autoptimize setup tutorial".
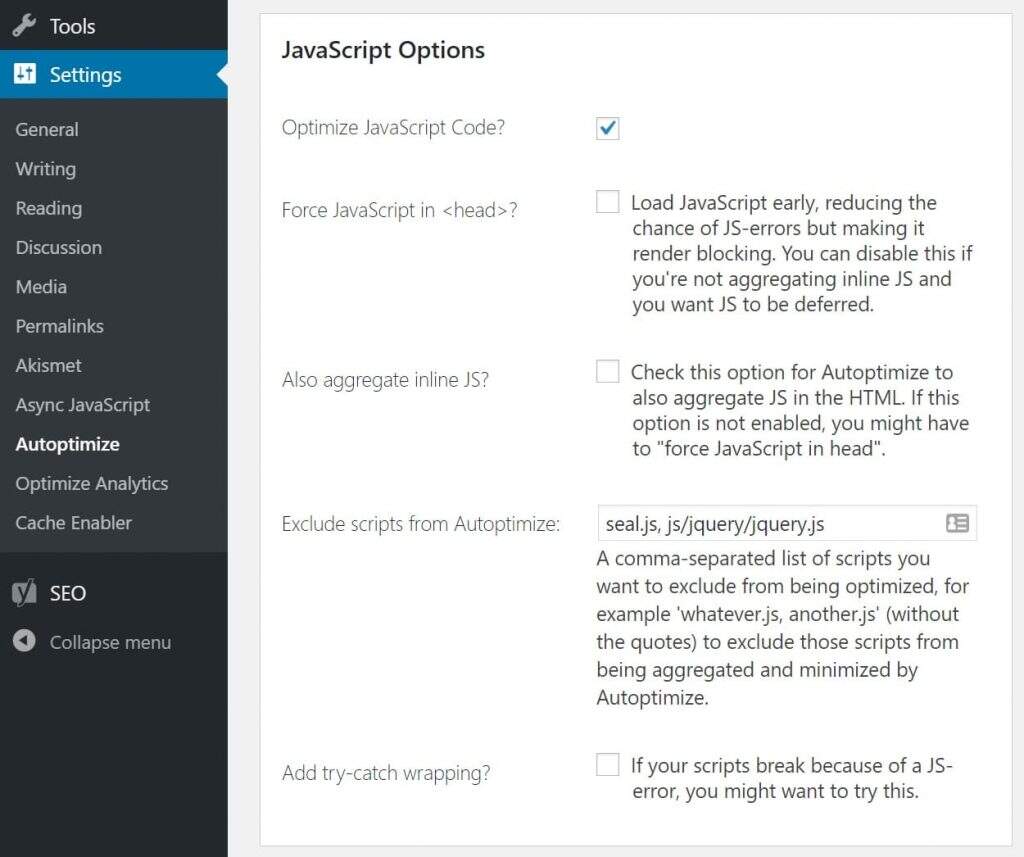
optimizes JavaScript code
Finally, it's time for us to witness a miracle when our test site's Insights score has reached the "peak of life"-a full score of 100.
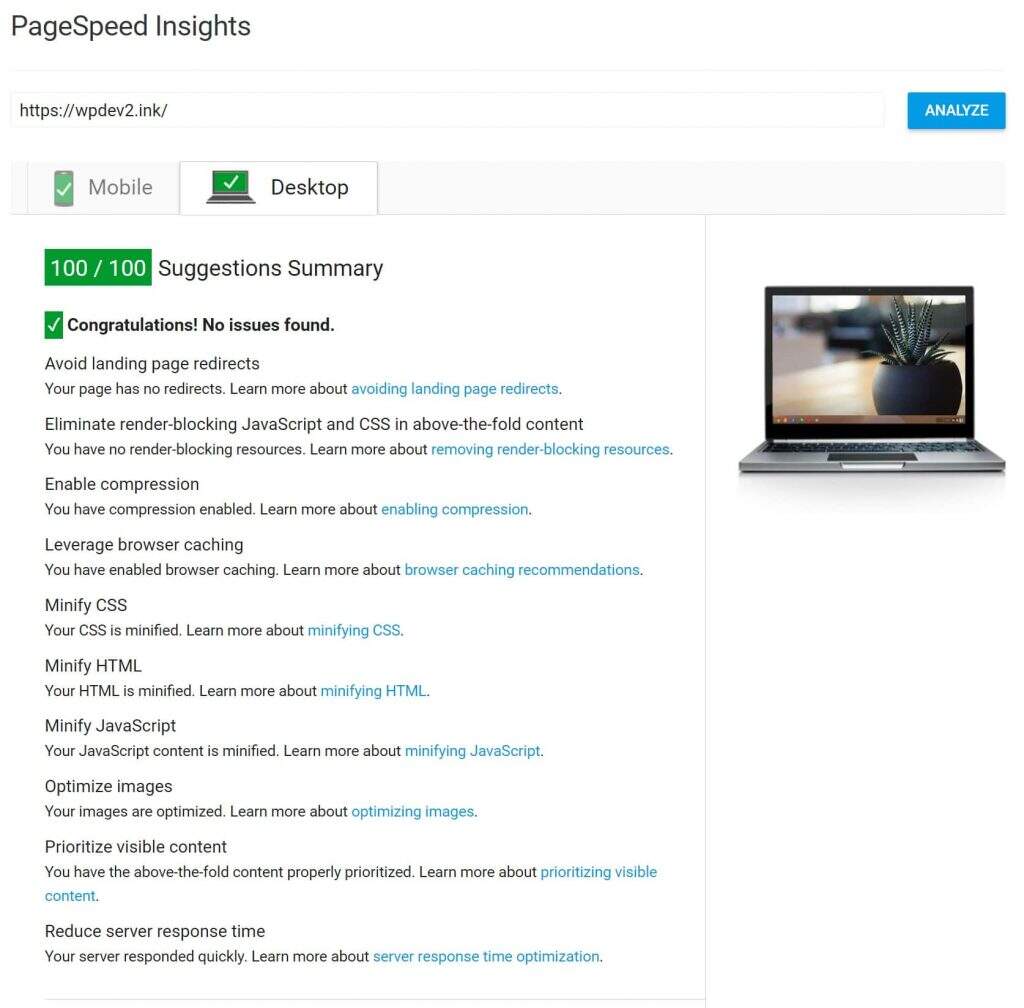
Google PageSpeed Insights Desktop score 100. Mobile device score below
. We didn't do anything extra for mobile devices. After the score of the desktop device reached 100, the user experience score of the mobile version of the site also reached 100.
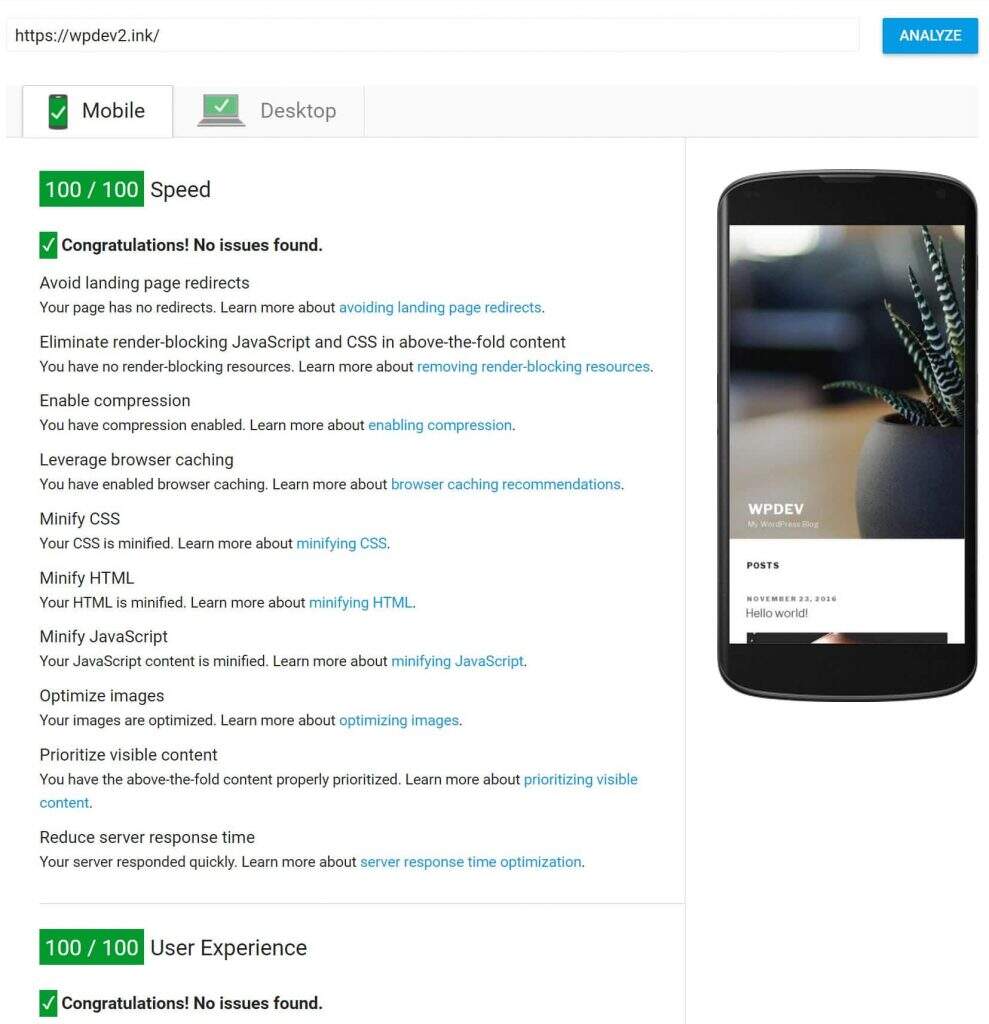
Google PageSpeed Insights Mobile device score 100
PageSpeed 3 other PageSpeed improvement points
We are only optimizing for Google PageSpeed Insights in this tutorial. In fact, in addition to the above points, there is much more we can do to speed up the loading of the site:
- deletes the query string
- uses CDN to accelerate the website
- to further optimize our images
- lazy loading images
has the opportunity, we can also take the time to explain these points one by one.
Summary
the purpose of this tutorial is to better explain and understand the warnings given by Google PageSpeed Insights in testing websites and what steps we can take to solve these problems. Once you have a better understanding of this, you can apply these strategies to larger sites. Of course, for large websites, you may never get a full score of 100! We should aim for the goal of full marks, although it is very difficult, but we suggest you implement it as much as possible, the speed of the website will certainly be greatly improved. And remember, it's the speed and user experience of your site that really matters, so don't worry too much about scores.

