
WooCommerce One Page Checkout is a plug-in that enables a one-page checkout process in WooCommerce stores. It allows users to fill out their order information directly on the shopping cart page without leaving the page. This improves user experience and reduces churn rates. It supports a variety of payment and delivery methods, and can customize order forms and validation rules.
usage
There are 3 ways to use One Page Checkout in the store:
- Enable one-page checkout on a per product basis.
- Insert short code and attributes into posts manually.
- Use of One Page Checkoutgraphical interface(Classic editor only).
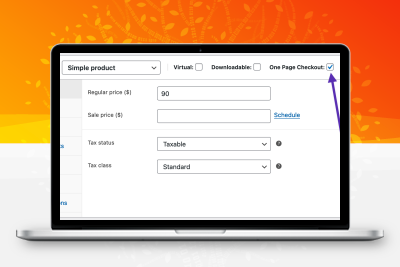
Per Product Setup
Once single-page checkout is activated, a new option is added to the Product Data Panel. By checking this option, single-page checkout is activated for that particular product.

When enabled, the checkout form appears on the product page. The Add to Order button no longer redirects to the Checkout page, but increases the product quantity by the quantity specified on the enclosed Checkout form. Other products added elsewhere are also visible, similar to how normal checkout pages work.

Manual shortcode usage
You can also add shortcodes manually[woocommerce_one_page_checkout]Go to any page, post, or custom post type, and customize the page using the properties of the shortcode.
To add shortcodes manually:
- inserted
[woocommerce_one_page_checkout]Content of the page or post - added
product_ids=""Properties with list of product IDs to display at the top of checkout process - Add a template with the template you want to use to display the checkout process
template=""Properties of the Slug - Save a post or page
 One-page checkout manual page shortcode use
One-page checkout graphical interface
If you’ve updated to WordPress 5.0 with the introduction of a new editor (formerly Gutenberg), there are onlymanuallyMethods are available. The graphical interface is currently only available for Classic Editor plug-in.
To insert the One Page Checkout shortcode using the graphical interface:
- Go to: page add new or post add new.>>
- Make sure the editor is in visual mode.
- Click the One-Page checkout icon.
- Click in the Product field and type the name of the product you want to display.
- Select the products to display.
- Select the template to use for the product selection field.
- Click Create Short Code.
![]()

additional content
Add content above or below the One Page Checkout short code in the WordPress editor to display a copy of the sale, terms and conditions, or other content above or below the One Page Checkout product selection and checkout form.
shortcode attribute
The One Page Checkout short code uses properties to customize the checkout process. Each attribute may exist only once in each shortcode. If more than one set of attributes exists, the value of the second attribute is used.
Product ID Attributes
To display a limited set of products, use theproduct_idsAttributes. This property requires a comma-separated list of product IDs, as shown below.
The order of the product IDs here also determines the order in which the products appear on the checkout page.
In some cases, such as using the Add to Cart button outside of One Page Checkout, you may not want to display any products, so simply exclude this property or leave it blank.
If one or more of the product IDs defined in the attribute are invalid, the other products are still displayed.
Usage examples: [woocommerce_one_page_checkout product_ids="30,45,12"]
Category ID Properties
To display products categorized in a specific category, use thecategory_idsAttributes. This property can be used with a single category ID or with multiple category IDs. Multiple category IDs should be separated by a single comma, as shown below.
In some cases, such as using the Add to Cart button outside of One Page Checkout, you may not want to show any products. To do so, simply exclude this property or leave it blank.
If any category ID is invalid, the other products in the valid category appear as expected in the selected template.
For help setting up product categories, see the WooCommerce documentation for product categories.
Usage examples: [woocommerce_one_page_checkout category_ids="27,11,45"]
template properties
To give you control over how product selection fields are displayed, One Page Checkout uses templates. you can usetemplateShort code properties to select built-in or custom templates.
built-in templates
To use built-in templates,templateProperty contains the slug of the template. Available templates (and their slugs) are:
- Product list:
product-list - Product list:
product-table - Single item:
product-single - Pricing Table:
pricing-table
Usage examples: [woocommerce_one_page_checkout template="pricing-table"]
custom template
To use custom templates, you can:
templateIf the template is in the theme’s/woocommerce/checkout/templates directory, use the template’s slug as the property valuetemplateIf the template is located elsewhere in the theme’s/woocommerce/templates directory, use the full path of the template as the property value