Autoptimize is a free WordPress optimization plug-in. In addition to HTML,CSS and JavaScript optimization, Autoptimize includes optimization features for other aspects of the WordPress site.
in this article, we will share Autoptimize plug-in setup tutorials to help webmasters improve the performance and page loading speed of WordPress sites. Why did
- choose Autoptimize?
- JS,CSS and HTML Optimization options set
- Picture Optimization options set
- other Optimization options set
before delving into the Autoptimize plug-in settings, let’s first understand the three reasons why Autoptimize has become the optimization plug-in chosen by many webmasters.
- The free version of Autoptimize has a complete feature set that optimizes your WordPress site.
- Autoptimize is strictly an optimization plug-in that does not perform any HTML page caching. This means that it is compatible with all Web hosts, even Web hosts with custom page cache configurations.
- Autoptimize has more than 1 million active installations in the WordPress plug-in market and continues to update (release new features and fix bug) new features.
HTML,CSS and JavaScript are the basis of Autoptimize. As with other optimization plug-ins, learning more about Autoptimize’s extensive feature set and settings can be a daunting task. To make things easier, we have integrated the best “Autoptimize” settings to improve the performance of your site. The
JavaScript option sets the JavaScript optimization item for

Autoptimize.
(1) Optimize JavaScript Code (JavaScript code optimization)
We recommend that you enable this option. When “optimize JavaScript code” is enabled, Autoptimize minimizes your JavaScript files.
(2) Aggregate JS Files (JS file merge)
enables the “aggregate JS files” option of the Autoptimize plug-in, which merges all JavaScript files of the site into a single file. In the past, merging JS and CSS files was a key step in WordPress optimization. It is important to note, however, that many server providers now use HTTP/2 servers that support parallel downloads and multiplexing-meaning that merging files is no longer as important as it used to be, because HTTP/2 allows multiple files to be downloaded at the same time. Having said that, aggregating CSS and JS files can still improve the speed of some types of WordPress sites, so we recommend that you test your page speed with this option on and off before deciding whether to enable it. The
(3) Also Aggregate Inline JS (aggregate inline JS)
“also aggregate inline JS” option extracts the inline JS from HTML and merges it with Autoptimize’s optimized JS file. Because this option causes the cache size of Autoptimize to increase instantly, we recommend that you disable this option unless you have a specific reason to enable it.
(4) Force JavaScript in (strong load JavaScript)
in most cases, we do not recommend forcibly loading the JavaScript file into theelement of your site’s HTML. Forcing JS to load early may cause rendering blocking elements, which may slow down your page loading speed. If you have JavaScript files that need to be loaded in theelement, it is recommended that you set these script files to the Autoptimize exclusion list.
(5) Exclude Scripts from Autoptimize (JS optimized exception list)
this option sets the exception list for specific directories and JavaScript files (the list contents are not merged). By default, Autoptimize excludes the following scripts or directories.
- wp-includes/js/dist/
- wp-includes/js/tinymce/
- js/jquery/jquery.js
, note that by default, adding scripts to exclude only affects the merge. Excluded JavaScript files will still be shrunk unless minify excluded CSS and JS files- minimized exception list CSS and JS Files under Misc Options- other options are not selected.
(6) Add Try-Catch Wrapping (add Try-Catch wrapper)
enable the “add try-catch wrapping” option to encapsulate your JavaScript code in a try-catch block. This option is useful for debugging problems caused by JS compression and merging. If your site only works with “add try-catch wrapping” enabled, we recommend that developers help you find the JavaScript file that is causing this problem, as excessive use of try-catch blocks can degrade JS performance. The
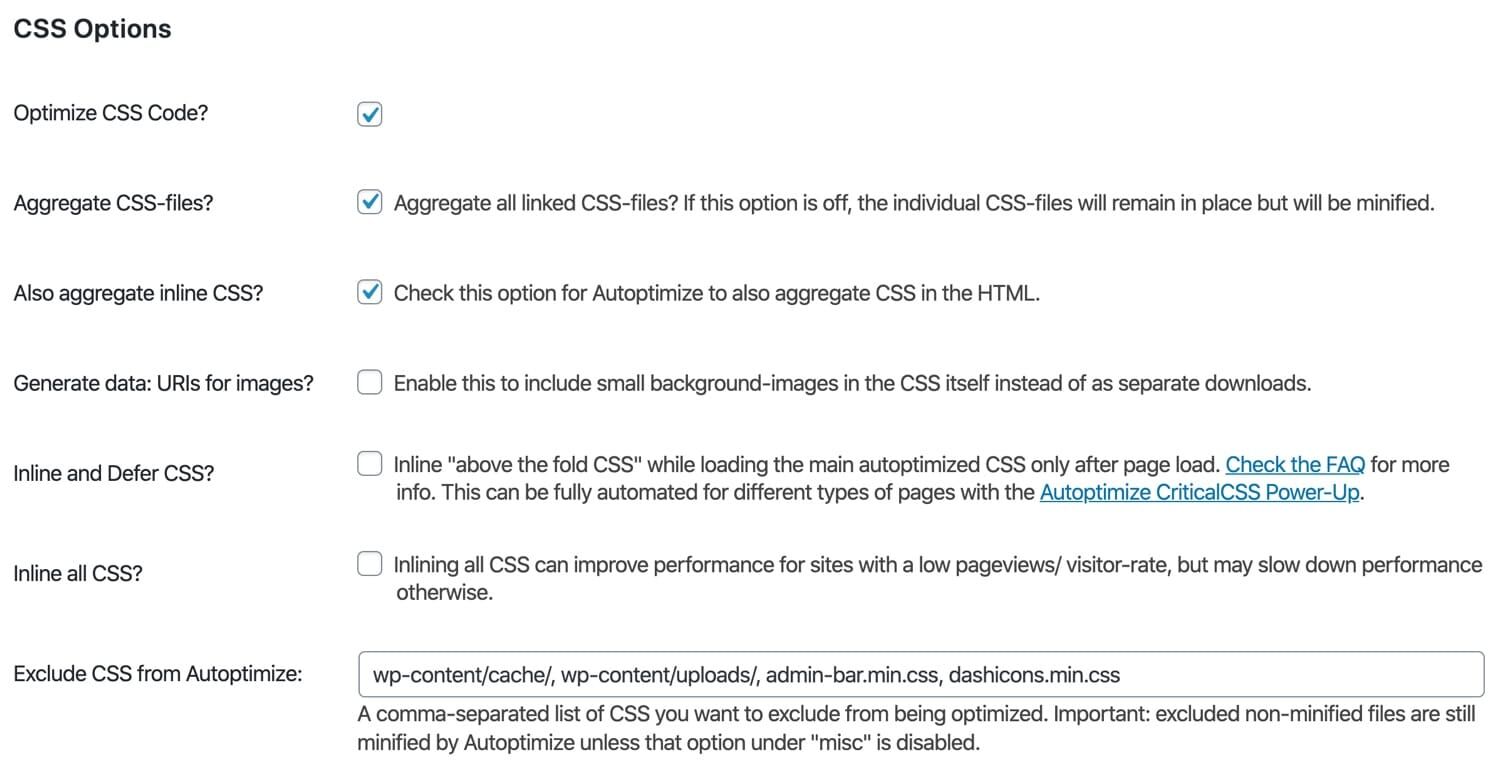
CSS option sets the CSS optimizer

(1) Optimize CSS Code (optimize CSS code)
for
Autoptimize. We recommend that you enable this option. When “optimize CSS code” is enabled, Autoptimize minimizes the site CSS file.
(2) Aggregate CSS Files (merge CSS files) the “aggregate CSS files” option of
Autoptimize merges all CSS files into one file. As mentioned earlier, this feature may not work for sites that support HTTP/2. It is recommended that you enable or disable this option to test the site for Ahand B to determine whether it is helpful for page loading speed.
(3) Also Aggregate Inline CSS (aggregate inline CSS)
this option merges inline CSS into Autoptimize’s CSS file. Although merging inline CSS into CSS files that support browser caching can reduce page size, it is recommended that you disable this option in most cases.
(4) Generate Data: URIs for Images (generate Image URI data)
when enabled, Autoptimize encodes the small background image with base64 and embeds it into the CSS. We recommend that you test this option to assess the impact on page speed. Although encoding an image to base64 format can reduce the number of HTTP requests, base64 format files are usually 20-30% larger than binary files.
(5) Inline and Defer CSS (inline and delay CSS)
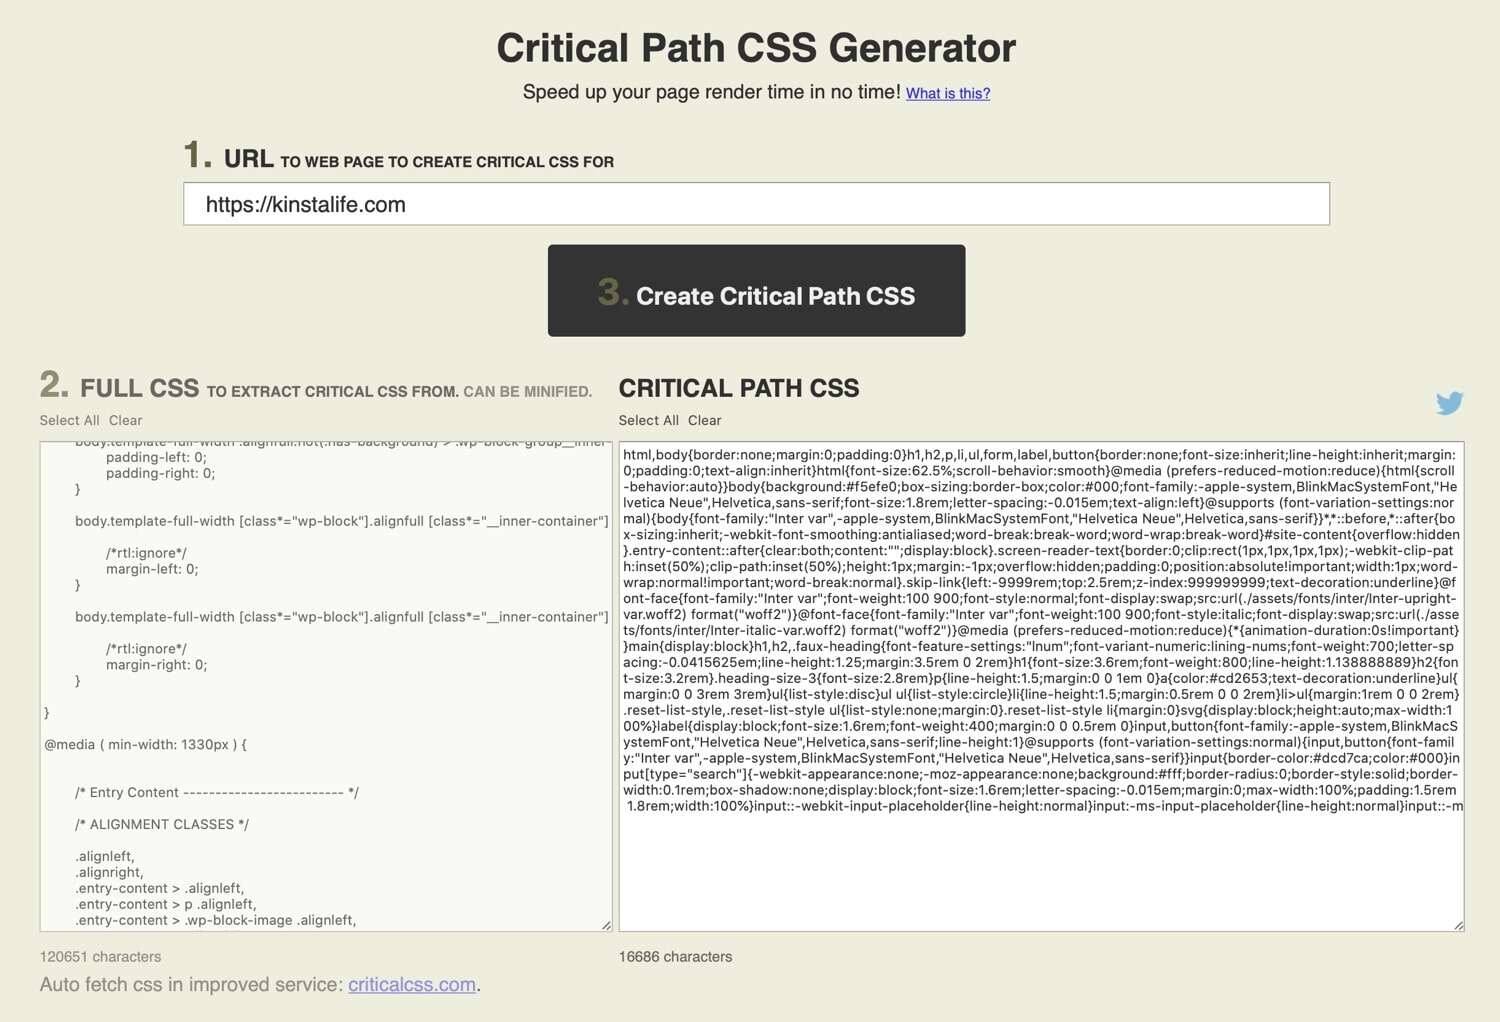
inline key CSS can significantly improve the speed of some sites. In fact, inline CSS usually targets elements such as structural elements, global font and size, and navigation styles. By inlining these key elements,
delays loading a large, complete CSS file without affecting the layout of the page. Although you can extract key styles manually, we recommend using more efficient online tools to generate styles. After

generates the critical CSS
generates the critical CSS, copy and paste it into the Autoptimize settings.

inline and postpone CSS
in Autoptimize the next step is to test the site’s front-end experience. If you notice some strange changes in unstyled content (FOUC), you may need to identify those unstyled elements and add the appropriate styles to the Autoptimize for inlining.
Autoptimize provides a “power-up” feature that automatically generates critical CSS for WordPress pages. In our experience, this feature sometimes slows down the site because it uses external API calls to generate critical CSS. Therefore, the initial critical CSS generation depends on the responsiveness of the external server. In most cases, a method that does not require any external API calls is a cleaner solution.
warm Tip: if you are not familiar with CSS, it is not recommended to enable this option. Moreover, the author believes that this method is limited to improve the loading speed of the website.
(6) Inline all CSS (inline all CSS)
for most sites, we do not recommend inlining all CSS because it will greatly increase the page size. In addition, Web browsers cannot cache CSS after inlining all CSS.
(7) Exclude CSS from Autoptimize (CSS optimized exception list)
by default, Autoptimize excludes the following directories and CSS files from the merge rule. If you don’t want Autoptimize to merge specific CSS files, you can add them to this list. Similar to the JavaScript exclusion list, this feature does not affect CSS file compression by default and only applies to CSS merge rules. The
- wp-content/cache/
- wp-content/uploads/
- admin-bar.min.css
- dashicons.min.css
HTML option sets the HTML optimization for
Autoptimize to reduce the page size by removing spaces.

Autoptimize’s HTML optimizer
(1) Optimize HTML Code (optimize HTML code)
we recommend enabling the “Optimize HTML Code” feature because it reduces the page size by removing unnecessary spaces in the HTML. Although this feature is compatible with most sites, deleting spaces may cause some sites to fail. Therefore, we recommend that you fully test HTML code optimization before using it in a production environment.
(2) Keep HTML Comments (keep HTML comments)
enable this feature if you want to keep HTML code comments. The
CDN option sets
if you are using CDN to accelerate static resources, you need to add CDN URL to Autoptimize. However, if you are using a CDN proxy service similar to Cloudflare, you do not need to make any configuration in the CDN option of Autoptimize. CDN optimization settings for

Autoptimize
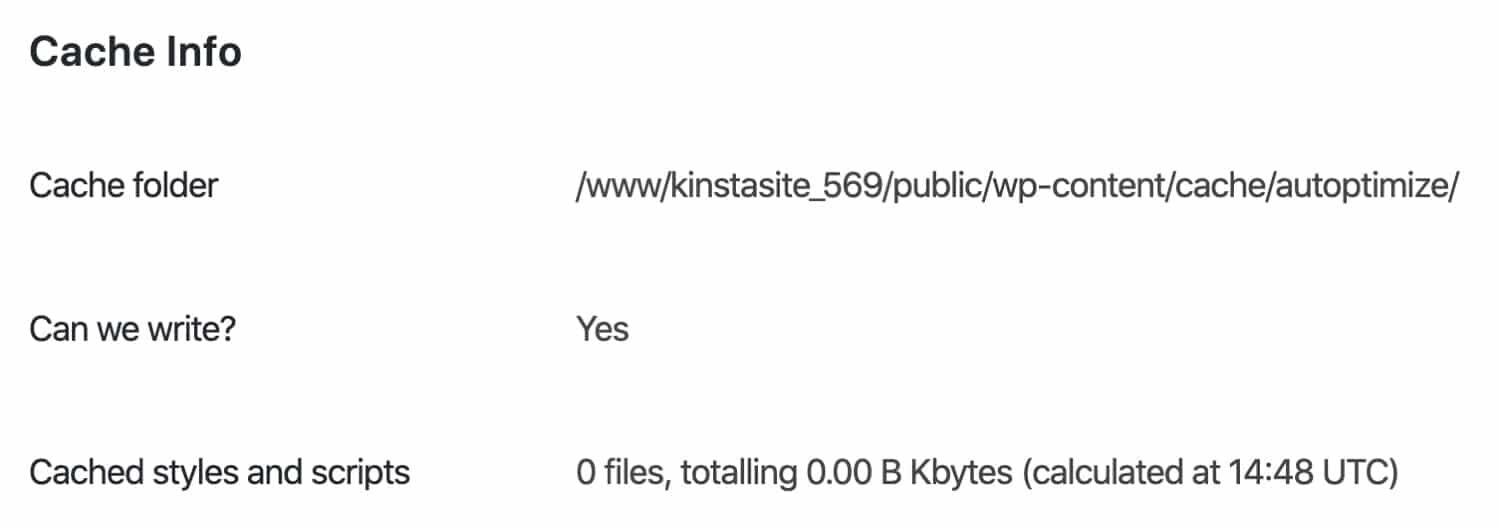
Cache information the “cache info” of the
Autoptimize plug-in is used for display, such as the location and permissions of cache folders, as well as cache information such as cache styles and the total size of scripts. If in “Can we write?” If you see “No” next to it, you need to modify the folder permissions on the server.

Cache information for Autoptimize
Miscellaneous Settings the
Autoptimize plug-in also has some other optimization settings. If you encounter problems loading a Web site after optimizing the CSS and JS files, you may need to reconfigure some of the following settings. Miscellaneous settings for

Autoptimize
(1) Save Aggregated Scripts/CSS as Static Files (merge JS/CSS and save as static file)
we recommend that you enable this option to save the merged file as a local static file. If your server does not configure file compression and cache expiration, you may need to disable this feature.
(2) Minify Excluded CSS and JS Files (CSS and JS File Compression exclusion list)
We recommend enabling this option to ensure that all CSS and JS files are compressed. However, if you find problems with some CSS and JS file compression, you can continue to disable this option.
(3) Also Optimize for Logged In Editors/Administrators (optimized for login editor / administrator)
We recommend enabling this feature to ensure that it is optimized for login editor and administrator roles. This is important if you want to test the Autoptimize setting as a logged-in user.
Autoptimize plug-in integrates ShortPixel to optimize images. In addition to the image quality settings, the Autoptimize plug-in also supports generating WEBP versions of images.
but if you are looking for more perfect image optimization, we do not recommend that you use the castrated image optimization feature provided by “Autoptimize”. Instead, it is recommended to use full-featured plug-ins from ShortPixel or Imagify directly. With the full plug-in, you will have finer control over the optimization settings, including rewriting the image to use thetag, which is necessary for some server WEBP support.

Autoptimize’s Picture Optimization
Autoptimize also provides image delay loading. We recommend that you enable this feature to improve the loading speed of pages with a large number of images. After enabling deferred loading, the “Autoptimize” plug-in also allows you to set the image delay loading exception list, class name and file name.
exclusion list settings are important for Logo, social icons, and other important image elements that should not be delayed loading. If you want to learn more about delayed loading of WordPress images and videos, you can read the article “how to achieve lazy loading of WordPress images and videos”.

Autoptimize
(1) Google Fonts
Autoptimize provides several different settings options for Google font optimization. Which option should be used depends on how the site uses Google fonts.
- remained unchanged.
- deletes Google fonts.
- merges and places Head.
- is merged and preloaded in Head.
- merges and loads asynchronously through webfont.js.
does not recommend the “keep the same” option, which has no speed advantage at all.
if Google fonts have little effect on the site, you might as well delete them and use the system fonts directly, brushing the page loading speed.
if Google fonts must be retained, it is recommended that you test the last three options to find the one that works best for your site.
(2) Remove Emojis (delete emoticons) this Autoptimize option removes CSS and JavaScript associated with emoticons provided by the WordPress kernel. We recommend that you enable this option because you can reduce the page size. In addition, most major operating systems come with emoji fonts.
(3) Remove Query Strings from Static Resources (delete static resource query string)
you can enable this option if you want to delete static resource query strings such as
. Deleting a query string does not affect load time, but may help improve your site’s score in GTmetrix,Google Pagespeed and other performance testing services. The?ver=(4) Preconnect to 3rd Party Domains (pre-connected to third-party domain)
Preconnect attribute allows your browser to connect to a specified domain to handle the DNS lookup and SSL handshake protocol before sending a full HTTP request.
for example, if the site has a Logo image stored in
, you can add the pre-connection instruction to thehttps://site.domain.cdn.com/logo.pngelement in the Autoptimize plug-in setting to handle the initial DNS and SSL connections before issuing the HTTP request in the HTML’selement.you can use the browser’s developer tool or inspector to find important external domains to pre-connect. In the following example page, pre-connect external requests for the following domains.
can add these three fields to Autoptimize’s pre-connection list.
https://cdn.brianli.comhttps://www.google-analytics.comhttps://www.googletagmanager.com
uses developer tools to find external resources

for performance reasons, we recommend adding no more than six domains to the pre-join list of Autoptimize, as specifying pre-join instructions for too many domains can lead to performance degradation. The
(5) Preload Specific Requests (preload specific request)
preload directive instructs the Web browser to download the asset as soon as possible. This directive is useful for downloading what you need early in the page loading process. In fact, preloading is usually used to load custom fonts before requesting them in the page CSS, thereby reducing page load time.
recommends that you discuss with the developer and finally find and determine what can be preloaded on the WordPress site, if any. Like many other performance-related adjustments, preloading too much content can slow down the loading speed of a Web site, as the saying goes.
(6) Async JavaScript Files (asynchronous loading of JavaScript files) the “async JavaScript files” function of the
Autoptimize plug-in can specify some external JavaScript files to load asynchronously through the
flag of the HTML code. Although asynchronous loading of JS files can improve page speed, it is recommended that adequate testing be done to ensure that the functionality of the site is not affected, and some JS may not be suitable for asynchronous loading.asyncSummary
if you know how to adjust its settings, the Autoptimize plug-in is a good choice for WordPress users who want to improve the performance of the site. With basic features such as HTML and CSS optimization, as well as more advanced features such as CDN integration, pre-connection, and preloading instructions, Autoptimize has everything you need to optimize the front-end performance of the WordPress website.
如果您知道如何调整其设置,对于希望提高站点性能的WordPress用户,Autoptimize插件是一个不错的选择。
借助HTML和CSS优化等基本功能以及CDN集成、预连接和预加载指令等更高级功能,Autoptimize具备了优化WordPress网站前端性能所需的一切。

