

WordPress started as a blogging platform and is still often used for this purpose. Comments are a key part of most traditional blogs and an easy way to attract readers. To help you take full advantage of this feature, WordPress provides some discussion settings that you can configure according to the needs of your own website.
By modifying the discussion settings in WordPress, you have complete control over how users interact with the comment area. In this article, we will introduce all the relevant options available and talk about their role.
- Introduction to WordPress discussion Settings
- How to configure WordPress discussion Settings
- Summary
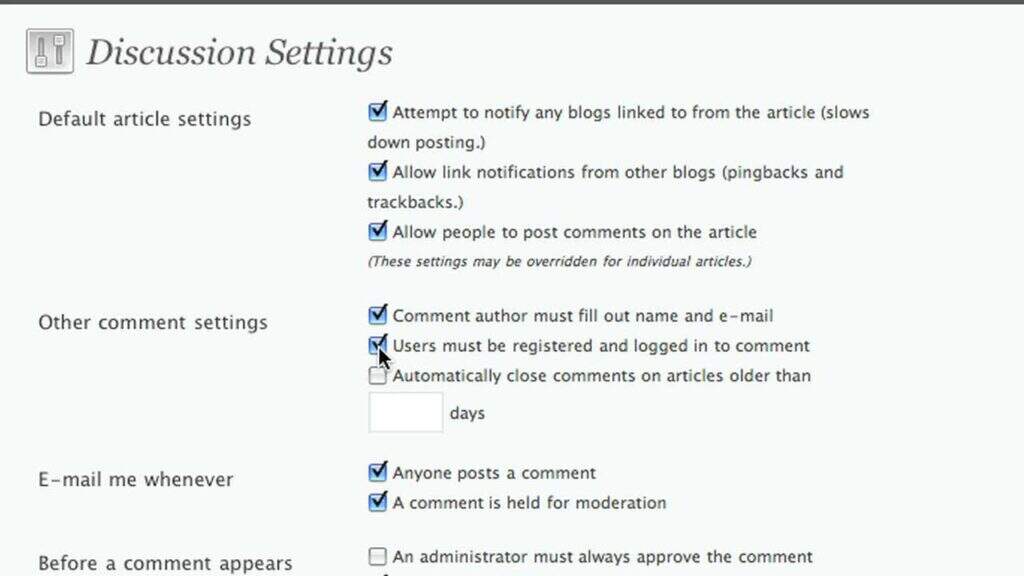
Introduction to WordPress discussion Settings
It’s easy to find the discussion settings in WordPress. Log in to the administrative dashboard and enter the Settings & gt; discussion:

In the following chapters, we will explain what each option on this screen allows you to do. This includes configuring how comments, notifications, reviews, and avatars work on the site.
It is important to note that there are some impressive comment plug-ins that bring more options, customizations, and new horizons to the WordPress comment system.
How to configure WordPress discussion Settings
Needless to say, let’s take a closer look at the options on this important settings page. After you make any changes to the discussion settings in WordPress, remember to save those changes before leaving the page.
Basic comment Settings
By default, WordPress includes a comment section in every article on your site. If you want to provide visitors with more opportunities to share ideas, you can also enable comments on specific pages:

You can disable comments for specific and pages by opening the Block Editor and expanding the discussion tab in the sidebar. Simply deselect the allow comments check box:

However, if you want to disable comments on all articles, you can do so on the WordPress discussion Settings page. The first part of the page includes three options under the default article settings:

The first two settings in this section relate to pingbacks. When you link to another website through an article or comment, WordPress attempts to send a “ping” or notification. If another website is also built with WordPress, the ping will appear in its comment review queue.
Disabling attempt Notification to any blog you link to will turn off ping notifications for your site. Deselecting allow link notifications from other blogs (pingbacks and trackbacks) in the new article will prevent other sites from sending ping to your site in all future content. These features have their own pros and cons, so be sure to understand the consequences before deciding to enable or disable them.
Finally, the last option in this section allows you to turn off WordPress comments completely. Some website owners think this is better than managing comments in different articles. However, it also means that you will lose valuable user participation opportunities. Once again, the pros and cons must be carefully weighed when setting up.
Other comment Settings
For finer control over the discussion settings in WordPress, you can view the next set of options in this interface:

Here, you can decide whether the user needs to provide a name and email address to comment. This helps reduce spam and bait because it eliminates the anonymity factor that makes some negative commentators particularly bold. It can also help you set up an email list or contact an individual seeking customer support.
To go a step further, you can require users to register and log in before they can comment. This is especially good for membership sites and other dedicated online communities.
Another option here is whether you want to “close” the comment area after a certain number of days. This is a simple way to allow readers to participate carefully in your content while minimizing your audit workload. Instead of browsing the comments of the entire blog, you just need to follow the discussion of the latest article.
Other settings that you can configure here include:
- Cookie option: determine whether to enable the comment author Cookie, which saves the user’s information in the browser so that they can comment more effectively in the future.
- Nested comments: specify whether users are allowed to reply to each other’s comments and create threads in the discussion area.
- Paging options: decide how to organize and display comments when they reach a certain number.
Finally, you can define the chronological order in which comments are displayed. The default setting for WordPress is to display earlier comments at the top of the section, which is familiar to most users.
Discuss notification settings
Next, you can determine how WordPress notifies you when a user submits a new comment. By default, whenever someone comments on a discussion on your website, you will receive an email:

New comments are also retained in the review queue, so you can manually approve them before they are displayed at the front end of the site. You can access this list by navigating to the comments section of the WordPress dashboard:

Unless you run a new blog and don’t get a lot of comments, it’s inconvenient to keep opening email notifications. Too many updates will occupy your inbox. For many website owners and blog managers, it is much more practical to check the audit queue regularly.
Comment Review Settings
For any WordPress site, comment management is essential. Without some intervention, you are likely to receive a lot of spam and occasional inappropriate or heated arguments among users.
As we have already mentioned, WordPress provides a review queue, so you can approve new comments before they go online. You can also delete submitted comments or mark them as spam.
In the discussion settings in WordPress, the options before comments appear provide you with several ways to handle comment reviews:

There are two main options, one is to approve each comment manually, and the other is to manually approve comments from new users. You can turn on either of these settings or leave them unselected, thus completely disabling the auditing feature. However, we do not recommend the latter approach, because if your comment area is full of spam, it will make your site appear unprofessional or unreliable.
Whitelisting previously approved commentators can reduce your workload, but it may also allow some malicious discussions to slip through the cracks. To solve this problem, you can use the discussion settings under comment Management to fine-tune what is allowed in the comment area:

Here, if the comment contains more links than the set number, you can keep it for review, which helps reduce the occurrence of spam comments. You can also list specific terms or even IP addresses that should trigger comments to be moved to the queue. This can help you weed out submissions that may be offensive or malicious.
Finally, to take this concept a step further, WordPress provides an option to completely block specific terms from comments:

If the comment contains any of the terms you list here, it will be automatically moved to the trash can so that you don’t have to waste your time reviewing it.
Avatar setting
The last part of WordPress’s discussion settings is about avatars. By default, WordPress enables avatars for all users who share ideas on the site. If they have a Gravatar account, WordPress will try to use that account to display personal photos of specific users.
If you prefer, you can choose to disable the avatar completely. You can also choose to disable pictures that may not be suitable for all audiences:

Last but not least, WordPress provides an option to set the default profile picture for users who do not have a Gravatar account or personal photos. You can choose from seven built-in options, including whitespace:

Avatars add a touch of personalization to your comment area, so enabling avatars allows your readers to read your content and share their views. However, from a functional point of view, avatars are not absolutely necessary, so whether or not to enable them is entirely up to you.
Summary
The WordPress comment area is a key part of any blog or website that allows visitors to share their thoughts. However, it is all too common for unmanaged discussions to get into chaos.
Fortunately, you can fully customize all discussion settings for your site in WordPress. In addition to enabling or disabling comments on the page, you can also specify how comments are displayed, who can comment, which audit criteria you want to enforce, and whether to display the avatar of the user while expressing his or her views.