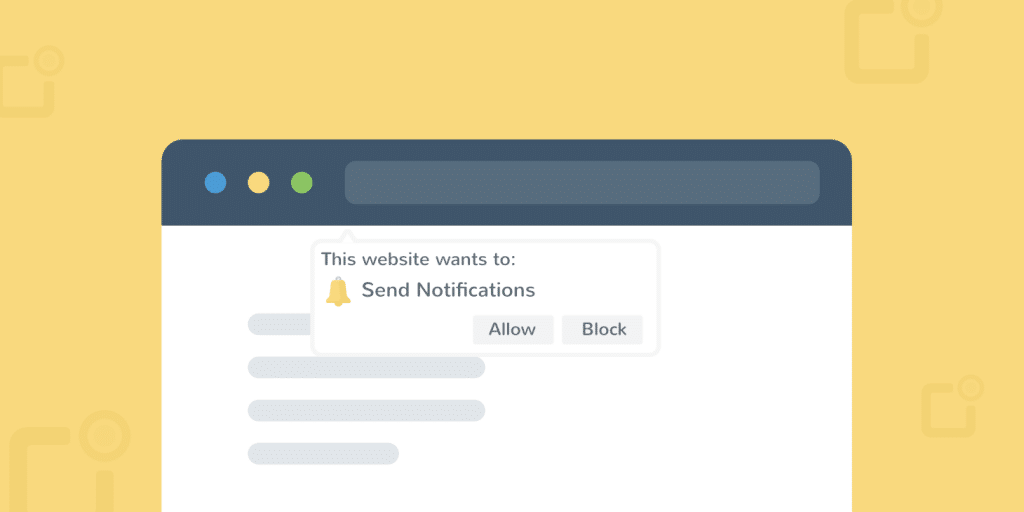
Push notifications, also known as online push notifications, have been popular among online enterprises and marketers in the past few years. These provide another way to attract audiences, increase responses, and in most cases have much higher click-through and participation rates than typical newsletter registrations. Today we’ll delve into what WordPress push notifications are, how they can help you expand your site’s coverage, and how to quickly add them to your site. Typical setup takes less than 10 minutes!
Push notification technology is rapidly developing from a simple messaging system to a rich interactive media. -OneSignal
The following is a website that attracts an average of more than 2500 visitors per month after using push notifications (shown below). This is only from this single recommendation source. Better yet, a small number of them are regularly converted to paying customers.
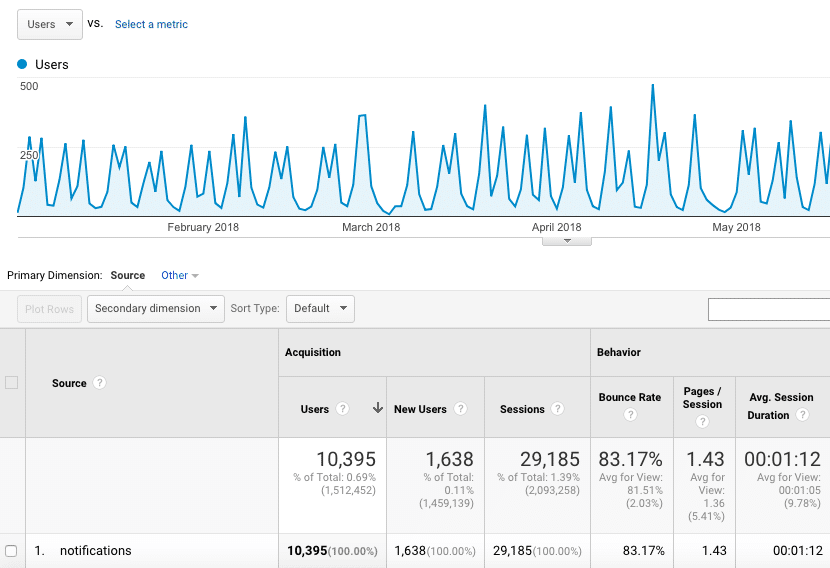
Push notification traffic
- What is a push notification?
- Benefits of WordPress push Notification
- How to set up WordPress push Notification
- Additional instructions and options for OneSignal
Push Notification
So first of all, what exactly is a push notification? WordPress push notifications allow you to automatically notify your audience when you post new content on your site. Or you can send predefined messages at any time. This can be a notification on a mobile phone or via browsers such as Chrome, Firefox or Safari. Push notifications were first introduced for Android and iOS devices in 2009 and have spread to other platforms ever since. If we look at the Google trend since 2014, we can see that interest around “web push notifications” has been growing steadily.

Trend of Network push Notification
The following is an example of a push notification registration request that you may have seen before. By clicking allow, the site can send notifications to you through your browser. The beauty of site owners is that visitors don’t have to be notified on your site, they just need to run a Web browser.
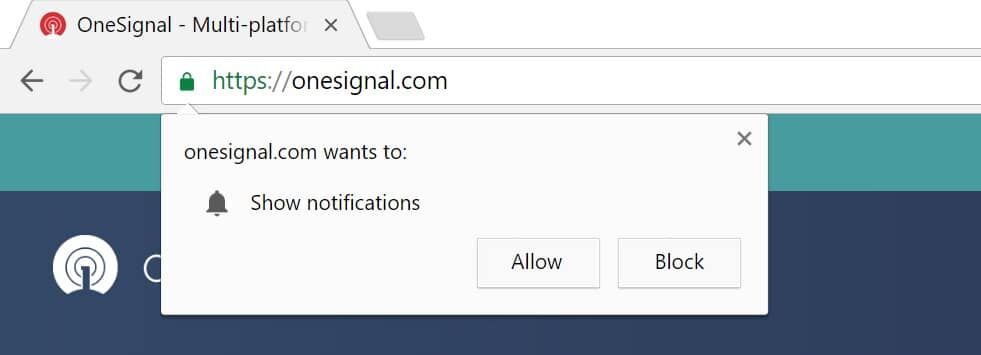
Push notification exampl
According to caniuse, global support for online push notifications is about 45 per cent. Safari was the first to offer Web push, followed by Chrome, followed by Firefox in 2016. Microsoft Edge and Opera also support push. Google Chrome currently has about 77 per cent of the browser market, which means that enabling push notifications in Chrome alone can reach a large audience. Push notifications can also be used out of the box on Chrome for Android mobile devices. The following is a screenshot and push notification request from the Android device. However, they are currently not supported on iOS, although they hope to do so soon.

Android pushes the notification
Benefits of WordPress push Notification
The main benefit of push notifications is that they provide another channel of communication for your WordPress site. Nowadays many people browse email or don’t read them at all. Push notifications can help put your messages in front of customers and visitors, bringing them back to your website. If you have questions about the effectiveness of push notifications, please review the following case study:
- YouNow has increased the retention rate by 19% through online push notifications. -Source
- United eXtra Electronics increased its e-commerce sales by 100% through online push notifications. -Source
- Average Networks has increased user engagement by 200% by pushing notifications. -Source
And these are just a couple. There are many other case studies from companies that have achieved great success in pushing notifications. Whether you run a WooCommerce store or an information blog, pushing notifications is definitely part of a marketing strategy you should try.
Does the push notification apply to everyone? Certainly not. Some people may feel that they are doing too much harm to the user experience. But in any case, remember not to overuse them, because they can be annoying.
How to set up WordPress push Notification
You now have a lot of good choices to choose from when setting up WordPress push notifications. Here are some popular and actively updated ones. Note: these packages include free and advanced solutions. Many of them have free plans for no more than a certain number of subscribers.
- OneSignal
- SendPulse
- VWO Engage
- PushUp
- Pushify
- Pushprime
- Roost
- PushAssist
- iZooto
- Desktop & Mobile Push Notification System
Since all of the above solutions have different browser and mobility support, we recommend looking at your Google Analytics data to understand the traffic types of your WordPress website. If you click “audience & gt; Technology & gt; browser and operating system”, you can see which browsers are most frequently used by visitors on your site. In the following example, you can see that enabling Chrome network push notification is of the greatest benefit to us, because more than 70% of desktop traffic comes from Google Chrome.

Analysis-browser and operating system
In this tutorial, we will use the plug-in for OneSignal, a completely free WordPress push notification solution. At the time of this writing, it currently has more than 50000 active installations and 4.7 stars (out of 5 stars).

WordPress plug-in-OneSignal
According to their website, they are used by more than 100000 developers, including big names such as Adob e, Uber and Tom’s Hardware. Some of their features include:
- 100% free use
- Unlimited WordPress push notifications
- Unlimited device
- Delivery automation
- Localization
- Complete API
- Infinite segment
- ABG B test
- Delivery plan
- Ability to import and export data
Sounds good. Is that true? Well, remember one thing. They don’t hide this fact at all, and they are very open to it on their website. The way they make money is to use the data they aggregate to improve the web and mobile experience. So, if this is a problem for you, you can upgrade to an enterprise version that they don’t have access to your data at any time. Prices for up to 500000 users start at $40 a month.
One of the advantages of OneSignal is that they allow you to set up any number of WordPress sites (applications). As a result, you can log on to OneSignal’s dashboard and have more than 10 different WordPress sites, all with their own push notification applications and data. If you manage multiple WordPress sites and want to implement push notifications on all sites, OneSignal may be a good way to manage them easily. Plus it’s free!
Using OneSignal,Web push notifications works exactly the same way as native mobile push. Therefore, you do not have to create mobile applications to reap the benefits of native push notifications on mobile devices. The following are currently supported browsers.

OneSignal browser support
Follow these steps to get started with OneSignal in a few minutes. Although OneSignal has the configuration of HTTP and HTTPS sites, we strongly recommend using HTTPS on your domain because Web push permissions and subscriptions are separated by domains / protocols. Your push notification cannot be transmitted in the future.
Step 1
Download and install the free OneSignal plug-in. You can download it from the WordPress plug-in library, or you can search for it under the install plug-in plug-in in the WordPress dashboard.

Install OneSignal Network push Notification
Step 2
Next, go to OneSignal and create a free account.
Step 3
Click “Add a new app” and name your application. In our example, we just use the name of the WordPress site. Then click “Create”.
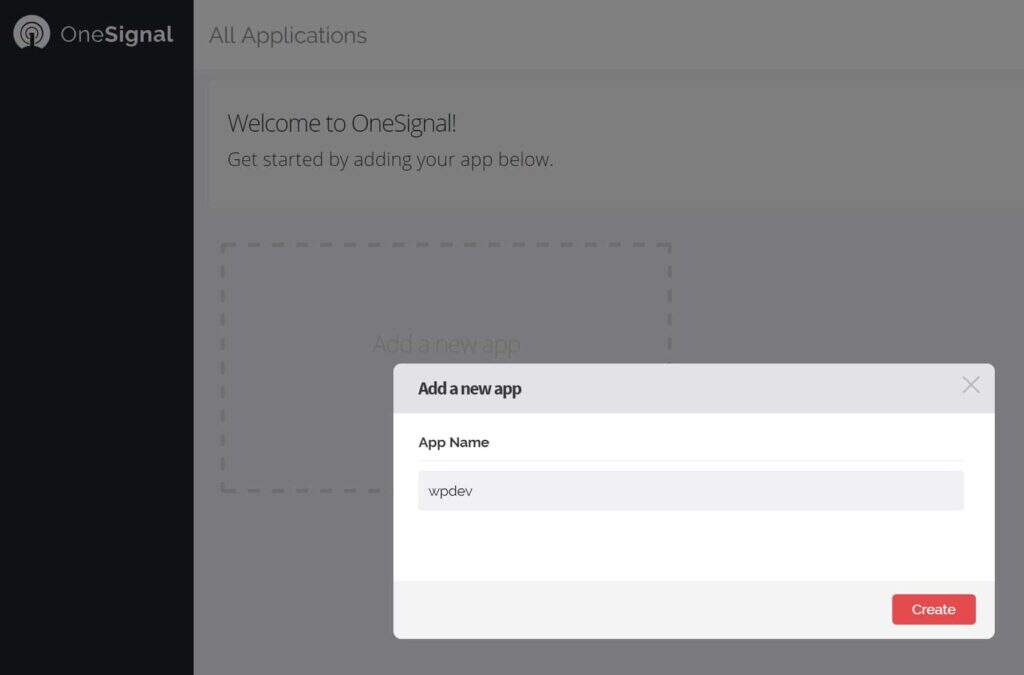
Add new applications to OneSignal
Step 4
Select Website Push, and then click Next.

Website push
Step 5
We first need to set up Google Chrome and Firefox. We will do Safari later. Then click “Next”.
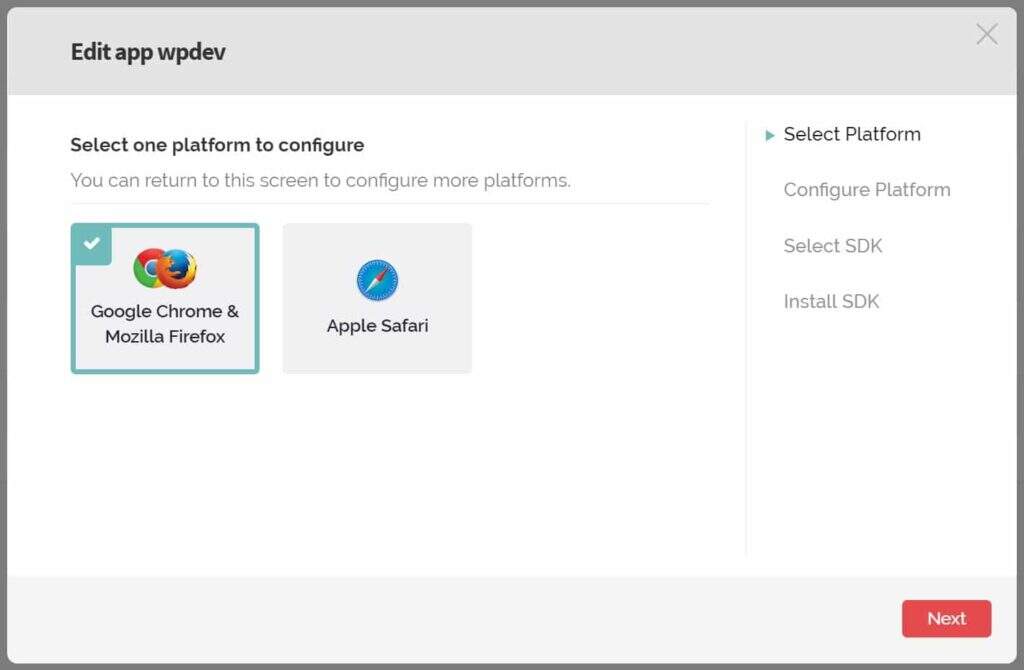
Google browser and Firefox
Step 6
Enter your WordPress website URL. Make sure you use the correct protocol, HTTP, or HTTPS, depending on what you are running on the site. In our example, our site uses HTTPS. Then enter the location of the notification icon URL. According to OneSignal, the icon size should be 192 x 192 or greater to display well on high pixel density devices. You can upload one to your WordPress library and copy URL. If you do not select one, the default OneSignal notification icon is used. Then click “Save”.
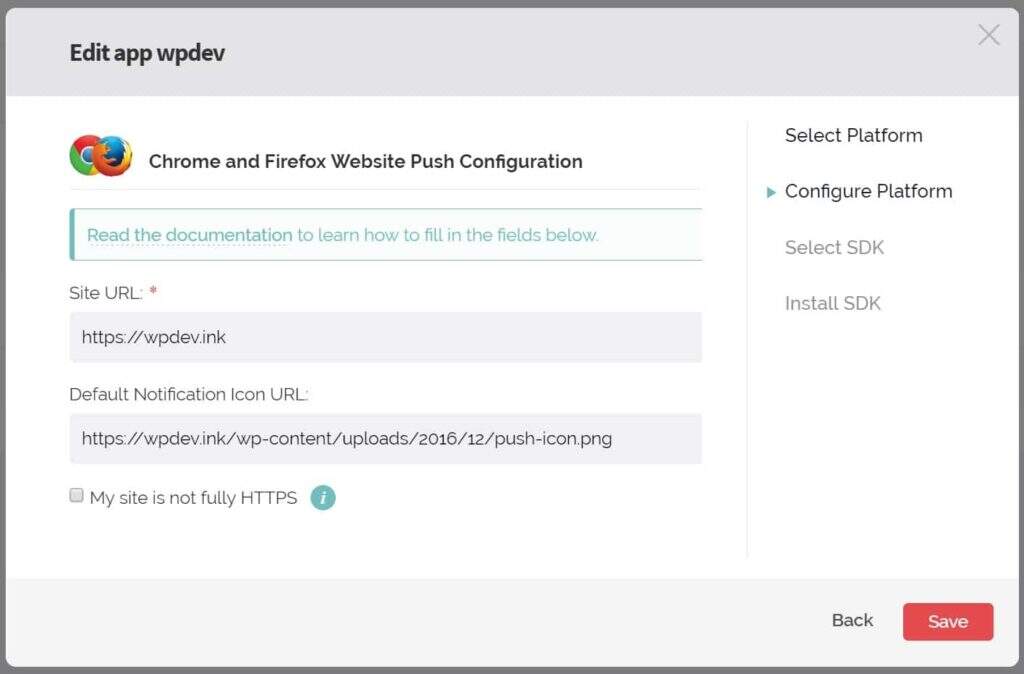
Push Notification URL
Note: if your site runs through HTTP, they allow you to create a subdomain on onesignal.com, allowing applications to run over HTTPS. For example, https://yoursite.onesignal.com.
Step 7
On the next screen, you need to select the target SDK. In this case, we select “WordPress” and click “Next”.

OneSignal WordPress SDK
Step 8
On the next screen, you need to copy your Rest API key and App ID because you need to enter this information into the settings of the WordPress plug-in. Keep this window open because you will be back here later.

OneSignal API key and App ID
Step 9
Go back to your WordPress site and click the “Configuration” tab of the OneSignal Push settings. Enter your App ID and REST API keys. You can now leave all other settings as default settings. Scroll down to the bottom, and then click Save.
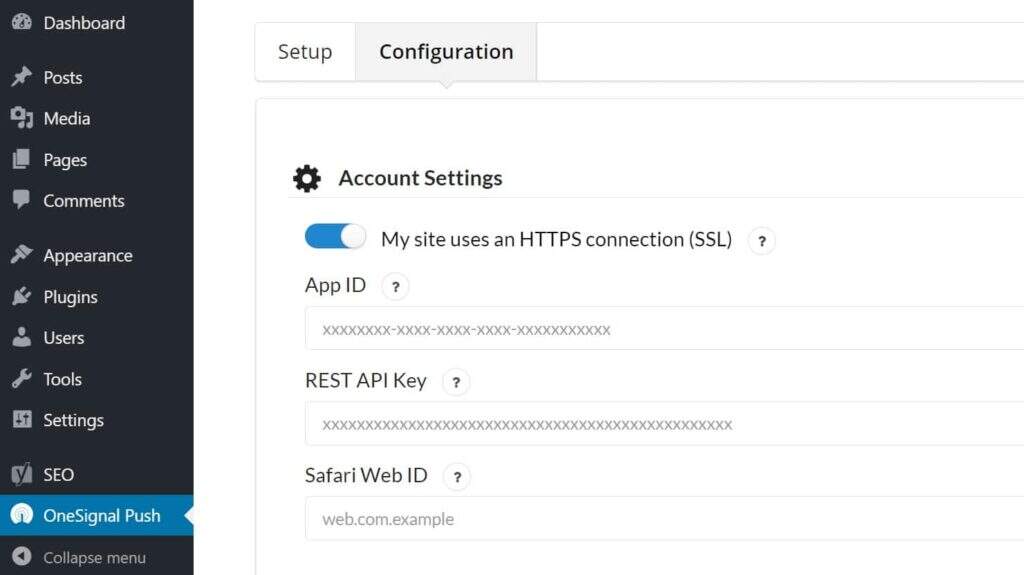
OneSignal Application ID
Step 10
Then you will need to browse your website and subscribe to notifications to test whether everything is all right. Click the red symbol in the lower right corner, and then click Allow. You can change these options later in the display settings. (note: if you are running Advertising blocker, you may need to disable it)
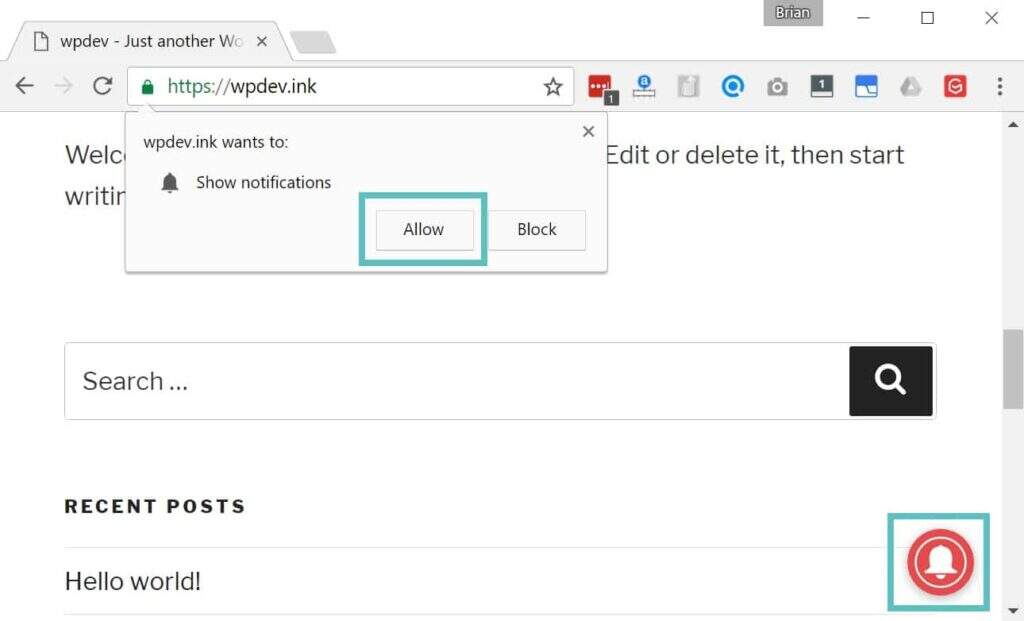
Subscribe to push notification
You will see a confirmation, or you can change its wording later.

Subscribe to notification
Step 11
Then return to the OneSignal site, click the “Check Subscribed Users” button, and then click “Done”.
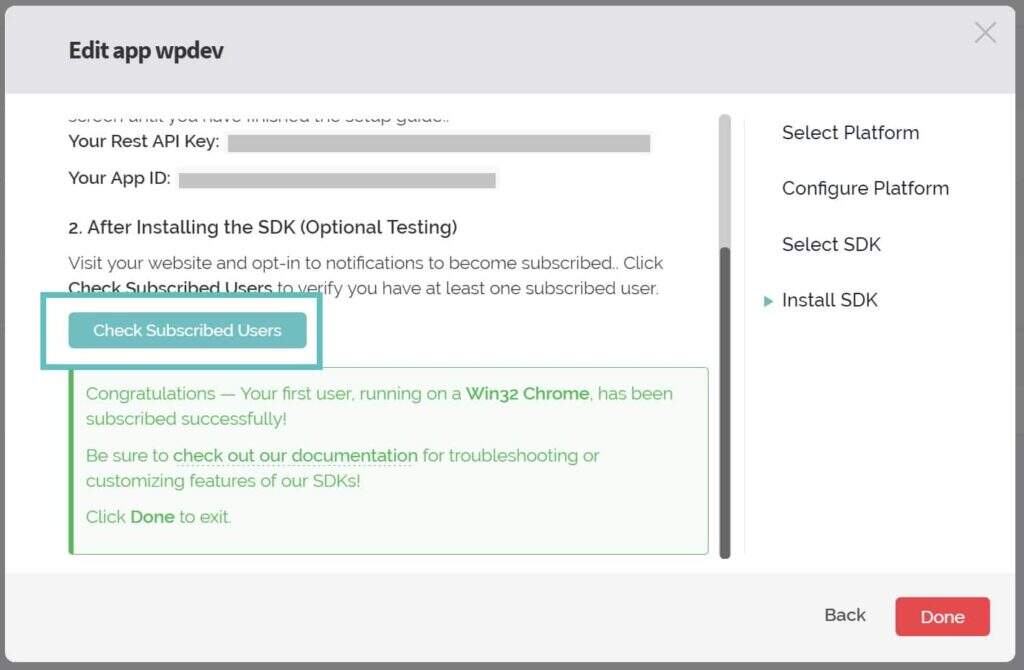
Check subscribers
Step 12
Now is the time to set up Safari push notifications. Click App Settings, and then click Configure next to Apple Safari (macOS).
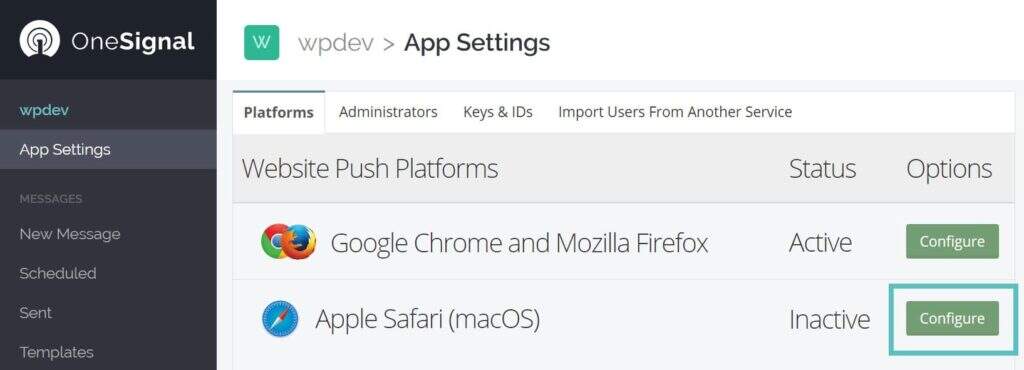
Apple Safari push Notification Settings
Step 13
Enter your site name (which is shown in the notification) and your site URL. You can then upload notification icons (including 16 x 16, 32 x 32, 64 x 64, 128 x 128, and 256 x 256). These are uploaded directly to OneSignal, not your WordPress library. If you do not upload them, the default OneSignal notification icon will be used. Then click “Save”.
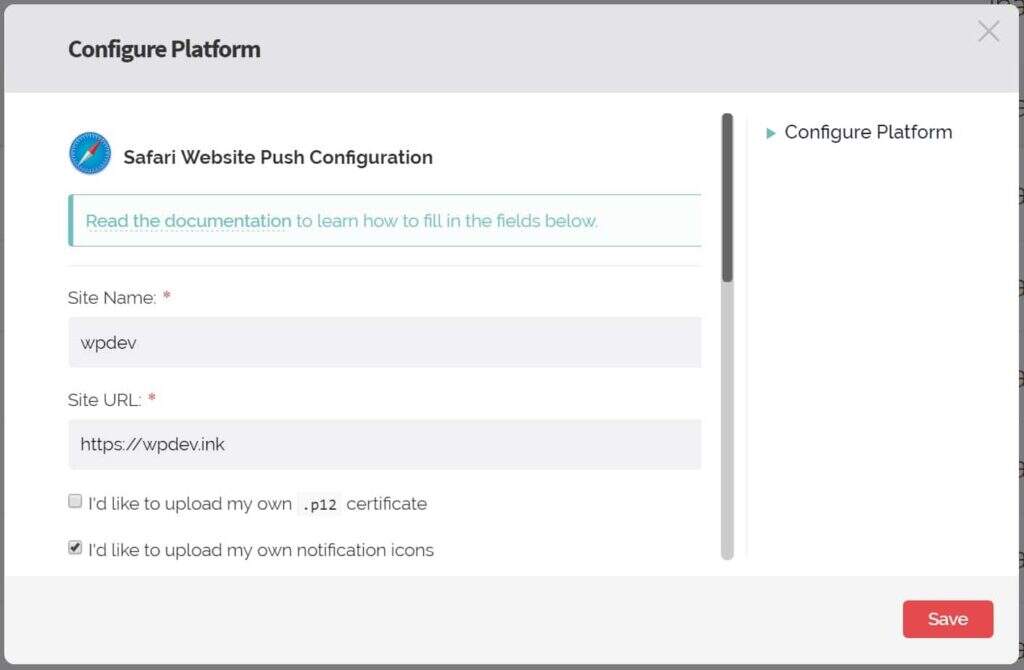
Configure Safari push
Step 14
It then displays the Web ID that you want to copy to the clipboard.
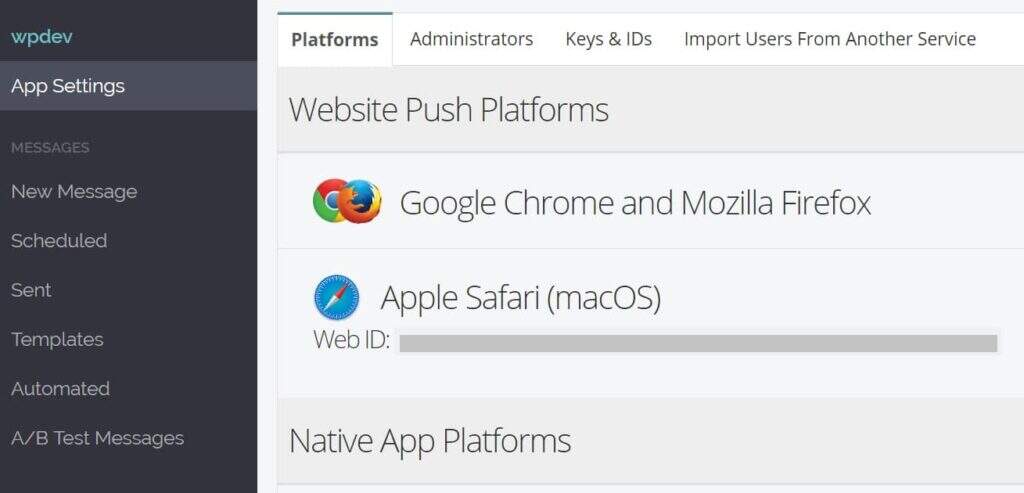
Apple Safari Network ID
Then paste it into the Safari Web ID field of the OneSignal configuration settings. Scroll down and click Save.
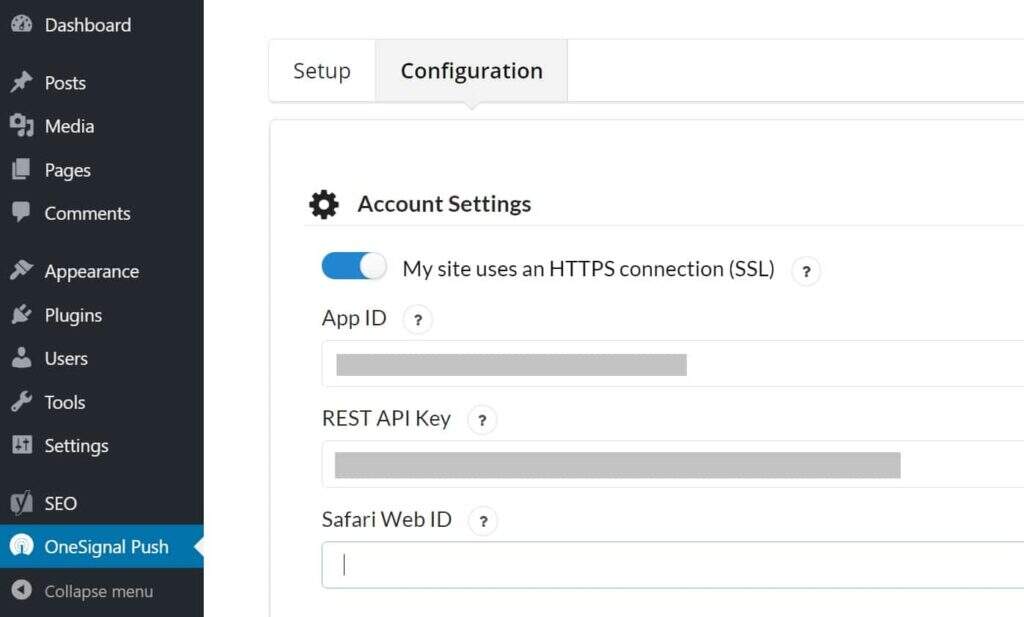
OneSignal Safari Network ID
okay! You have now started and run WordPress push notifications.
Additional instructions and options for OneSignal
You can configure dozens of settings in the plug-in, some of which we will describe below. If you are curious about the performance of OneSignal, the plug-in is quite lightweight and uses a script that is less than 100 KB. This is provided by their CDN partner Cloudflare. In our tests, OneSignal didn’t slow down our site at all.

OneSignal load time
One thing to note, however, is that their plug-ins do not work well with 3rd CDN provider plug-ins. In our example, we used the free CDN plug-in CDN Enabler, which requires us to add the following exclusion to our settings so that OneSignal works properly. If you use other plug-ins or CDN providers, you can view their additional documentation on CDN troubleshooting.
.php,.xml, onesignal-free-web-push-notifications

OneSignal CDN support
In addition, if you use the free Cache Enabler plug-in on your website, you will need to disable JavaScript minimization.
Automatic push notification
When you install the OneSignal WordPress plug-in, it enables the “send notification on post publish” option by default (shown below). If you post an article that you don’t want to be pushed, you can easily uncheck this item.
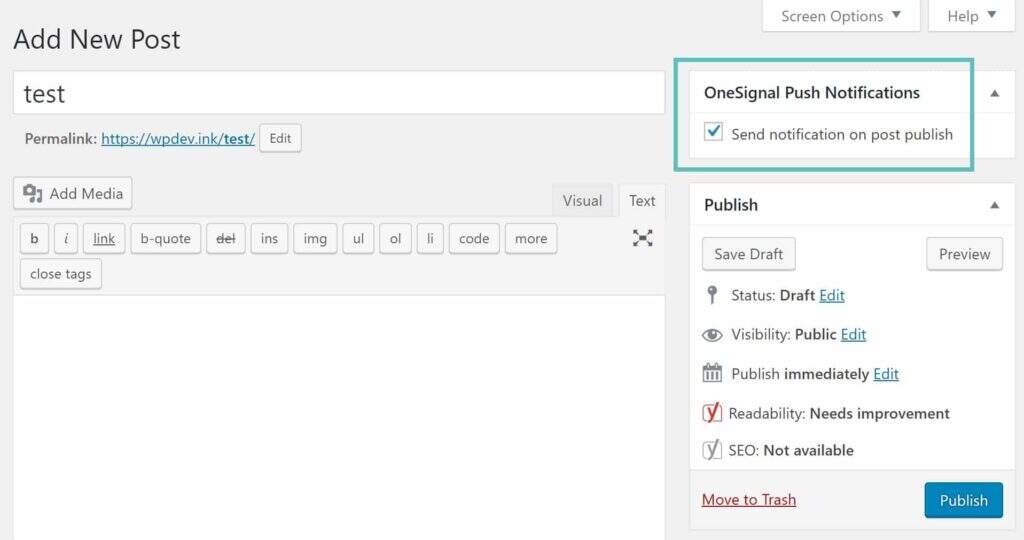
Send push notification
You can also disable the above automatic checking by entering the OneSignal Push plug-in settings and turning off the “Automatically send a push notification when I create a post from the WordPress editor” option. Then, when you want to push it, you can simply check it manually from the WordPress editor. This may be a safer route.

Disable automatic push notification
Automatically prompt the user
If you want to automatically prompt new visitors to subscribe, you can enable it in the plug-in settings. If you think the “red” floating icon may be too abrupt for visitors, you can also disable it.

Automatically prompt the user
You can change many other options, such as:
- Add additional UTM tracking parameters
- Create additional custom article types
- Change the wording of the “Thank you for subscription” option
- Change the wording of the pop-up window
- Change the appearance of the widget and how it interacts with visitors on your site
- Use the feature picture of the post as the notification icon
- Turn off the notification after about 20 seconds
Then you can control everything from the OneSignal dashboard. We were even surprised by the data. On a site where we added it, we had more than 140 push notification subscribers within 48 hours (see below). Keep in mind that even if you don’t subscribe to notifications in person, that doesn’t mean that’s what your visitors think. Never assume that testing is the best way to get specific data when marketing your WordPress site.

OneSignal dashboard
If you push notifications directly from the OneSignal dashboard, be sure to add the UTM parameter so that you can segment and track traffic. This is an example that we use on each URL.
https://yourdomain.com/?utm_medium=push&utm_source=notifications
Unsubscribe to push notification
If your site gets a lot of traffic, then there must be some visitors who accidentally subscribe to your site’s push notifications. Therefore, it is best to have a link somewhere on your site about how to unsubscribe from push notifications. It varies from browser to browser, so it’s usually best to point users to their official documents.
Summary
As you can see, WordPress push notifications are fairly easy to set up! It looks like a few steps, but it can be done in 5 minutes. If you are looking for other ways to connect with visitors or customers, we suggest you give it a try. There’s really no risk. If you don’t like it, you can simply uninstall the plug-in, cancel the service, and return to normal. Pushing notifications can be a good way to get more attention to your content and get visitors back to your WordPress site.

