
If you are going to set up a corporate website or blog, it is necessary to set up a contact form. The contact form is a bridge between visitors and you, making it easy for visitors to give feedback to your website or to contact you for further communication.
if you actively engage with website visitors and provide them with help or solutions, it can help you establish a friendly image, increase the frequency of visitors, and may even become a paying customer of your site and improve your site conversion rate.
installs a contact form for your WordPress website to provide the most direct communication channel for visitors, and the user experience is the best. Few people are willing to open a new tab, go to their email, and send you an email. For most people, it takes too much time and effort. By embedding the contact form directly into your site, it provides a smooth, barrier-free user experience. Why does
- use contact forms on WordPress sites? What is required and prepared in the
- contact sheet? How to use WPForms to create contact forms
- how to use Contact Form 7 to add contact forms
- to create contact forms follow-up work
- how to make full use of contact forms
- more contact forms plug-ins and platform
- summary
- directories
prevents email spam-spam is a pest. You will quickly notice this when you have a WordPress site that uses blog comments. One thing spammers do is automatically scan websites for unprotected e-mail addresses so that they can add them to their mailing lists. The contact form prevents this from happening by giving visitors the opportunity to contact without posting your address online.
asks for the right information-the person you contact doesn’t always send all the information you need. Using the contact sheet, you can make a clear request in advance. It also provides you with a way to filter queries, such as by type. This makes your life easier and reduces a lot of back and forth.
- notifies your customers– conversely, the contact form can also be used as the first point of information. You can provide information to callers about the expected response time and the steps they can take in advance to resolve their queries. This reduces the likelihood of multiple emails from the same impatient person. What is required and prepared in the
- contact sheet? The
- contact form can be used for a variety of purposes on your website. They can help you get more prospects and overcome sales objections. In addition, it is faster and easier to contact you than sending an email, so they will certainly improve the user experience. When building contact forms in
, you need to keep the following points in mind:
is user-friendly: visitors should be able to send their messages and other details directly from your site.
gets the right information: only ask visitors for the information you want, such as their phone number, email address, and so on.
- Spam Protection: any form of spam on the website is bound to receive spam. Plug-ins can help you prevent spammers and hackers from submitting fake entries or even malware.
- organized data: the data you get from the contact table is valuable. As more and more users submit forms, it’s easy to lose your data. It is the right way to organize form entries from the beginning.
- lead generation: take this opportunity to ask users if they can add them to your email list so that you can let them participate in your weekly newsletter.
- compliance: many contact form builders provide the option to add check boxes to ask users if they are allowed to contact them. You can easily follow GDPR rules. How
- uses WPForms to create contact forms
- if you want to create contact forms on WordPress, you should use the best plug-ins on the market. That’s WPForms. Let go.
WPForms is the most powerful form builder for WordPress sites. It has all the features you need to create any type of form with just a few clicks. With its simple drag-and-drop builder,
allows anyone to add contact forms to WordPress without any coding. The plug-in provides a large number of form templates, so you don’t have to create one from scratch. You can simply add or remove fields and customize the form the way you want.
In addition, you can access other advanced features, such as form notifications and confirmations.
this will allow you to send confirmation emails and messages to visitors as soon as they click the submit button on the contact form. You can even notify yourself and your team members to reply immediately to the user
and you can say with certainty that WPForms is the best choice for creating contact forms in WordPress. The following are the main features provided by the plug-in:
beginner-friendly drag-and-drop form builder
more than 100 pre-built form templates
- supports payment tools such as PayPal, Stripe, Square,
- management dashboard for tracking and managing form submissions
- integrates with email marketing services to build your email list
- built-in spam protection
- with CAPTCHA option now you know which form generator to use Let’s learn how to easily create contact forms in WordPress.
- step 1: install the WPForms plug-in
first, you need to sign up for a WPForms account. You can also start using the WPForms Lite plug-in available on WordPress.org. This free version has a number of features that can be used to create professional contact forms for your website.
if you want to access advanced features such as payment gateways and forms plug-ins, you can upgrade to the professional version. The pricing plan is as low as $39.50 a year. After registering with
, you will find your download file and license key in the WPForms dashboard.
you need to install the WPForms plug-in on the WordPress website. After
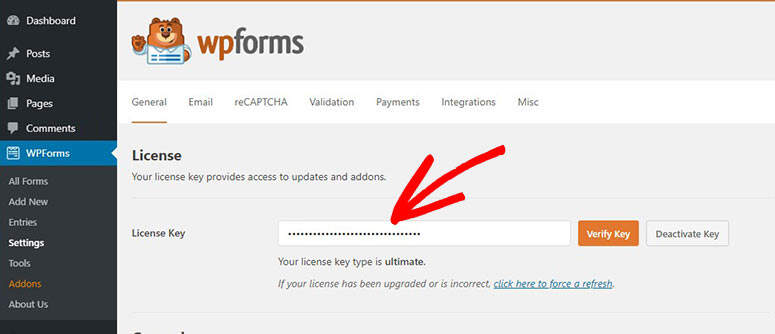
installs the plug-in, open the WPForms »Settings page and enter your license key here.

then click the “Verify Key” button to view the success message.
now you can start creating the WordPress contact sheet. Step 2 of
: create a new contact sheet
to create a new form, go to the WPForms »Add New tab on the left menu of the WordPress dashboard.
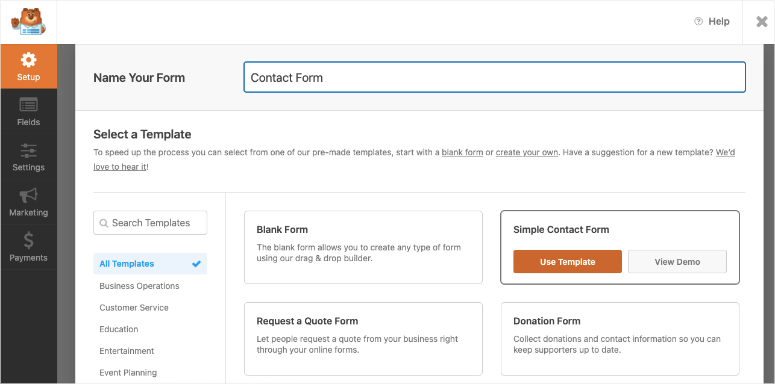
then you will see the template library where you can choose to contact the form template or a blank form to get started.
you can name the form at the top, and then select the Simple Contact Form template for this tutorial.
on the next screen, you will see the drag-and-drop form builder. All form fields, such as email, numbers, CAPTCHA, and file uploads, are provided on the left side of the page.
is on the right, and you will see a preview of the form. The form template already contains all the necessary form fields, such as:
name (first and last name)
email address
- comment / message
- if this is what you need, click “Save” and go to the next step. If you need to customize it more, the drag-and-drop builder is very easy to use.
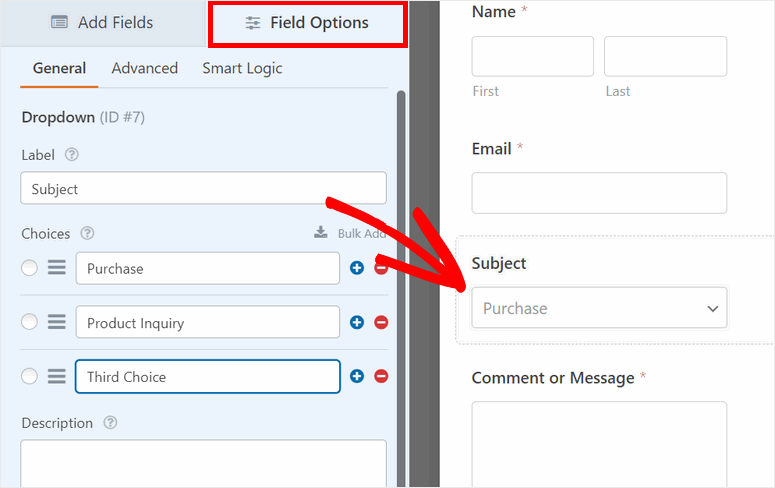
- you can easily add new form fields to the form preview and sort them as needed. For example, we add a drop-down field to the contact form.
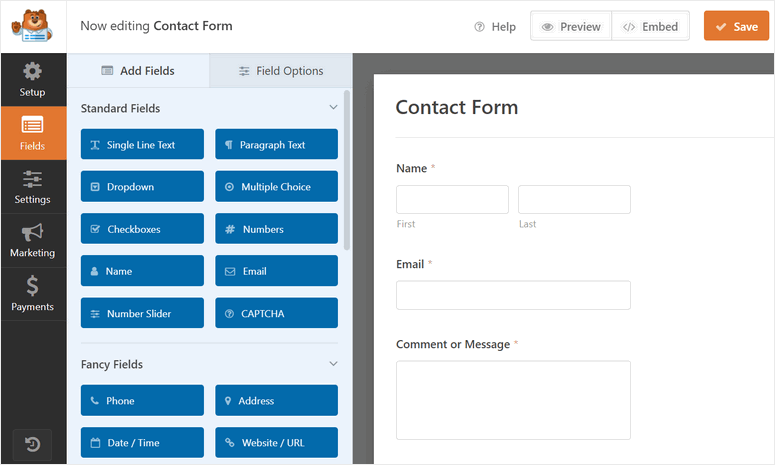
edits the form field, you just click it, and you will see field options such as label, item label, description, and so on.
in the Advanced settings tab, you will find more options, such as form style, field size, CSS class, and other custom form field settings. After

finishes customizing the contact form, you can adjust the settings to ensure that it suits your needs.
step 3: configure form Settings

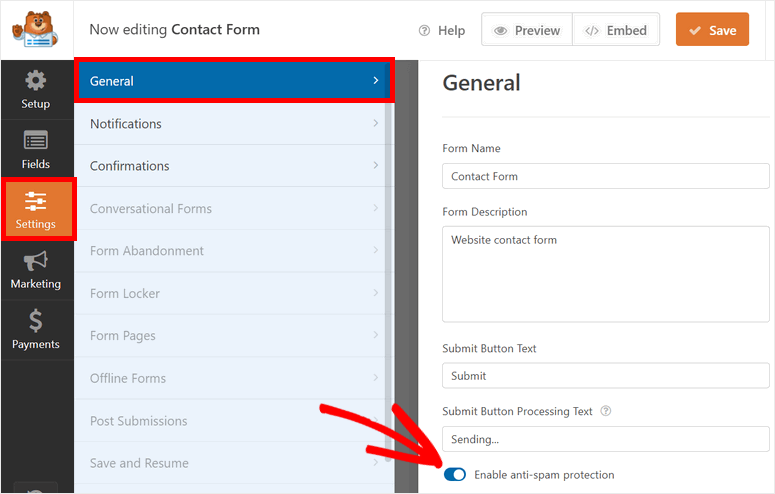
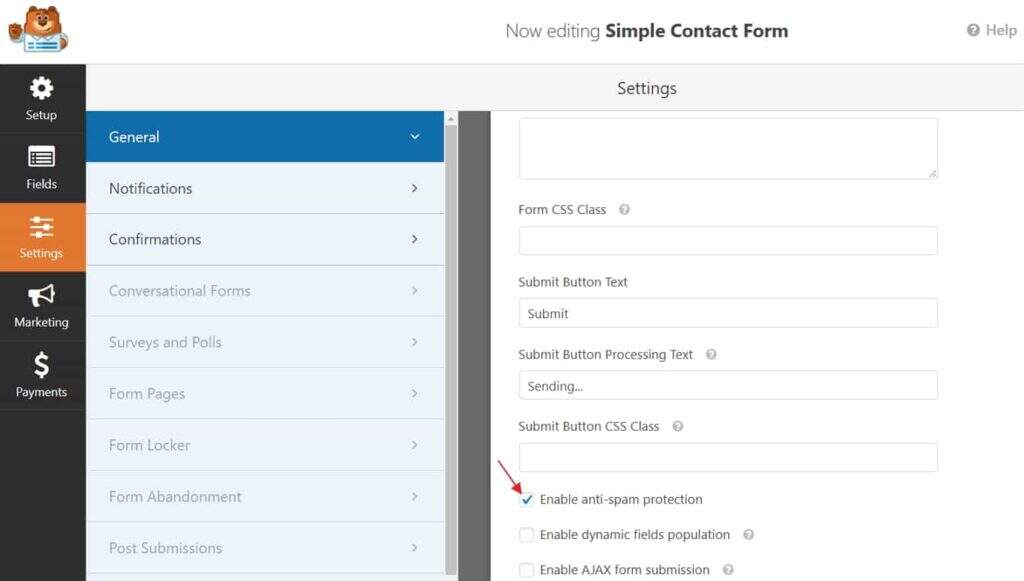
in the left menu panel of the form editor, click the Settings »General tab. Here, you will see these form settings:
form name: edit the name of your contact table.
form description: add a simple description of the functionality of your contact form.
- submit button text: change the label of the submit button of the contact form. The
- submit button processes text: enter the text that appears on the submit button when the form is processed.
- enables anti-spam protection: prevents spam robots from submitting forms. If
- scrolls down, you will see advanced options, such as custom CSS for the submit button, AJAX form submission, and so on. These are for developers who want to add custom coding. When the
- is complete, click Save and proceed to the next step.
step 4: enabling form notifications and confirming
WPForms allows you to control what happens after users submit forms on your WordPress site. You can send the form notification and confirmation to:
notifies yourself and your team members of the information about the new form submission
sends an email to the user to confirm their submission.
- displays a confirmation or thank you message after successfully submitting the form
- redirects the customer to another page after submitting the form
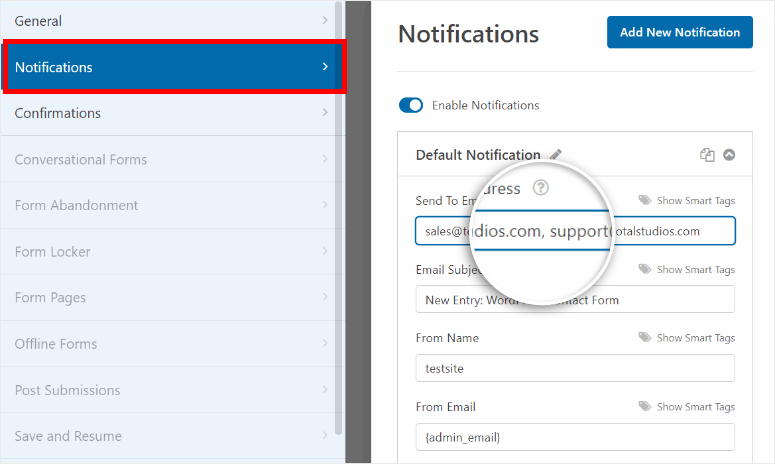
- to set up an email notification, open Settings »Notification on the left menu of the form builder.
- by default, administrator notification is set. This sends an email to the webmaster whenever a new form is submitted.
in the Send to Email Address field, you can also add more e-mail addresses for team members. Just make sure they are separated by commas.
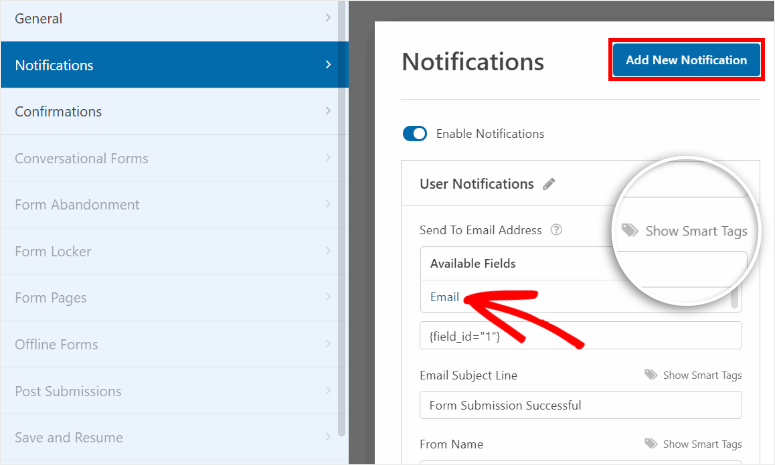
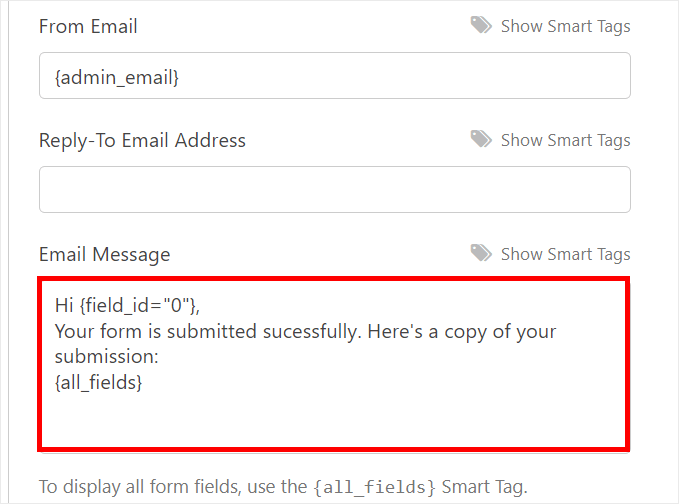
more importantly, you can set up notifications for your users and send them automatic confirmation emails. To do this, simply click the Add New Notification button.
to add the user’s e-mail address, click the Show Smart Tags option and select the Email form field.
next, you can customize the subject line, form name, and e-mail body. If you want to display form submission details in an email, use the {all_fields} smart tag.
this automatically retrieves data from the form submission and adds it to the e-mail notification.
you can now set the confirmation message that is displayed at the front end of the WordPress site after the user submits the form.
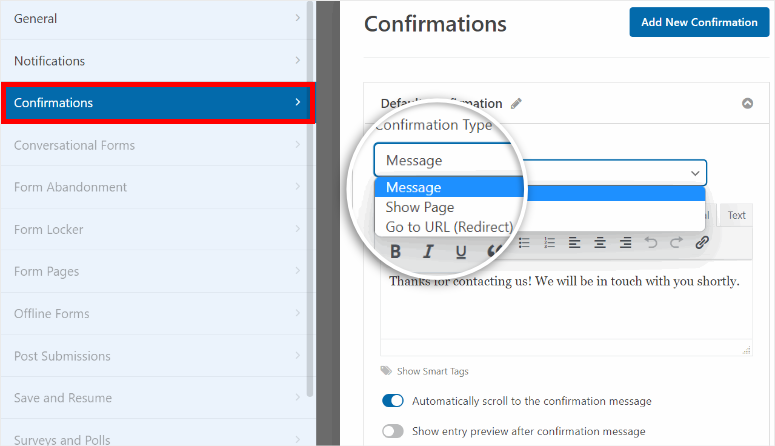
to do this, click the Confirmations tab on the settings page. Here, you will see three options:
Display custom message
redirect to other pages on your site
- redirect to an external site or page
- if you want to display a thank you message to the user, you can enter custom information in the text area.
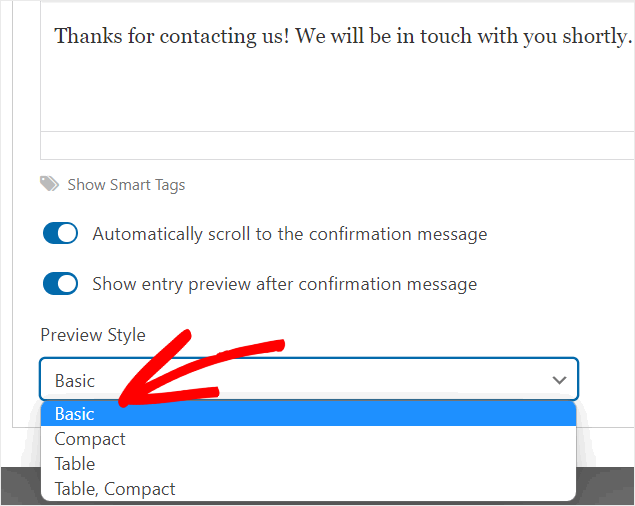
- in addition, you can choose to automatically scroll up to the confirmation message and display a preview of the form submission to the user. You can even choose a preview style. Finally,
, don’t forget to save your settings.
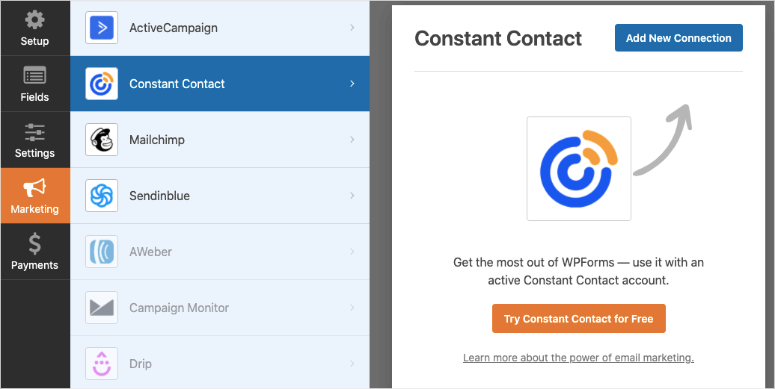
all you need to do now is add the contact form to your WordPress site. Before we do this, if you want to connect this contact sheet to your email marketing account, you can do so under the Marketing tab.
you just need to select your email provider and connect to your account. You can then segment prospects and automatically add them to your email contact list and activities. It’s really that simple!
now let us add your contact form to your website. Step 5 of
: add your contact form to WordPress
WPForms allows you to add a contact form to any page, article, or sidebar on your site. It provides contact form brief code and Gutenberg block editor support to make the process super simple.
Add a contact to a WordPress page or article (Gutenberg)
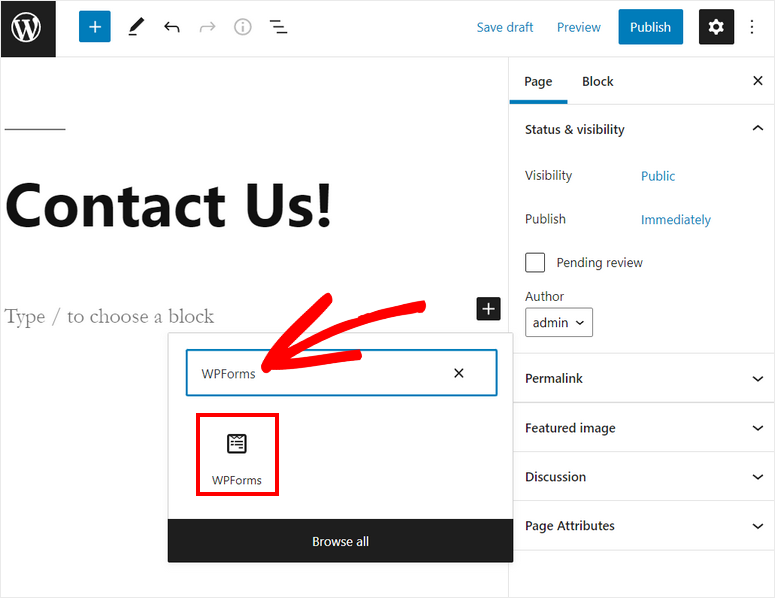
to add a contact form to any WordPress page or article, you can search for the WPForms block and add it to the text editor.
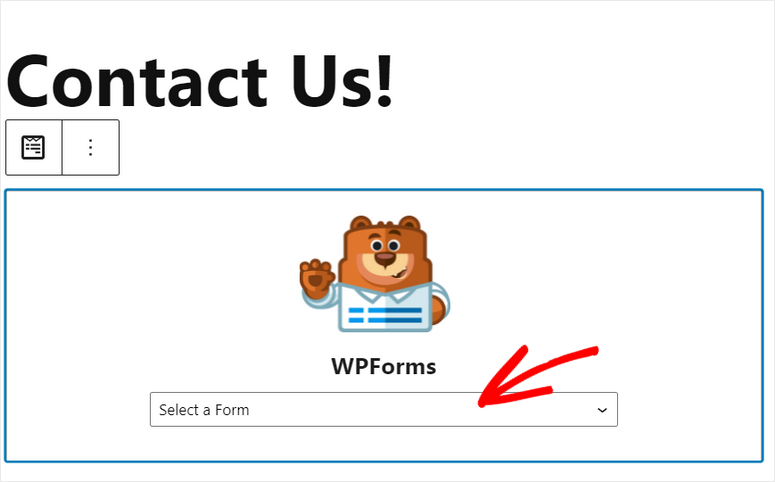
then you will see a drop-down menu where you can select the contact form you just created. After
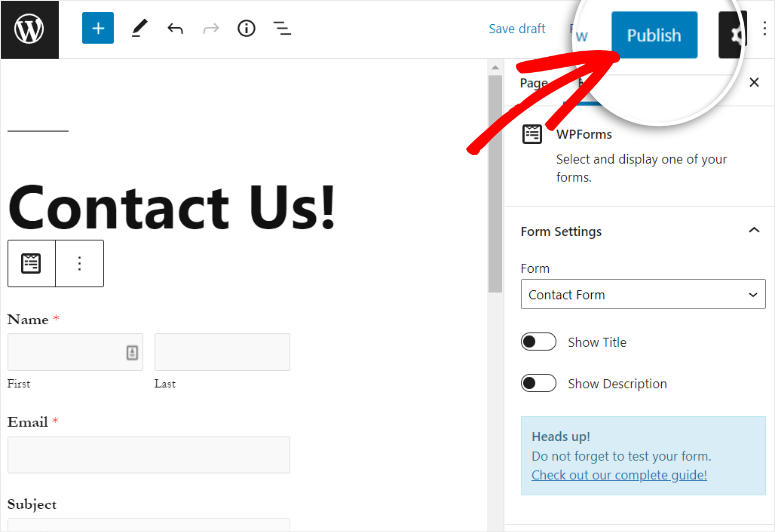
selects the form, you will see a preview in the text editor. To add the contact form to your site, click the publish button in the upper right corner.
Add contacts to WordPress pages or articles (Classic Editor)
if you use the WordPress Classic Editor, you can add a contact form using the “Add Form” button. Alternatively, you can simply copy and paste the form short code to embed the form into your Web site.
Add a contact form to the sidebar
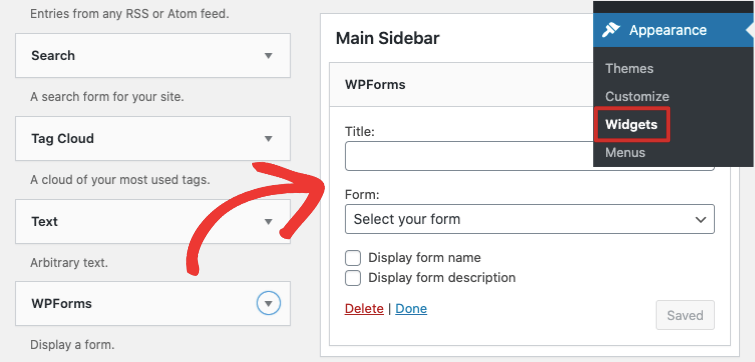
you can also add a contact form to the sidebar gadget. To do this, go to the appearance »gadget. Now drag and drop the WPForms gadget to the sidebar or footer menu on the right. After

, use the drop-down menu to select your form and save your changes. When
is complete, click the “Save” button. Your form will now start to appear on the sidebar of your site.
there is no doubt that WPForms is one of the top form builder WordPress plug-ins that allows you to create forms for any purpose. It is compatible with all major WordPress themes and page builders, so there will be no problem using it on your site. How to add contact forms for
using Contact Form 7
there are many WordPress contact form plug-ins to add contact forms to your site, both free and premium. Next we will use another forms plug-in, Contact Form 7, to demonstrate the operation of adding a contact form in WordPress.
this plug-in is available for free download from the WordPress directory and has always been one of the most popular plug-ins of all time. In addition, they are easy to use, with a good list of features and reasonable add-ons.
step 1. Installing the Contact Form 7 plug-in
installing Contact Form 7 is as simple as any other WordPress plug-in. Just log in to your website, go to plug-in & gt; to install the plug-in, and enter its name in the search box.
, it should be the first to appear. Click install now to download it to your site. When you are finished, click enable to start using the plug-in.
step 2. After creating a new contact form

installation, you will find a new menu item named “Contact” in the WordPress sidebar. Click it to enter this screen.
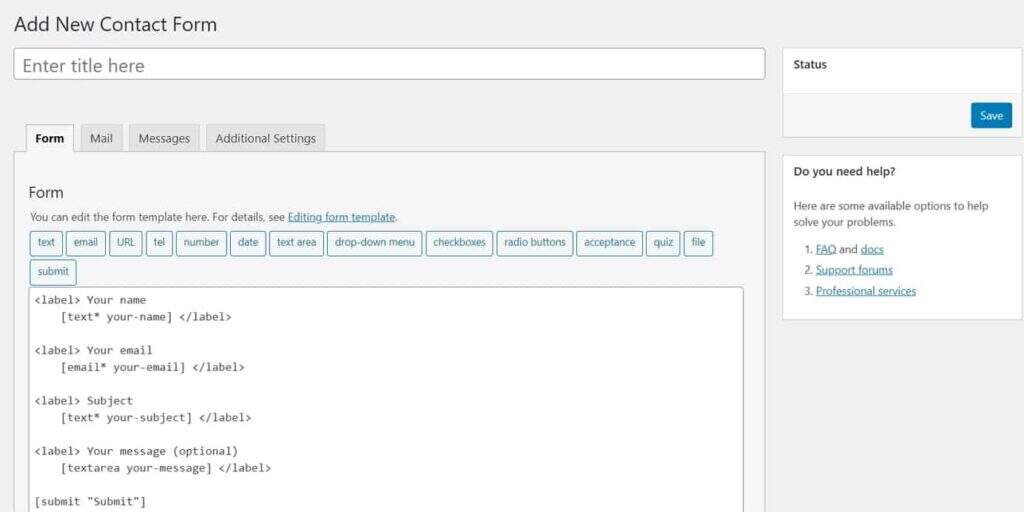
you will find a list of all contact forms on your website. It contains a sample form that you can theoretically use immediately. Click it to start editing or click “Add New” at the top of the screen. Both will bring you here:
looks a little mysterious at first, but don’t worry– the plug-in comes with a tool for automatically generating code, so you don’t have to code anything yourself.

step 3. Configure your form
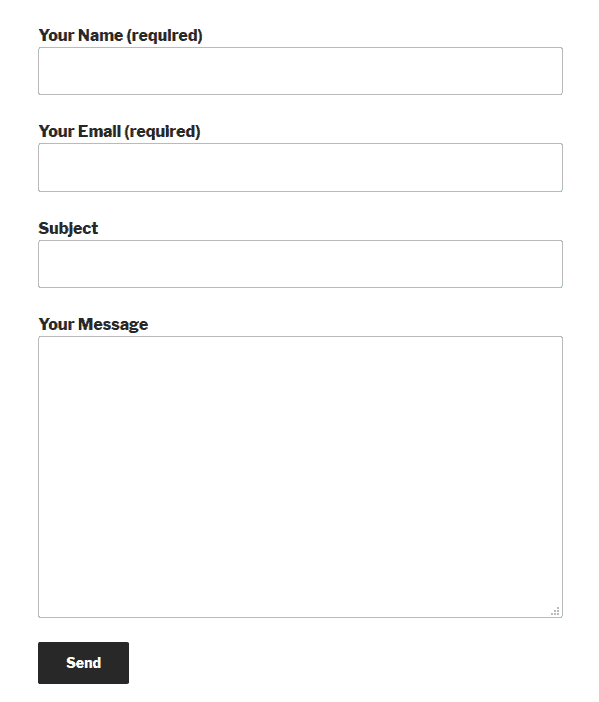
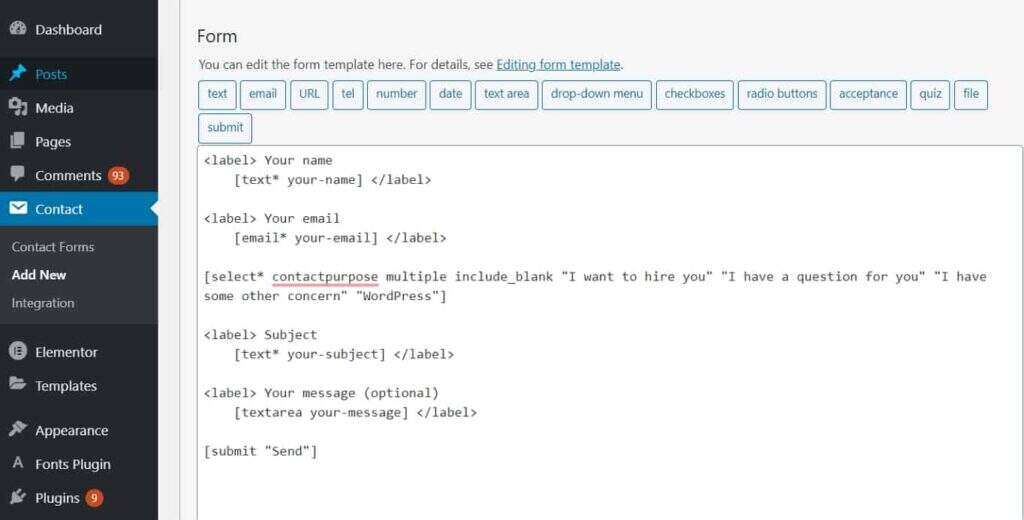
currently, the default form we have on the back end will look like this on the page.
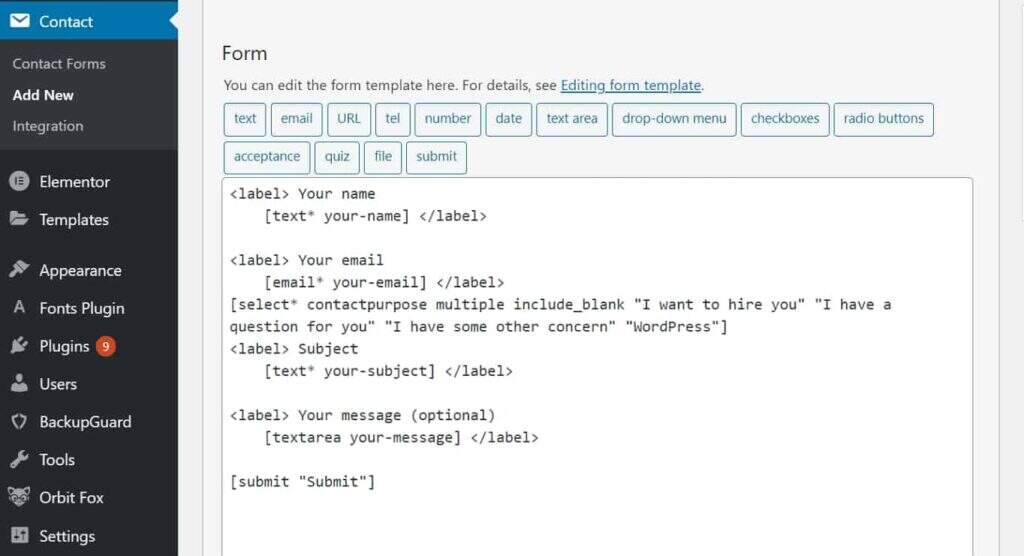
is standard. Suppose you want to add a drop-down menu to select the purpose of contacting you. In this way, you can immediately see the messages that you want to prioritize.
to do this, you first need to place the cursor where you want the menu to appear in the contact form. In this case, it lies between the e-mail address and the subject.
clicks the drop-down menu in the top toolbar. It takes you to the menu:
the following is how to fill in different fields:
field type-choose whether this field is required to submit the contact form.
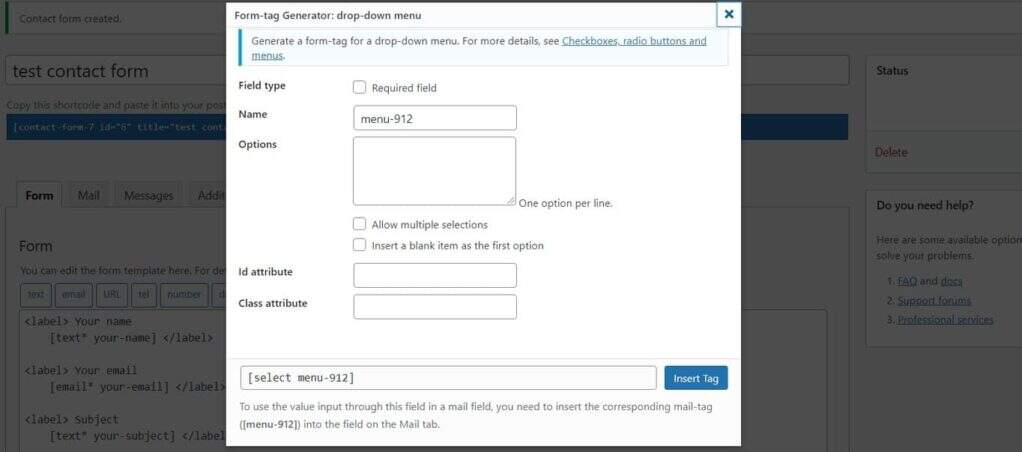
name-this means the name used in the tag. It is not displayed to visitors, but it makes it easier for you to remember the purpose of the tag and configure the e-mail that will be sent to your account later.
- options-use the drop-down menu to enter options available to visitors. One per line. You can also choose to allow multiple choices and use blank items by default.
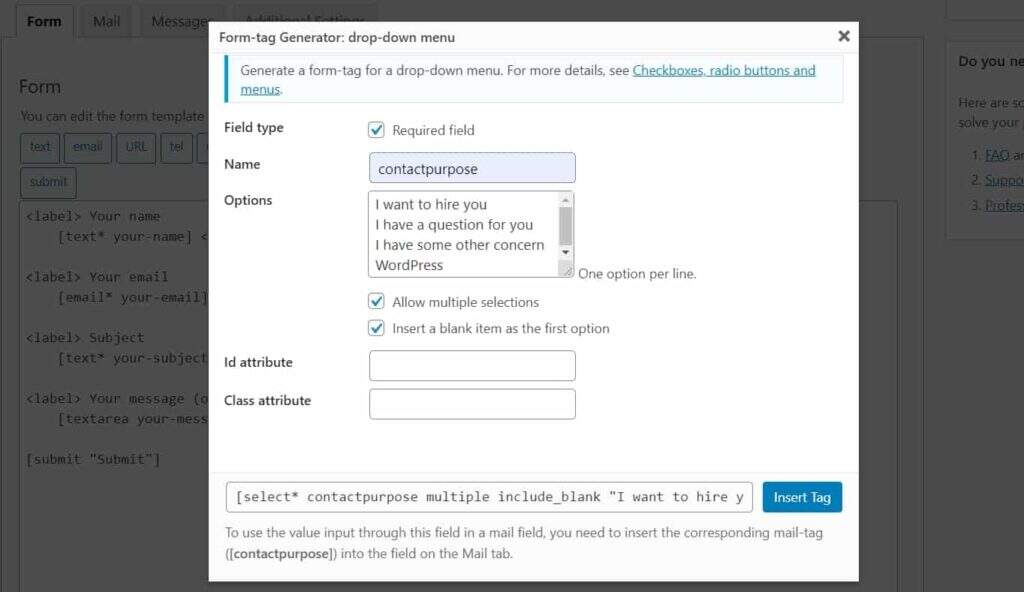
- Id/Class property-at this point, you can assign a CSS class or id to this field. This is useful for customizing styles. We’ll talk later. Here’s what we filled out for
- : when
- is satisfied, click “Insert Tag” to put it in the form. All that’s left for
is to add a tag. This is the text that comes with the contact form field to explain what it does. Just copy and paste the existing code from other fields and adjust it according to your needs.
Step 4. Edit email Settings
next, you must configure the email sent to you from the contact table. You can do this under the Mail tab at the top.
you will find that these fields are pre-populated with labels similar to the previous contact sheet. It also provides you with available field tags, including any new tags you created previously (if you have saved the form). You can use these customizations to receive messages from your contact form.
the following is the meaning of each field:
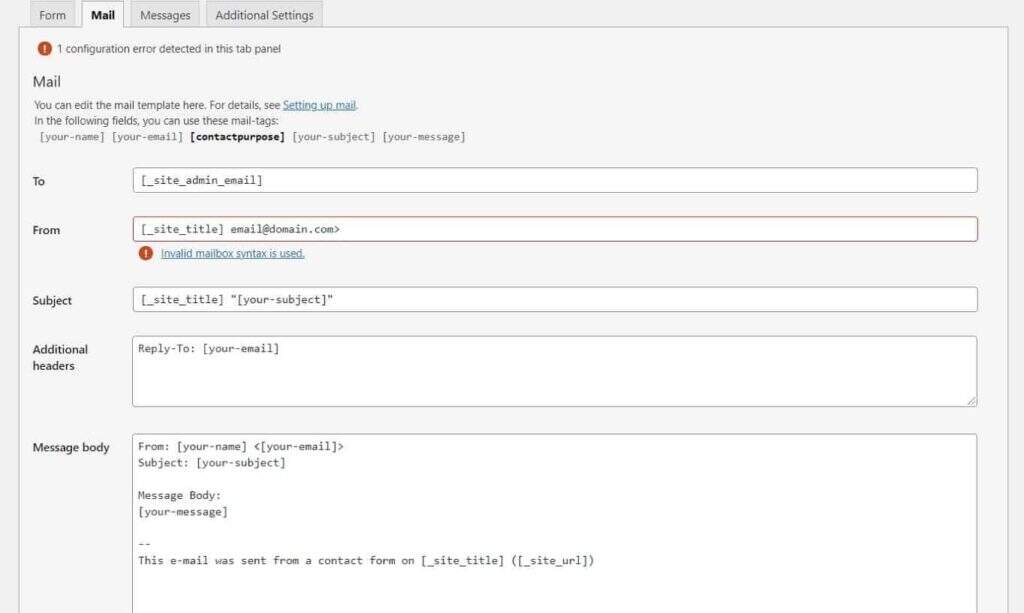
To-the email address to which the message will be sent. You can usually leave it as is.
From-the sender of the email. By default, it is set to the name of the person who uses your contact sheet.
- Additional Headers-the space where the header field is attached. When you click reply, the standard setting sends your reply to an email from the person you contacted, not from (that is, your site). You can also put the recipient’s CC or BCC there.
- Message body-the body of the email you will receive.
- Exclude lines with blank mail-tags from output-when selected, the plug-in excludes any used tags from the message if they are empty.
- Use HTML content type-by default, messages are sent in plain text. Check this box to use HTML instead.
- File Attachments-if your form allows files to be uploaded, the tags for those files belong here. You can also use it to attach files hosted on your server.
- Mail (2)-an additional mail template that is commonly used as an automatic reply. Check to activate. The
- standard option is very good. For our example, the only thing we need to change is the subject line.
- uses the above format, and you can now set filters in your mail program to sort messages by subject line and give priority to business queries.
step 5. Add the form message

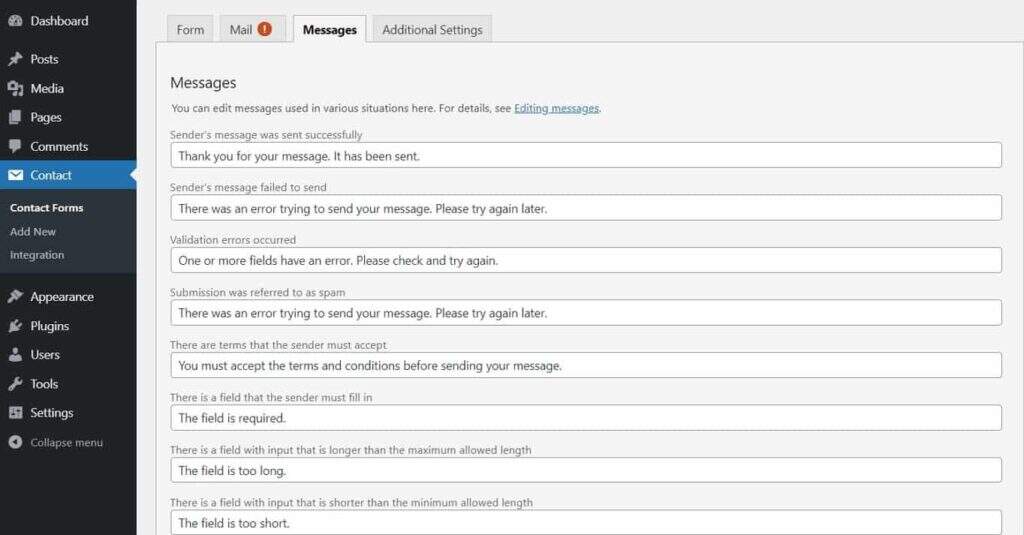
, followed by the Messages tab. You can configure messages that visitors may encounter when using the form.
these are error messages, success messages, or just tips on how to use the form correctly. We find that these are already very good, so we usually leave them as they are. If you have reason to change any of them (for example, to suit the tone of your site), feel free to do so.
step 6. Customize other settings
finally, you can make other settings. By default,
, these are empty.
you can do different things-from restricting the ability of login-only people to submit contact forms to setting the form to demo mode for testing. This is not important for our purpose, but you can find all the different options in the documentation.
step 7. Add the form to your site
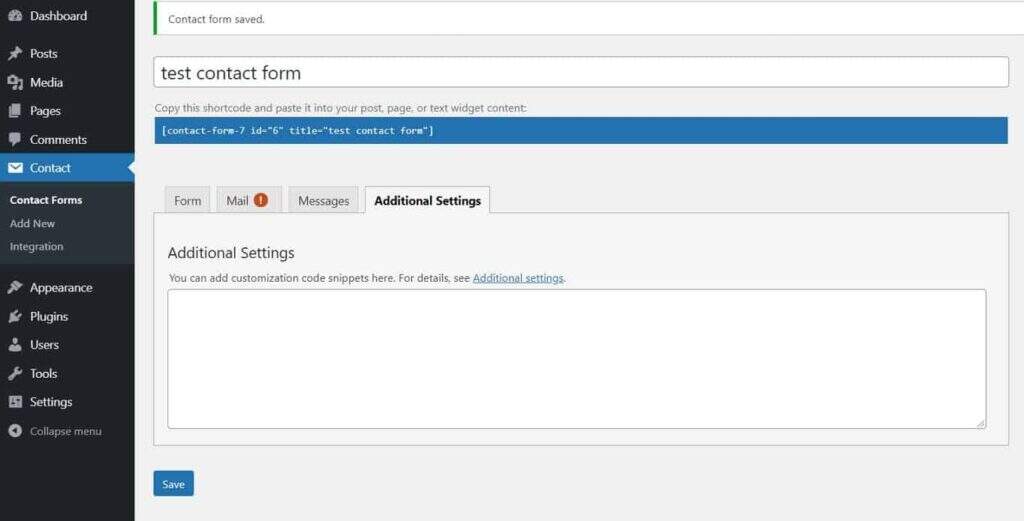
now that you have finished configuring the form, it’s time to get it on your site. The first thing you need to do is save the form.
before that, you may need to add a name at the top. If you create multiple forms, this will make the form more distinguishable. After
saves the form, a short code appears on the screen:
you will use it to place the form wherever you want.
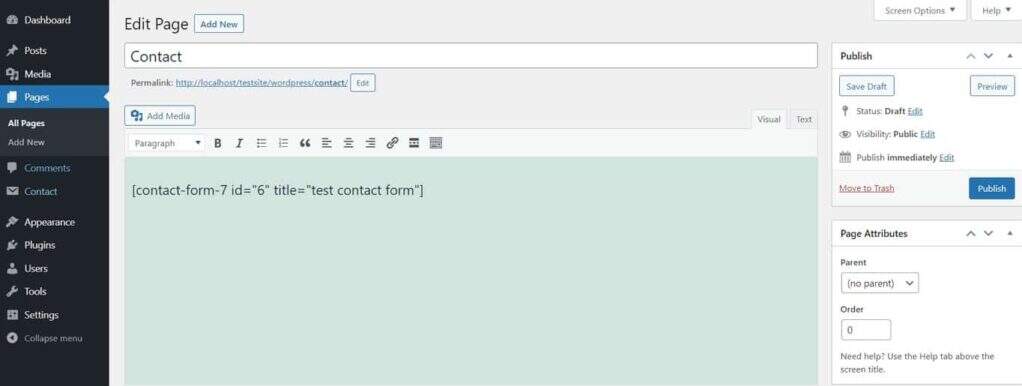
the first thing you need to do is mark it and copy it. When you are finished, go to the page where you want to place the form. For example, you can simply create a new page and name it Contact. Paste the short code into the WordPress editor.

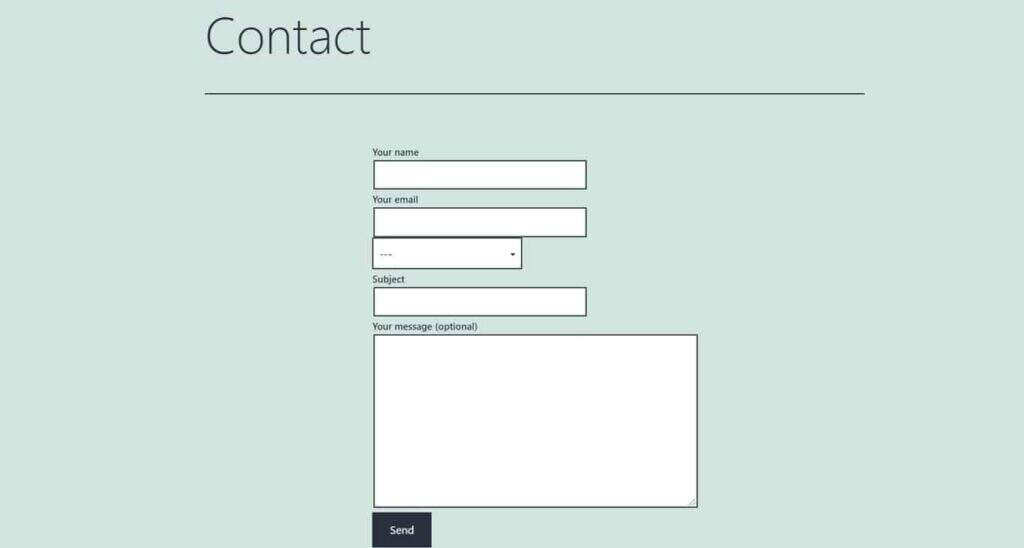
when you publish the page now and go to the front end:
it is there. Please note the drop-down menu we created earlier. It is now part of the contact form when needed.
‘s follow-up to the creation of a contact form after
gets the form on your website, the work is not over. There are also important things to deal with, such as styling forms, protecting them from spammers, and implementing protection measures for personal data. Let’s do this in order:
changes the form design
in general, there is no need to change the style of the contact form.
form styles are already defined in the stylesheet in some WordPress themes. As a result, the contact form is likely to automatically suit your website design. If you still need to make adjustments, you have a variety of options.
Contact Form 7 forms have standard HTML tags. You can simply change the associated CSS to change the appearance of the form. Keep in mind that this also affects other input fields on your site that share the same tag.
therefore, in order to design your contact form, you must learn a little bit of CSS. However, this is not too complicated, and Contact Form 7 has a tutorial on how to do it.
Contact Form 7
is similar to the above, and the WPForms contact form can also be styled using CSS. In fact, WPForms has created a tutorial on how to implement custom CSS styles for your forms.
implements spam protection
WPForms
generally speaking, spam is a big topic on the Internet and websites. If you leave unprotected email addresses on your site, many automated programs will extract them and start sending you unsolicited quotes, phishing emails, or worse. Unfortunately for
, the same is true of contact forms. Unless you take steps to prevent this from happening, there are other programs that can send you spam through the contact form. Fortunately for
, Contact Form 7 provides an easy way to prevent this.
(1) simple calculation
One of the
Contact Form 7
is simple: include a quiz that a robot cannot answer in your form, just like a simple equation.
(2) reCAPTCHA
In addition to
, there is reCAPTCHA. This is a Google service used to combat spam. You need an API key and integrate it with Contact Form 7. This may have an impact on the protection of personal information.

you can add it to your form using the reCAPTCHA tag. The manufacturer of Contact Form 7 also has a CAPTCHA plug-in called “Really Simple CAPTCHA”, which you can use for the same purpose.
(3) plug-in
you can also use third-party plug-ins for spam protection. The most famous of course is that Akismet and Contact Form 7 provide detailed instructions on how to combine the two.
has other things, such as Contact Form 7 Honeypot or WPBruiser. For the latter, you need a paid extension to use Contact Form 7. You can also easily find more options.
WPForms comes with its own anti-spam option, which you can enable immediately. To do this, go to Settings-& gt; General. Then scroll down and check the “Enable anti-spam protection” box.
for extra protection, you can also add reCAPTCHA and hCaptcha to your form.
WPForms
brings it into line with GDPR
you may know that some changes have taken place in European Internet privacy laws. On May 25th, 2018, the General data Protection regulations (GDPR) came into effect.
has made some changes to the law governing the use of personal information online. It also threatens to impose huge fines on anyone who violates the rules.
, why is this important? Contact the form to collect personal data. So, if you fall within the jurisdiction of a regulation (as most people do now), there are a few things you need to pay attention to.
do not collect data that you do not need-the contact form allows you to select the fields to include. If you have any data that you don’t actually need, stop collecting. In this way, if there is a loophole, you will not lose it.
disables any tracing-if you use contact forms that track cookie, user agents, and / or user IP, you need to disable this feature to comply with GDPR.
- get absolute approval-add a way to your form to get people to allow you to collect their data. For example, contact sheet 7 provides an acceptance box. (important: do not set the check box to be enabled by default. The user must do this by himself. In addition, please include a message describing the content and purpose of your collection and a link to your privacy policy).
- sets privacy policies-according to GDPR, every professional website needs to present a privacy policy that explains what data they collect and how they use it. You also need to enable visitors to ask about their personal data and delete it.
- implements HTTPS-encrypts the exchange of data between the browser and the server using SSL/HTTPS. This is important to keep the contact form of personal data secure. This is also considered to be a common practice nowadays.
- you can find more information about applying GDPR-compliant forms to contact forms here:
- Contact Form 7-how to make privacy-friendly contact forms
WPForms-how to create GDPR-compliant forms
- how to make full use of contact forms
- contact forms allow you to make dynamic connections with website visitors. However, you should keep some tips in mind when planning to build a website.
out of the box
although we have made a simple form in this tutorial, WPForms and other contact form plug-ins have hundreds of templates that you can use to create a variety of forms. Forms are not just used to collect contact information, they are also critical to the success of the enterprise. You can use many WordPress form generators to create questionnaires, conduct polls, and generate quotes for customers. You can even use contact forms to collect product personalization requirements. In addition, don’t be afraid to be creative when using forms on a website.
ensures that forms are secure
spammers will use every means to accomplish their tasks, one of which is to contact the form online. However, security features such as Akismet or Recaptcha can help secure form content and e-mail addresses. When you add a form to a site, don’t forget to make sure the form is secure. The power of
integration
integration is the advantage of using WordPress native contact forms. You can create custom email subscription forms that automatically populate your email marketing solution (such as Mailchimp). Your form can be connected to your customer relationship management (CRM), allowing you to effectively nurture prospects. The WordPress contact form looks and feels similar to your site, so it gives customers a sense of trust. Your form will be a source of power for all aspects of your business while keeping your process seamless and simplified.
Custom form notifications and email
if you want to send notifications to yourself or to visitors, remember to customize your notifications and emails. Add your brand color, change the template text, etc., so that website visitors have a sense of trust in your brand. In addition, if you redirect users to different pages after submitting the form, make sure that these pages provide customers with all the information they need to take the next step on the site.
considers the user experience
to create a transformation optimization form to ensure that visitors successfully fill out and submit the form. Creating a simple, easy-to-understand form can help guide visitors to submit the form successfully. Consider adding tooltips, instructions, instructions, and placeholders to let customers know the different fields and parts of the form and provide them with a seamless, friction-free form filling process.
Considering accessibility
accessibility is not often discussed, but it has gradually become a frontier issue in web design. Consider how other users interact with your form in other ways. Make sure that tags, ARIA, tag sequences and other functions are in place to help people who may use the Internet in different ways also use your site and eventually experience the interactive elements of the site in a way that best suits their needs.
more contact form plug-ins and platforms
here are some contact form plug-ins and platforms available for trial.
Formidable Forms: a popular form generator with a simple drag-and-drop interface, more than 15 advanced add-ons to create advanced calculators, etc.
Gravity Forms: another WordPress forms plug-in with a library of more than 30 form field types, payment processor integration, and complex form templates such as quizzes, surveys, and so on.
- Ninja Forms: this forms plug-in integrates with platforms such as AWeber and CampaignMonitor and has more than 40 advanced add-ons, making it an ideal form creation tool for users who value integration.
- Divi: this most powerful WordPress theme has an excellent contact form module that allows you to create branded, mobile responsive forms on your site.
- Google Forms:Google Forms is another free form creation tool that comes with Google Forms for every Google account. It is a powerful creation tool with excellent analysis capabilities, allowing the creation of multi-page forms, and so on.
- Typeform: this form generator has been popular over the past few years because of its exquisite user interface design, form animation, and integration capabilities. It provides a unique way for users to participate in the form in a conversational way.
- Jotform: as one of the earliest online form generators, Jotform has undergone many changes, but it is still one of the most popular free online form generator platforms.
- View more contact forms plug-in
- Summary
- every corporate website and blog needs a contact form that opens a communication channel for visitors to connect easily. As a user, the higher the turnover rate of your site, if you don’t have a simple and convenient way to contact you. You should take all necessary measures to ensure that visitors can easily find your contact form and contact you. WPForms and Contact Form 7 (and of course there are many other contact form plug-ins to choose from) provide a simple, user-friendly solution that provides easy-to-use forms that can be set up in minutes.
小结
每个企业网站和博客都需要一个联系表单,该表单为访问者打开一条沟通渠道,以便轻松连接。作为一个用户,如果没有一个简单便捷的方式与你联系,你的网站的流失率就越高。你要采取一切必要的措施,确保访客很容易找到你的联系表单并联系到你。WPForms和Contact Form 7(当然除此之外还有很多其他联系表单插件可选)提供了一个简单、用户友好的解决方案,它提供了易于使用的表单,只需几分钟就可以设置好。

