A study by Forrester Consulting shows that “47% of consumers want the web page to load in two seconds or less.” Sadly, many webmasters do not realize that slow-loading websites not only make people feel depressed, but may also have a negative impact on site search rankings and affect site revenue! The good news for
is that there are ways to speed up the loading time of the website. This tutorial will detail how to configure the current mainstream WordPress cache plug-in WP ROCKET to improve the speed and performance of the site.
This tutorial is mainly divided into the following three parts:
- download and install WP Rocket
- how to use the recommended parameters to set WP Rocket
- where can I get help and find the official document
what is WP ROCKET? WP ROCKET is a mainstream WordPress caching plug-in, which is very effective in improving the load time of the website.

WP Rocket Planning and pricing:
- $49 / year-one year of support and updates (single website).
- $99 / year-one-year support and update (three websites).
- $249 / year-one-year support and update (unlimited website).
WP Rocket is the WordPress advanced cache plug-in of choice for many webmasters. Getting started with WP Rocket is very easy, and you only need to install some recommended settings to complete plug and play.
- advantages: minimum configuration / page cache / cache preload / static file compression
- disadvantages: for domestic webmasters, the price is not low. Unlike most other WordPress caches,
has a variety of confusing options and settings. Later we will take the time to introduce the best free alternative to WP Rocket.
Hidden
I. Download and install WP ROCKET
first, go to the WP Rocket website and buy the WordPress plug-in.
chooses the most suitable paid package according to its own needs and completes the steps required to place an order.
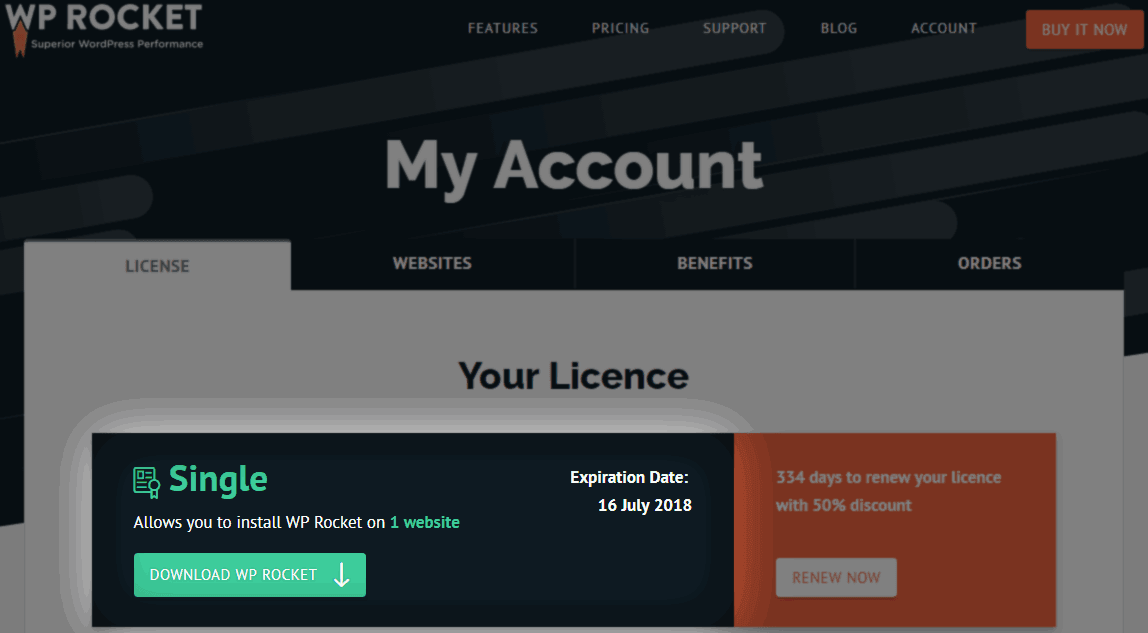
next, wp-rocket.me will send your account an email containing login information. Click the attached link to log in to the website, then go to “My Account” to find the download link, click download and save the zip file to your computer.
next, log in to your WordPress website and go to the plug-in-& gt; to install the plug-in-& gt; upload plug-in. Just upload the plug-in package to install WP Rocket. Finally,

deactivates WP Rocket, which completes the final installation of the plug-in.
II. The best configuration of WP ROCKET
Let’s take a look at the best configuration of WP Rocket, of course, in fact, it also needs to be determined by the webmaster according to his own situation. The so-called optimal configuration is more of a reference.
& gt; WP Rocket, the settings in the background of WordPress website administration, go to the plug-in settings page. You need to configure and adjust the settings of the following 10 tags or parts, as well as some other configuration options and instructions:
- My account (default tab)
- cache settings
- CSS and JS file optimization settings
- media settings
- preload settings
- advanced rule settings
- database settings
- CDN settings
- add-on (Cloudflare)
- tools
more settings options and instructions:
- configures WP Rocket
- for HTTP/2 using WP Rocket and KeyCDN
- Which Web hosts are WP Rocket compatible with?
- downloads and imports WP Rocket configuration file
1. WP ROCKET dashboard
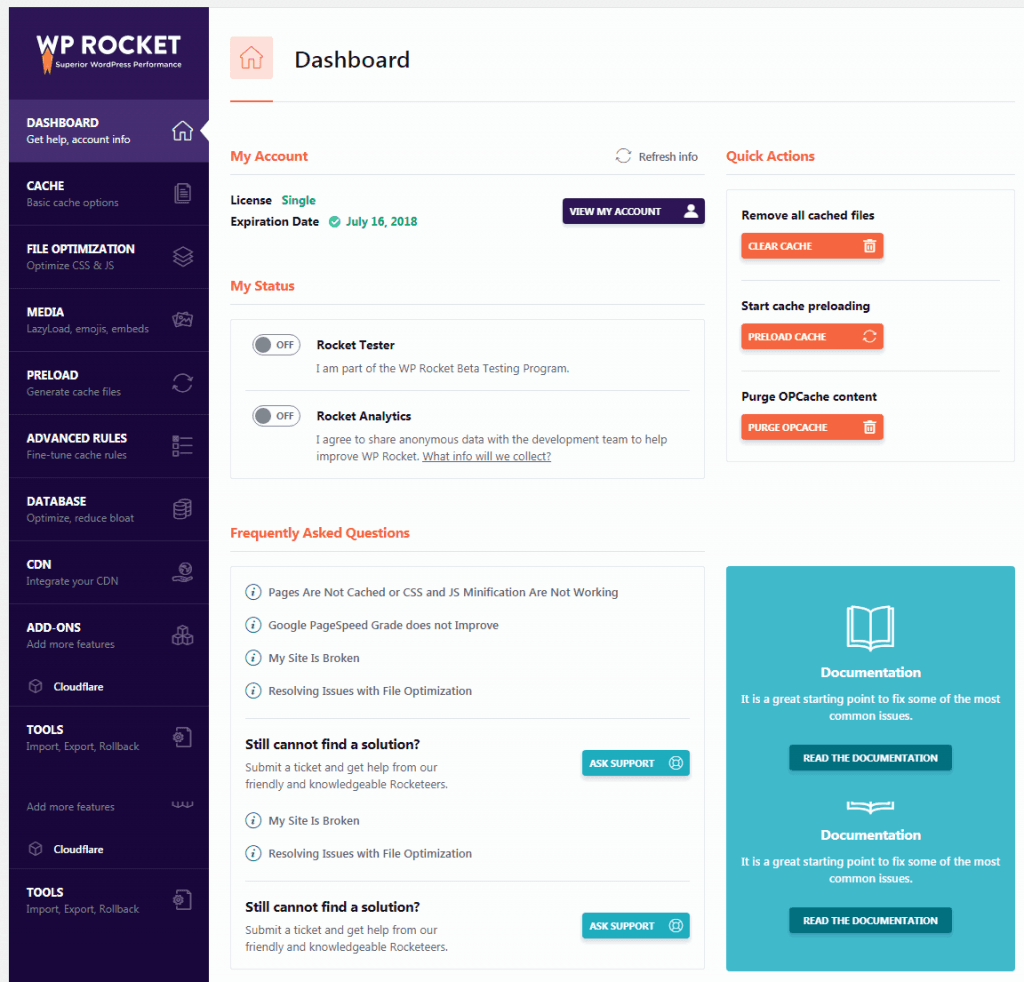
The WP ROCKET dashboard provides information about licenses and when they expire. You can also choose to join Rocket Tester (the beta test plan) and Rocket Analytics (which allows WP Rocket to collect data anonymously). You can also find links to WP Rocket support and frequently asked questions here.
in the dashboard, you can Remove All Cached Files (delete all cached files, it is recommended that you do so after configuring the WP Rocket settings), Start Cache Preloading (start cache preloading, generate caches for all internal links on your home page and on the home page), and Purge OPcache (clear OPcahce content to prevent problems when updating the WP Rocket plug-in).
2.1Caching Settings
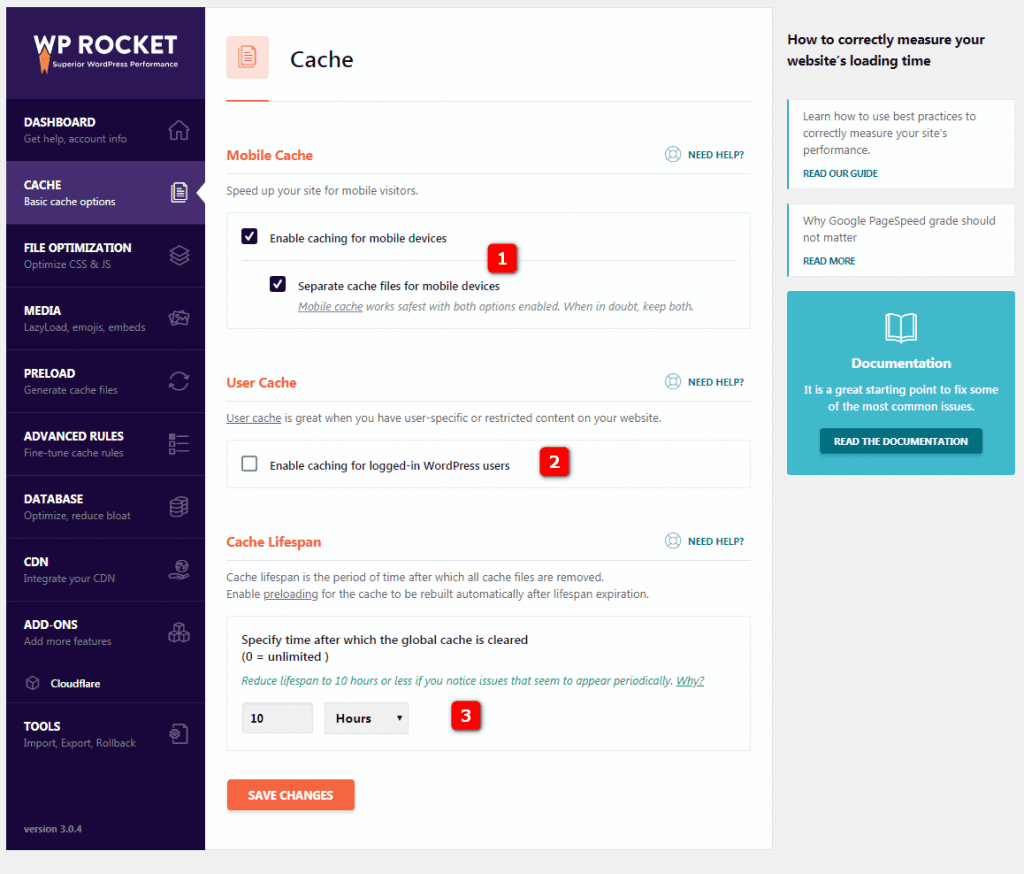
2.1Caching for mobile devices should be activated because it enables caching for mobile devices to speed up the loading of mobile devices on your website.
also selects Separate cache files for mobile devices (to separate cache files for mobile devices). Because WP Rocket mobile caching is the safest when these two options are enabled. If in doubt, please keep both.
2.2 Enable caching for logged in WordPress users- enables caching for WordPress logged-in users, which is recommended only if you have a member site, or when the user must log in to view the content. The
2.3 Cache lifespan- cache life cycle is automatically set to 10 hours, which means that the cache file is automatically deleted 10 hours after it is recreated. If you rarely update your site or there is a lot of static content, you can try to set a longer cache life cycle, which varies from person to person.
Finally, be sure to save and test! If you find a problem with the site, please disable the settings.
3. CSS and JS file optimization settings
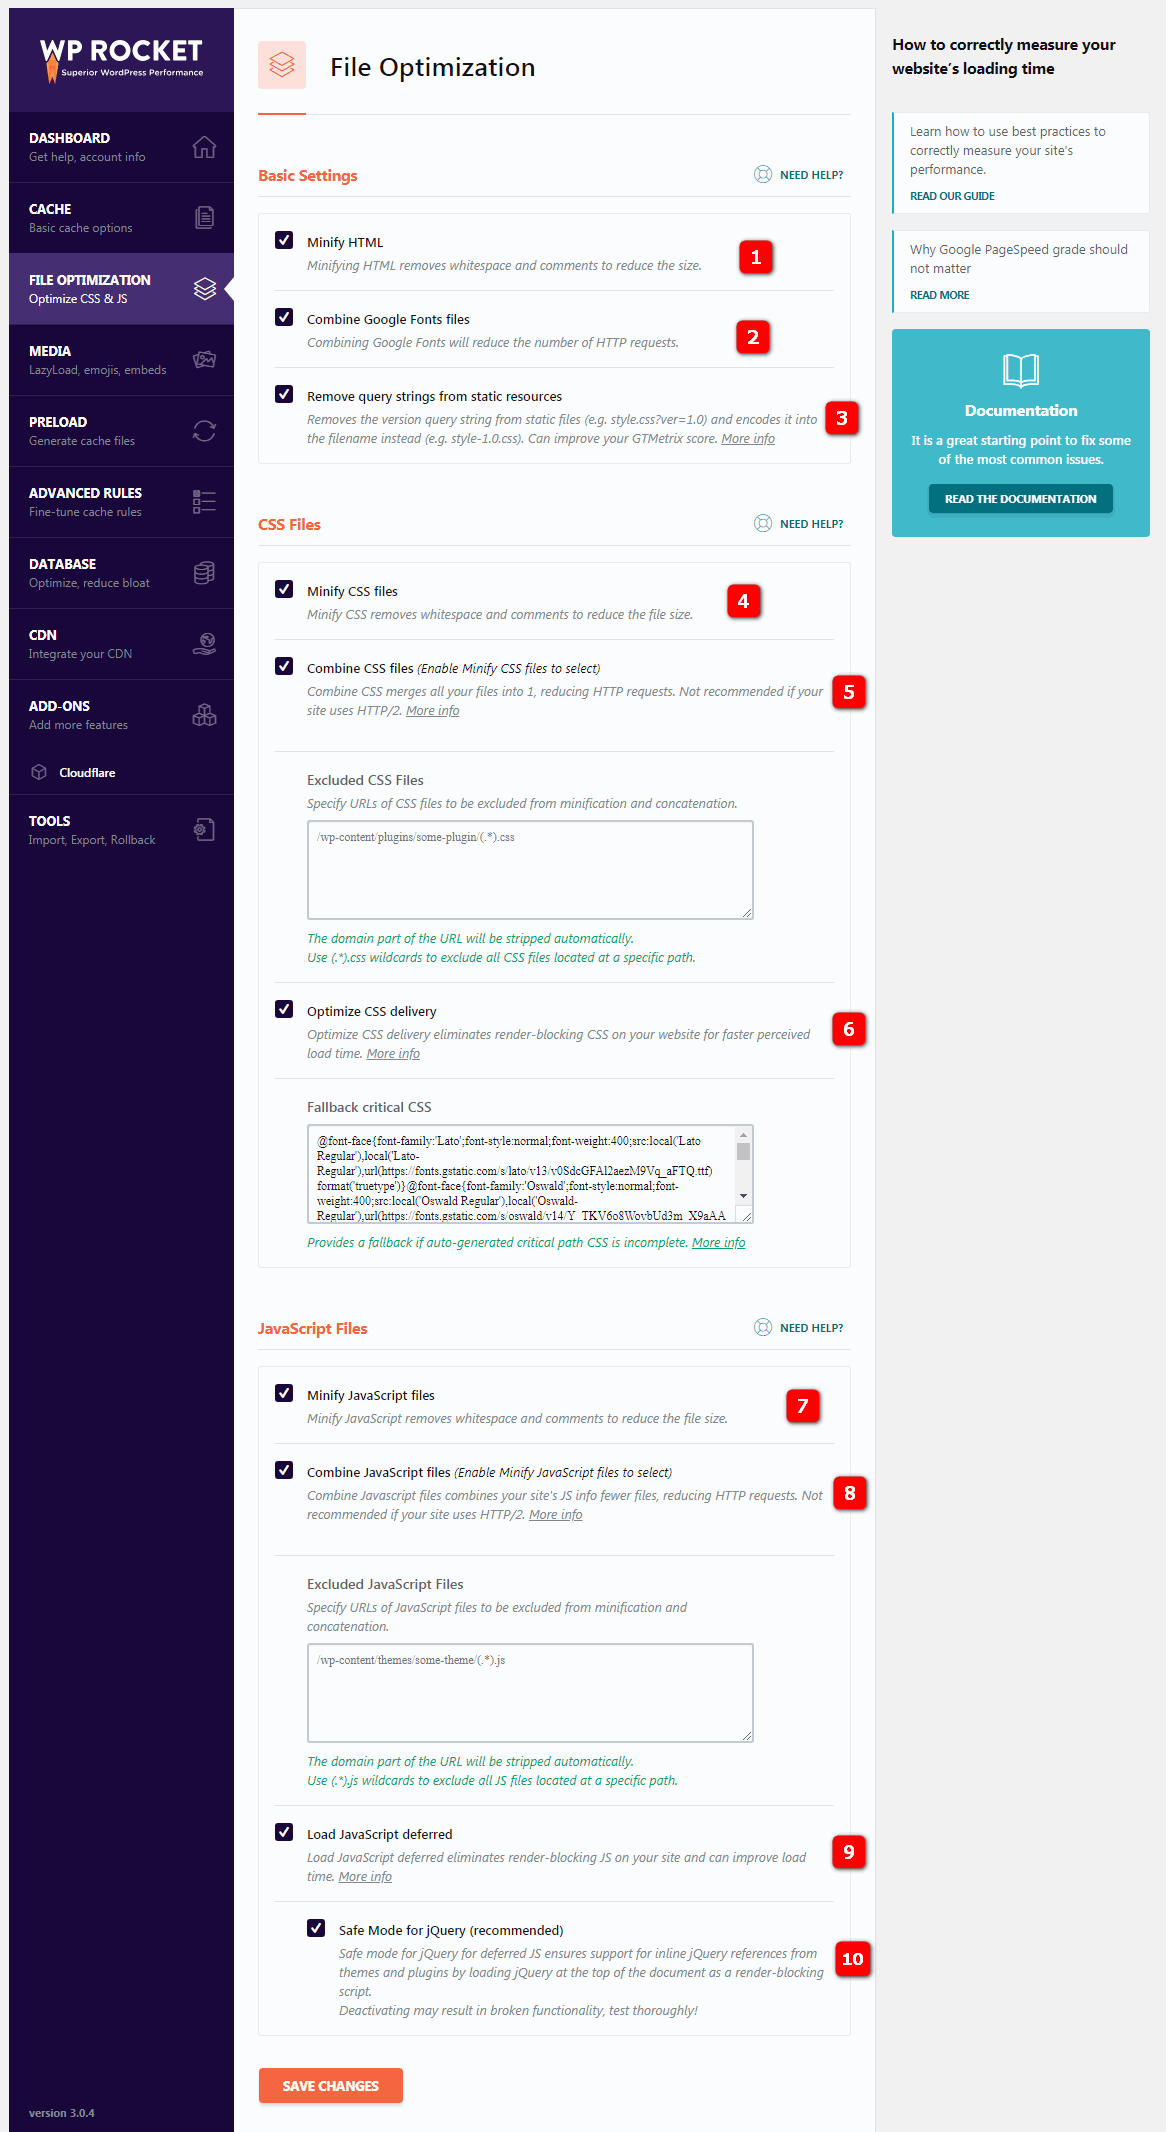
Minifying files (file slimming) reduces file size and reduces load time. Minification removes spaces and comments from static files, allowing browsers and search engines to process HTML,CSS and JavaScript files faster.
Combining files (merge files) combines multiple files into a smaller group to ensure theme / plug-in compatibility and better performance. However, it is recommended that you do not force a connection to a single file, because browsers can download six smaller files in parallel faster than one or two large files.
merging CSS and JS into fewer files is considered a best practice under HTTP/1, while this is not necessarily the case with HTTP/2. If your site is running on HTTP/2, the following are considerations that you should consider configuring WP Rocket.
3. 1 Minify HTML files-HTML files for HTTP/2 slimming will remove spaces and comments to reduce page size on the site
3.2 Combine Google Fonts files- merging Google font files will reduce the number of HTTP requests (especially if you use multiple fonts).
3.3Remove query strings- removing query strings from static resources can improve the performance level of GT Metrix. This setting removes the version query string from the static file (such as style.css?ver=1.0) and encodes it to the file name (for example, style-1-0.css).
3.4 Minify CSS files-CSS file downsizing removes spaces and comments to reduce the stylesheet file size.
3.5 Combine CSS files- merge CSS files merge all files into one file, which reduces the number of HTTP requests. If your site uses HTTP/2, it is not recommended.
Tips: this may lead to abnormal appearance of the website! If you find any errors on the site after activating this setting, please disable the setting again and the site will return to normal.
3.6Optimize CSS delivery- optimized CSS delivery eliminates CSS that prevents rendering on the website to reduce perceptual load time. This means that your page starts loading without style, which is a factor that Google PageSpeed Insights takes into account when “calculating” the speed of the page. The
critical path CSS means that your page will start loading without all its CSS styles. This means that it will be a little strange for a moment when loading.
this is called FOUC (flash of unformatted content). To avoid this, you must use the so-called Critical Path CSS. This means that the CSS of the content at the top of the page must be placed directly in the HTML to avoid FOUC when the page is loaded. To generate a usable critical path CSS for
, you can use the critical path CSS generator tool.
3.7.The Minify JavaScript files-JavaScript file slimmed down to remove spaces and comments to reduce the size of the JS file.
3.8 Combine JavaScript files- merging JavaScript files will merge your website’s JavaScript information to reduce JS files and HTTP requests. If your site uses HTTP/2, it is not recommended.
Tips: this causes the site to load abnormally! If you find an error in the site after activating this setting, please disable the setting again and the site will return to normal.
The delayed loading of
3.9 Load JavaScript deferred-JavaScript eliminates the JS that prevents rendering on the website, which reduces load time. This is a factor that Google PageSpeed Insights should consider when grading the speed of the page. The safe mode of
3.10 Safe Mode for JQuery-JQuery ensures that inline jQuery references from themes and plug-ins are supported by loading jQuery as a rendering blocking script at the top of the document.
Important tip: save and test! If you find that there is a problem with site loading, disable or modify the settings until the site loads normally.
4. Media Settings
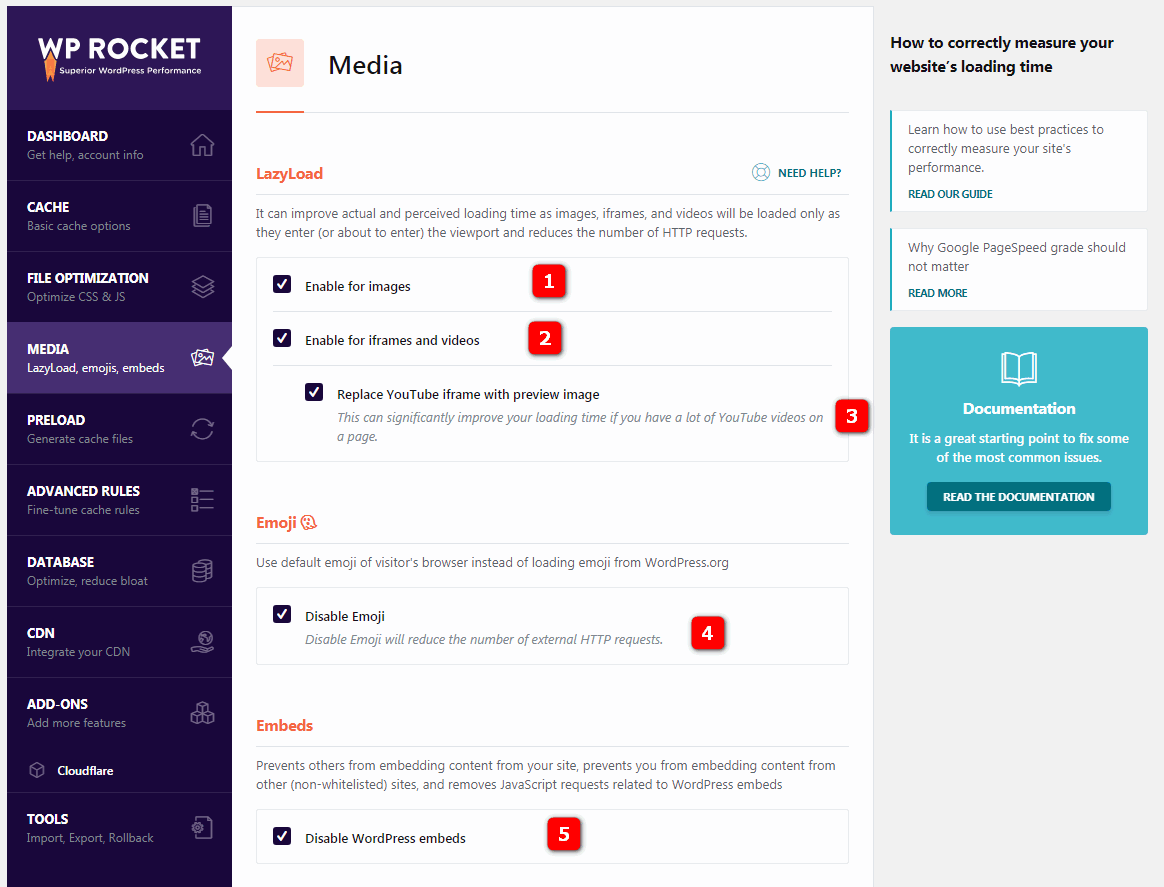
4.1 Lazy load images- lazy loading pictures means that images will be loaded only when they enter (or are about to enter) the visitor’s field of vision, that is, only when the user scrolls down the page. Lazy loading reduces the number of HTTP requests and improves page loading time.
(I sometimes disable delayed loading of images simply because when deferred loading is enabled, the anchor link pointing to the position below the delayed loading image scrolls to the wrong location on the web page.)
4.2 Lazy load iframes and videos- delayed loading of iframe and video means that iframe and video will be loaded only when they are in (or are about to enter) view, that is, only when the user scrolls down the page. Delayed loading reduces the number of HTTP requests and improves load time.
4.3 Replace YouTube iframe with preview image- replaces YouTube iframe with preview images. If you have a lot of YouTube videos on a web page, you can significantly reduce the page load time.
can turn off lazy loading on a single page / article (you can find this setting in the article / page sidebar)
4.4 Disable Emoji- disables emoticons. Should be disabled because the default emoji of the visitor’s browser should be used instead of from WordPress.ORG. Disabling emoji caching reduces the number of HTTP requests, thus reducing load time.
4.5 WordPress embeds-WordPress embedded video should be disabled because it prevents others from embedding content in your site, prevents you from embedding content in other sites, and removes JS associated with WordPress embedding.
To perform the above operations, you should save and test! If you find that the site loads abnormally, please disable the settings.
5. Preload Settings
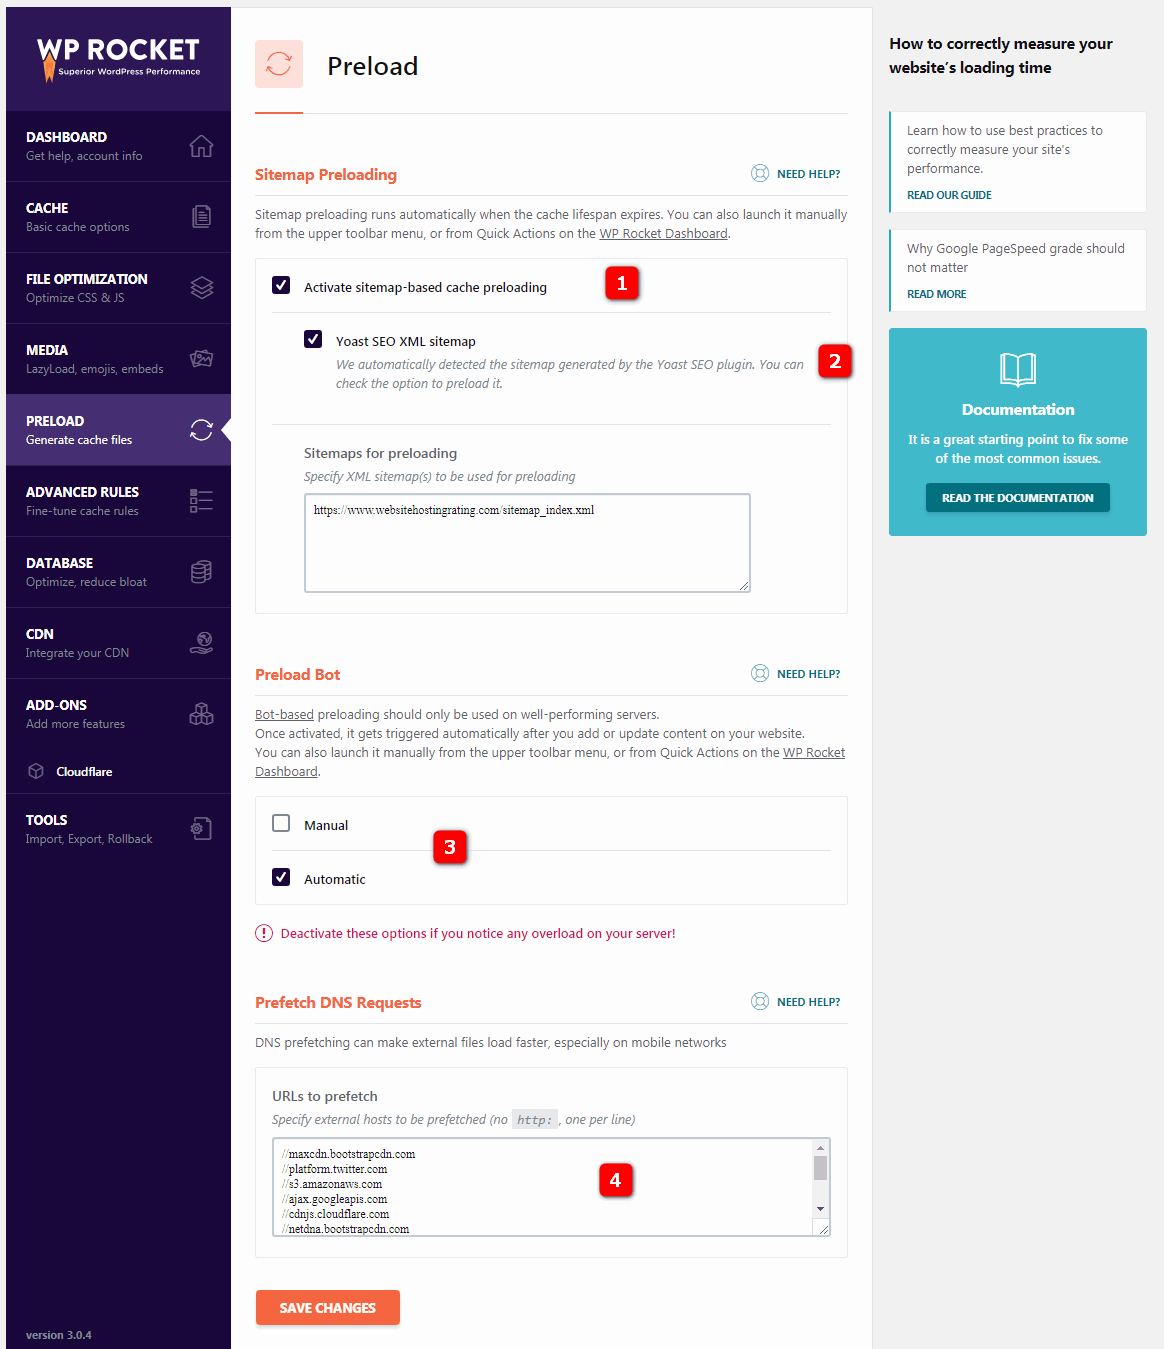
5.1 Sitemap preloading- site map preload when the cache life cycle has expired and the entire cache has been cleared, use all URL in the XML site map to preload.
5.2 Yoast SEO XML sitemap-Yoast SEO XML site map. WP Rocket will automatically detect the XML site map generated by the Yoast SEO plug-in, and you can select the preload option. The
5.3 Preload bot- preloaded robot should only be activated and used on servers with good performance. When activated, it is automatically triggered when you add or update content on the site. If this causes high CPU usage or performance problems, change to manual.
When you write or update a new article or page, WP Rocket automatically clears the cache of that particular content and any other content related to it. Preload bot will grab these URL to immediately regenerate the cache.
5.4 Prefetch DNS requests- prefetch DNS requests allow domain name resolution to be parallel (rather than serial) with the acquisition of the actual page content.
you can specify external hosts to prefetch (such as / / fonts.googleapis.com and / / maxcdn.bootstrapcdn.com) because DNS prefetching makes external files load faster, especially on mobile networks. The most common prefetch URL for
is:
- //maxcdn.bootstrapcdn.com
- //platform.twitter.com
- //s3.amazonaws.com
- //ajax.googleapis.com
- //cdnjs.cloudflare.com
- //netdna.bootstrapcdn.com
- //fonts.googleapis.com
- //connect.facebook.net
- //www.google-analytics.com
- //www.googletagmanager.com
- //maps.google.com
Save the settings and test! If you find that the site is abnormal, please disable the settings or enable them one by one for testing.
6. Advanced Rule Settings
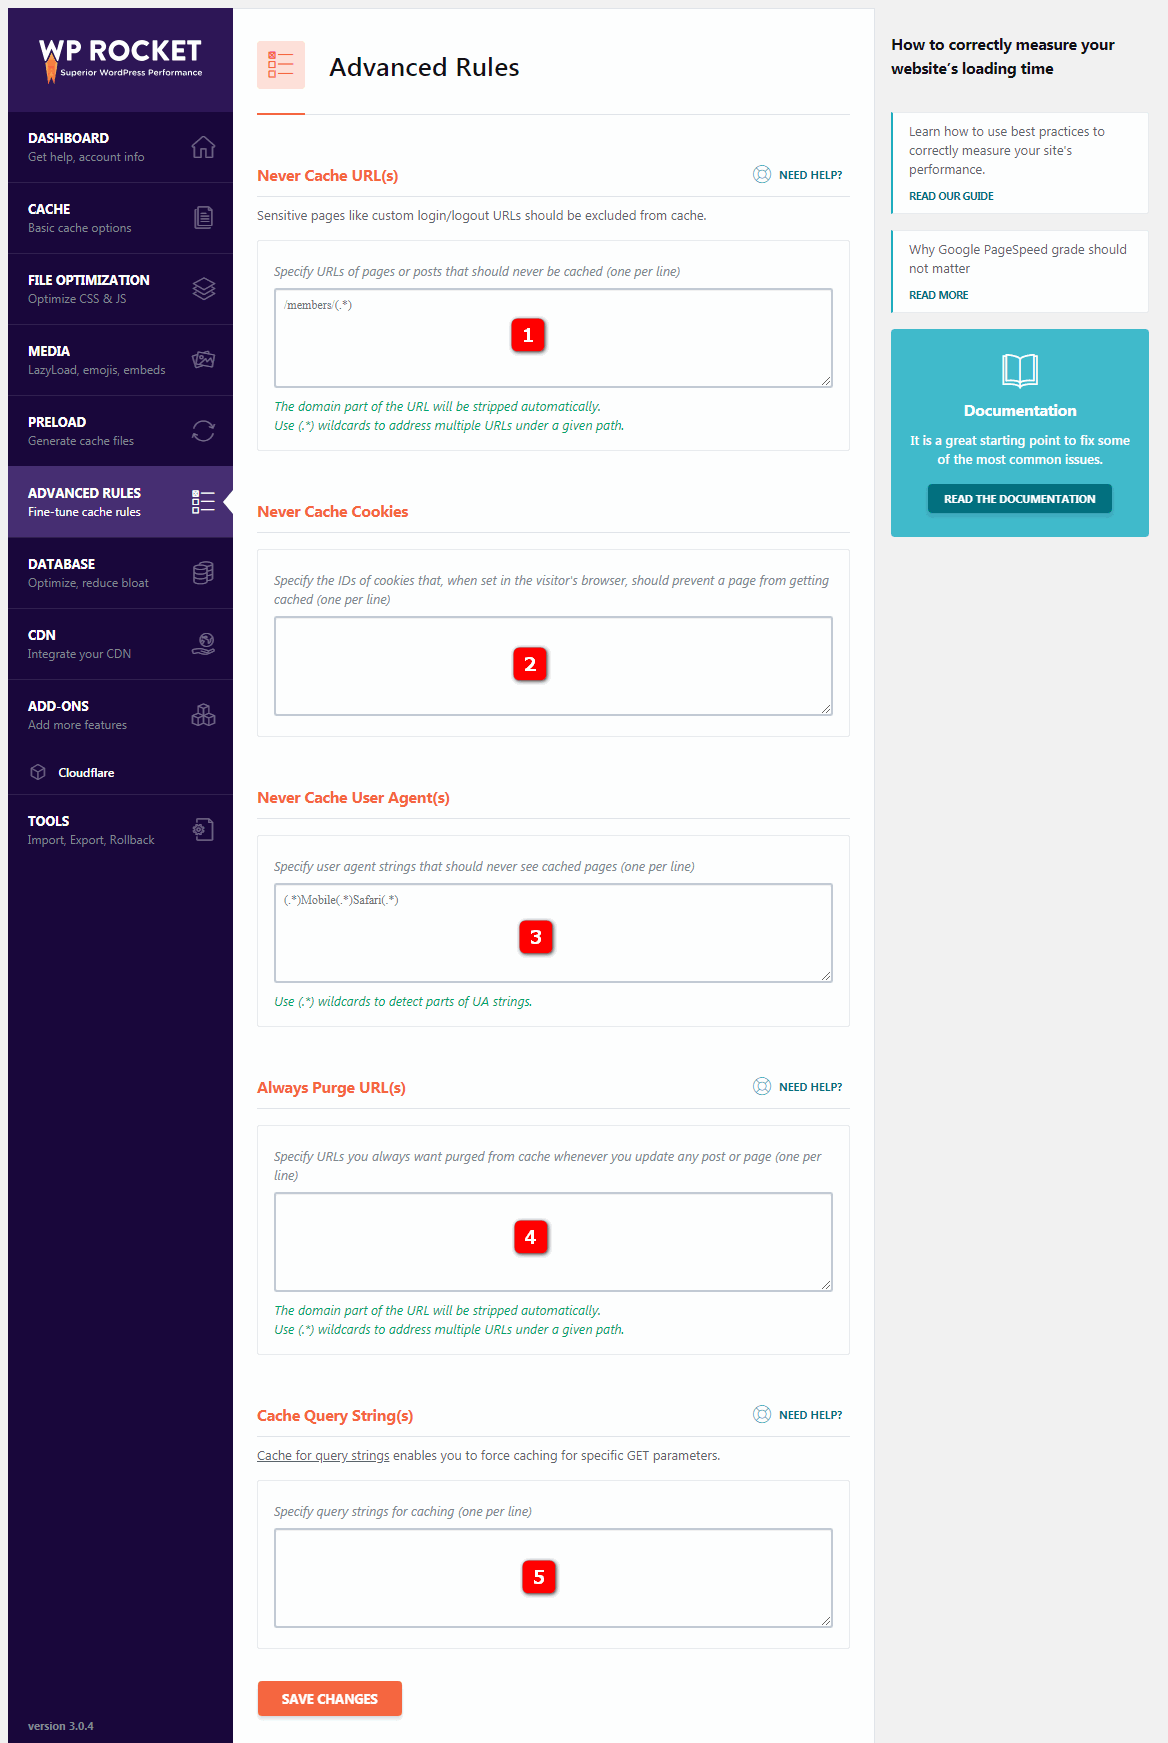
these settings are used for advanced cache management and are typically used to exclude shopping carts and checkout pages from e-commerce sites.
Never cache URL (s)-never cache URLs that allow you to specify the URL of pages or articles that will never be cached.
6.2 Never cache cookies- never cache cookie allows you to specify the ID of Cookie, and when set in the visitor’s browser, the page should be prevented from being cached.
6.3 Never cache user agents- never cache the user agent allows you to specify a user agent string that will never see the cached page.
6.4 Always purge URL (s)-always clear URL allows you to specify the URL that you always want to clear from the cache each time you update any article or page. The
6.5 Cache query strings- cache query string allows you to specify a query string for the cache.
Similarly, you should test after saving this setting! If the site loads abnormally, disable the relevant settings or enable them one by one to test the feasibility.
7. Database Settings
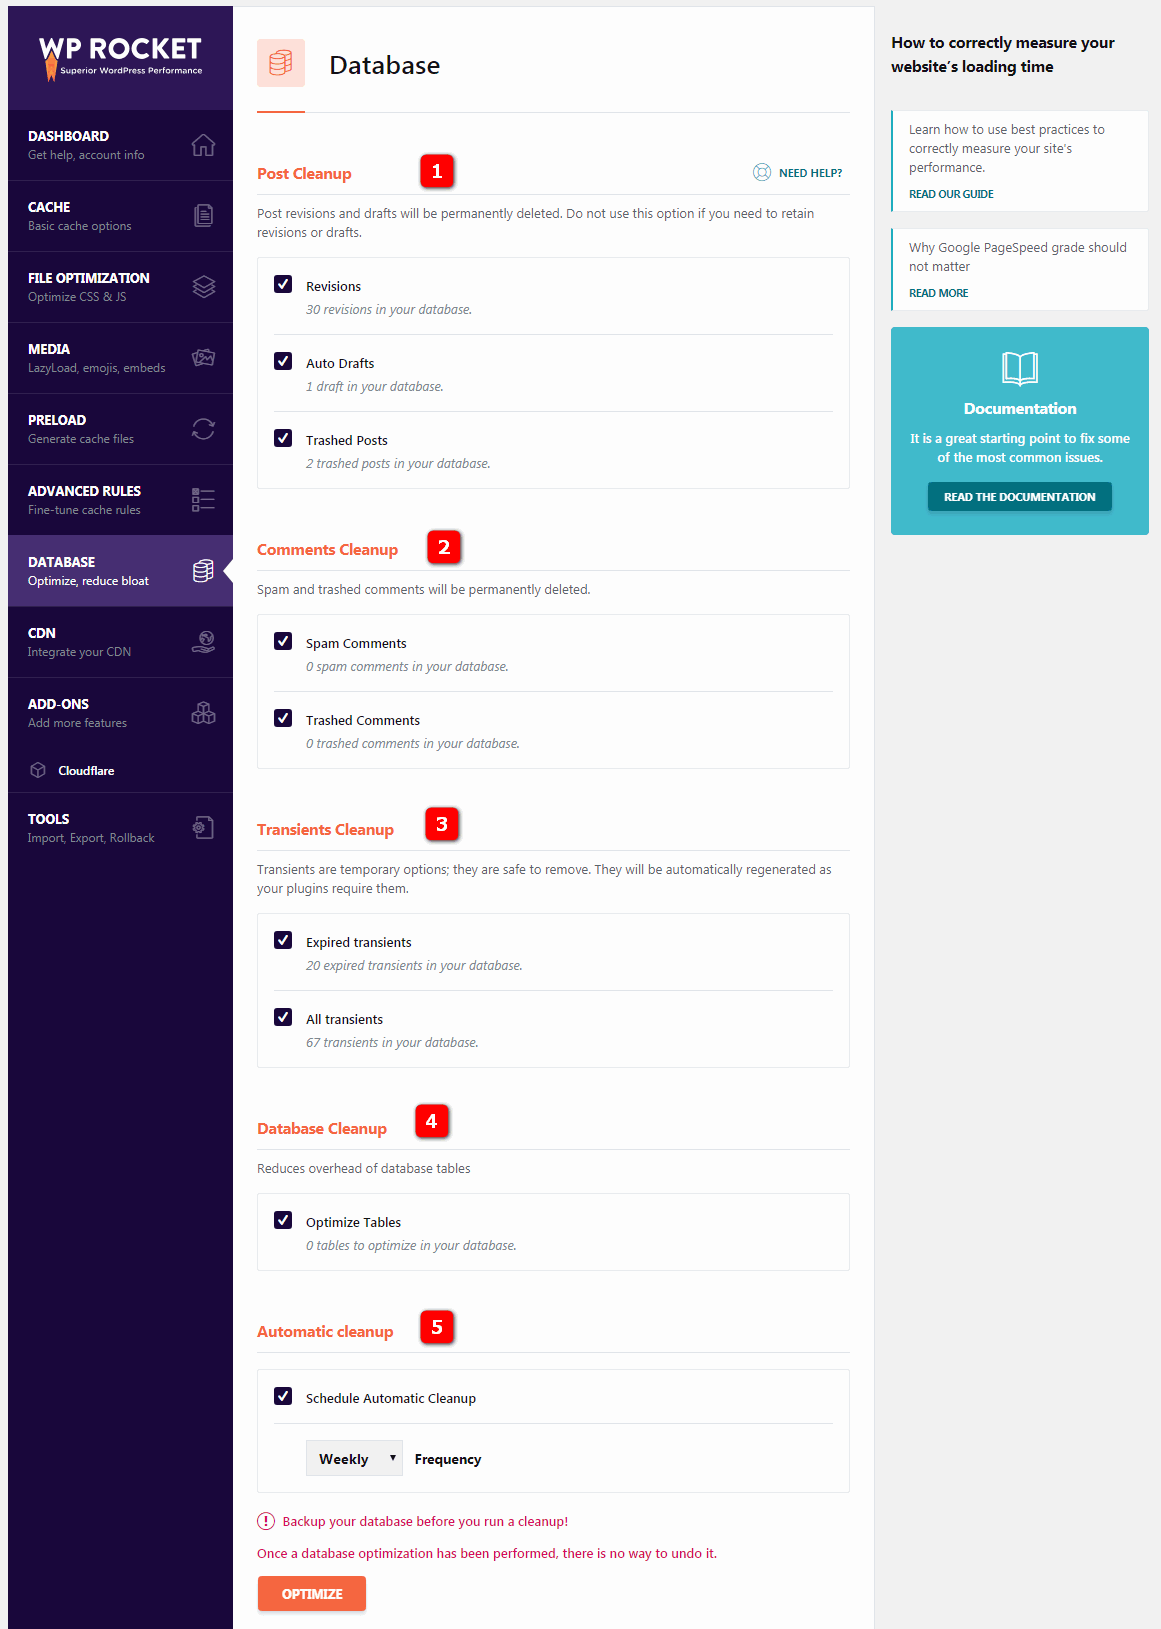
this section contains a series of settings for cleaning and optimizing WordPress.
7.1 Post cleanup- articles cleanup will delete revisions, automatic drafts, and deleted articles and pages. Delete these unless it is necessary for you to keep the old version of the article (or deleted article).
7.2 Comments cleanup- comment cleanup will remove spam comments and Recycle Bin comments.
7.3 Transients cleanup- transient cleanup deletes stored data similar to social counts, but sometimes when transient expires, they remain in the database but can be safely deleted.
7.4 Database cleanup- Database cleanup optimizes your WordPress database tables.
7.5 Automatic cleanup- automatically cleans up. I usually clean up on an ad hoc basis, but you can also arrange for WP Rocket to run automatic cleanup of the database.
ideally, you should back up the database before running cleanup, because once you have performed database optimization, you cannot undo it.
8. CDN setting
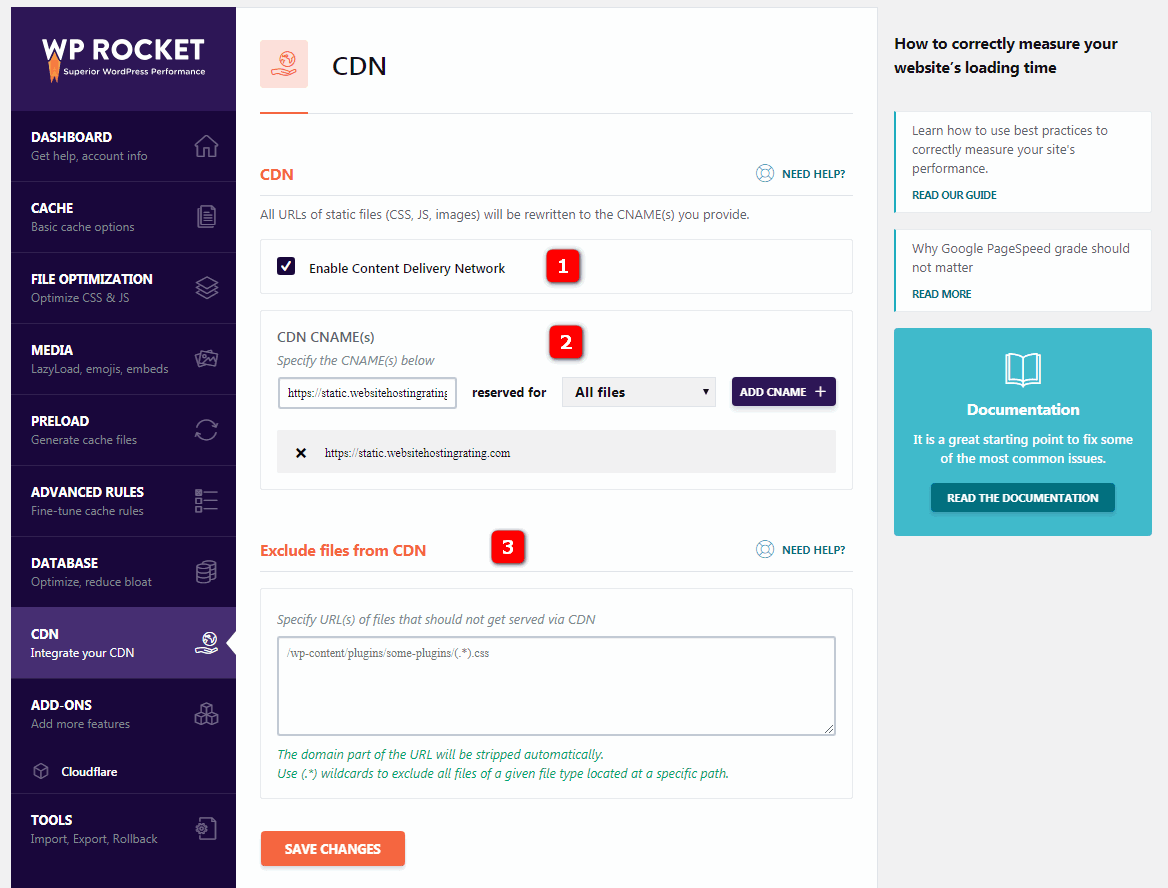
to use content delivery network (CDN) means that the CNAME (s) provided to you rewrites the URL (CSS,JS, image) of all static files.
8.1 Enable CDN- enables CDN. If you are using CDN, enable this feature. WP Rocket is compatible with most CDN, such as Amazon Cloudfront,MaxCDN,KeyCDN, etc. Learn more about how to use WP Rocket
8.2CDN CNAME (s) with CDN. Copy the CNAME (domain) provided to you by your CDN provider and enter it into CDN CNAME. This will rewrite the URL of all static files on your site. The
8.3 Exclude files- exclusion file allows you to specify the URL of files that should not be provided through CDN, such as static files for some plug-ins.
Full testing should be performed using the above configuration features! If you find that there is a problem with site loading during use, disable the settings.
9. Add-on-CLOUDFLARE sets up
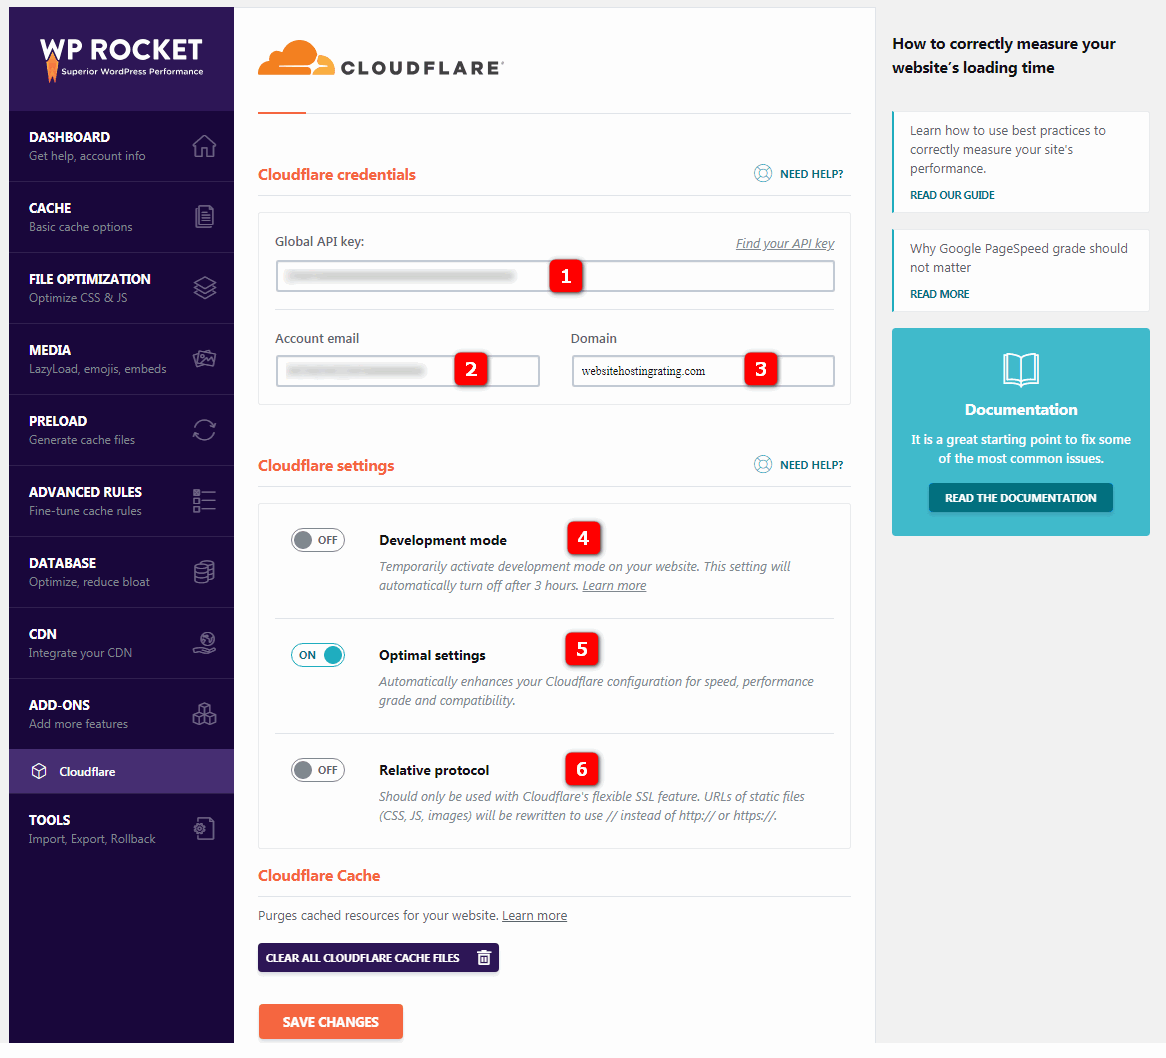
WP Rocket so that you can integrate your Cloudflare account with its additional functionality.
9.1 Global API Key . You will find the API key in the upper right corner of your Cloudflare account. Simply go to your profile and scroll down to find Global API Key, copy and paste it into WP Rocket.
9.2 Account Email . This is the email address you used for your Cloudflare account.
9.3 Domain . This is your domain name, such as yourdomain.com.
9.4 Development Mode . Temporarily activate the development mode on your website. This setting will be turned off automatically after 3 hours. This is useful when you make a lot of changes to your site.
9.5 Optimal Settings . Automatically enhance Cloudflare configuration to improve speed, performance level and compatibility. This option activates the best Cloudflare settings.
9.6 Relative Protocol . Should only be used with the flexible SSL feature of Cloudflare. The URL of the static file (CSS,JS, image) will be rewritten with / / instead of http:// or https://. The
10. WP Rocket tool
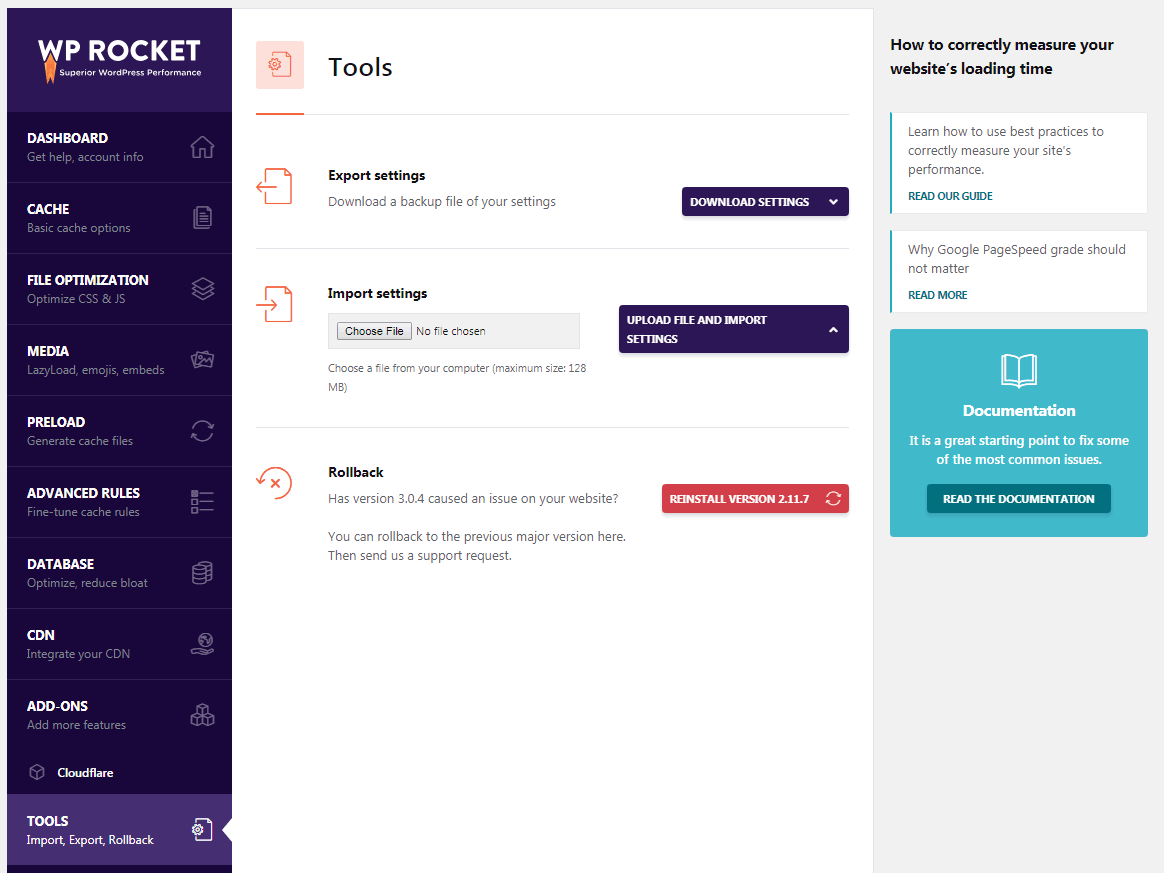
10.1 Export settings- export settings allow you to export WP Rocket settings for use on other sites. The
10.2 Import settings- import settings allow you to import preconfigured WP Rocket settings.
10.3 Rollback- rollback if the new version of WP Rocket causes you any problems, this tool allows you to revert to the previous version.
configuring WP ROCKET
HTTP/2 for HTTP/2 is an upgrade of HTTP that has managed communication between Web servers and browsers since 1999. HTTP/2 paves the way for faster page loading through better data compression, multiplexing requests, and other speed improvements.
many servers and browsers support HTTP/2, and most Web hosts now support HTTP/2. You can use the HTTP/2 online detection tool to check whether your website can use HTTP/2.
if your site can use HTTP/2, configure WP Rocket for it as follows. It is not HTTP/2 best practice for
to connect (combine) all CSS and JS files to as few files as possible and WP Rocket recommends setting inactive file concatenation on the File Optimization tab.

WP Rocket recommends that you uncheck the two boxes for merging CSS and merging JS in the above screenshot. For more information, see this article on WP Rocket. How
uses WP ROCKET
under KEYCDN to set up WP Rocket using KeyCDN is very simple. (FYI KeyCDN, a popular content distribution network service provider for overseas sites)
first creates a pull zone in KeyCDN. Then go to the CDN tab of the WP ROCKET plug-in and check the Enable Content Delivery Network option.
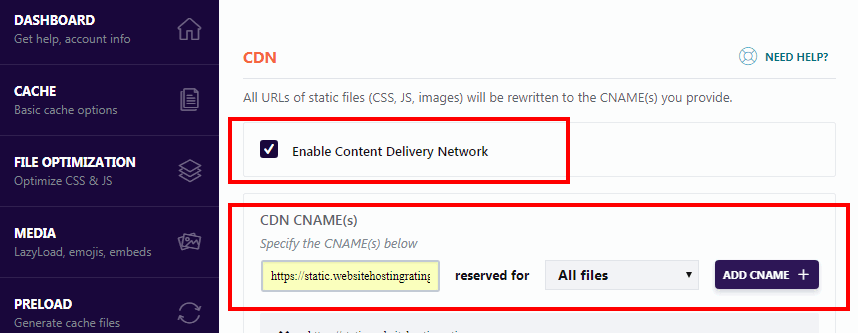
now update the “the Replace site’s hostname with:” field to include the URL you obtained from the KeyCDN dashboard (under the “Zones & gt; Zone URL” of the pull zone you created. The URL looks similar to: lorem-1c6b.kxcdn.com)
or, the recommended option, which WEB hosts can use WP ROCKET using the CNAME of URL (such as https://static.wbolt.com)
that you choose?
WP Rocket is compatible with almost all servers. However, there are some special management WordPress hosts that may not apply to WP Rocket. If your website hosting provider is not listed below, it does not mean that it is not compatible with WP Rocket. The best way to be 100% sure is to contact your server provider and ask (Note: domestic stand-alone VPS servers should theoretically be able to install and use WP Rocket).
- Kinsta:Kinsta only supports WP Rocket version 3.0 and later. WP Rocket’s page cache is automatically disabled to prevent conflicts with Kinsta’s built-in cache. Kinsta is the official partner of WP ROCKET.
- WP Engine:WP Rocket is the only allowed caching plug-in on WP Engine. WP Engine is also the official partner of WP Rocket.
- SiteGround:WP Rocket is compatible with SiteGround’s static, dynamic and in-memory cache. SiteGround is the official partner of WP Rocket.
- A2 hosting: WP Rocket is fully compatible with A2 Hosting. A2 Hosting is the official partner of WP Rocket.
- WebHostFace:WebHostFace supports (and is the official partner of WP Rocket).
- Savvii:Savvii support (also the official partner of WP Rocket).
- FastComet: provides specialized optimization packages for WordPress and WP Rocket. FastComet is the official partner of WP Rocket.
- Bluehost Managed WordPress plans: the Varnish configuration of this server destroys WP Rocket’s minification, so you must turn off Bluehost’s Varnish or turn off WP Rocket’s minification function.
- Cloudways WordPress Hosting: when using WP Rocket’s minification with Cloudways’s Varnish, you must create an exclusion rule for Varnish in the Cloudways application settings.
- Flywheel: you must contact Flywheel support and ask them to activate WP Rocket.
- HostGator Managed WordPress plans:WP Rocket is not compatible.
- Synthesis:W3 Total Cache is pre-installed on Synthesis, but can be removed and replaced with WP Rocket.
- WebSavers.ca:WebSavers.ca is the official partner of WP Rocket.
read more about WP Rocket-compatible Web hosts https://docs.wp-rocket.me/article/670-hosting-compatibility.
download my WP ROCKET configuration file
if you are too lazy to reset WP Rocket, you can try our WP Rocket configuration. You just need to download the WP Rocket configuration file and import it through the “tools” of the WP Rocket plug-in.
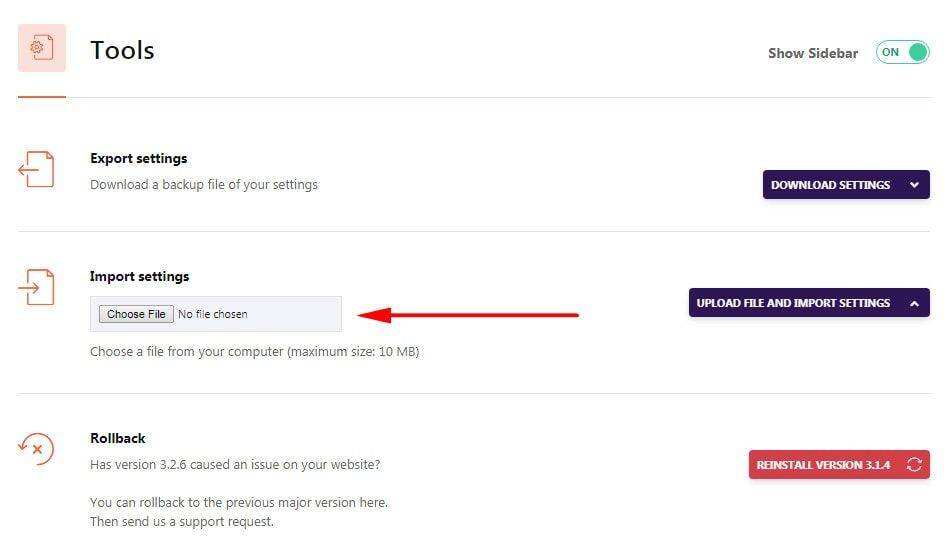
Note: someone else’s WP ROCKET profile may not be suitable for your site, even if you use someone else’s profile to import, you also need to test the site. If you encounter an abnormal loading of the website, you should adjust each configuration. Personal advice, refer to this tutorial, one by one operation is more reliable.
3. WP ROCKET help and official documentation
if you encounter WP Rocket-related problems for some reason, you can visit the WP Rocket website knowledge documentation for a great deal of useful information. In addition, the purchase of plug-ins officially provides a year of technical support, using Google translation or Baidu translation to contact the official technology is also a wonderful experience.
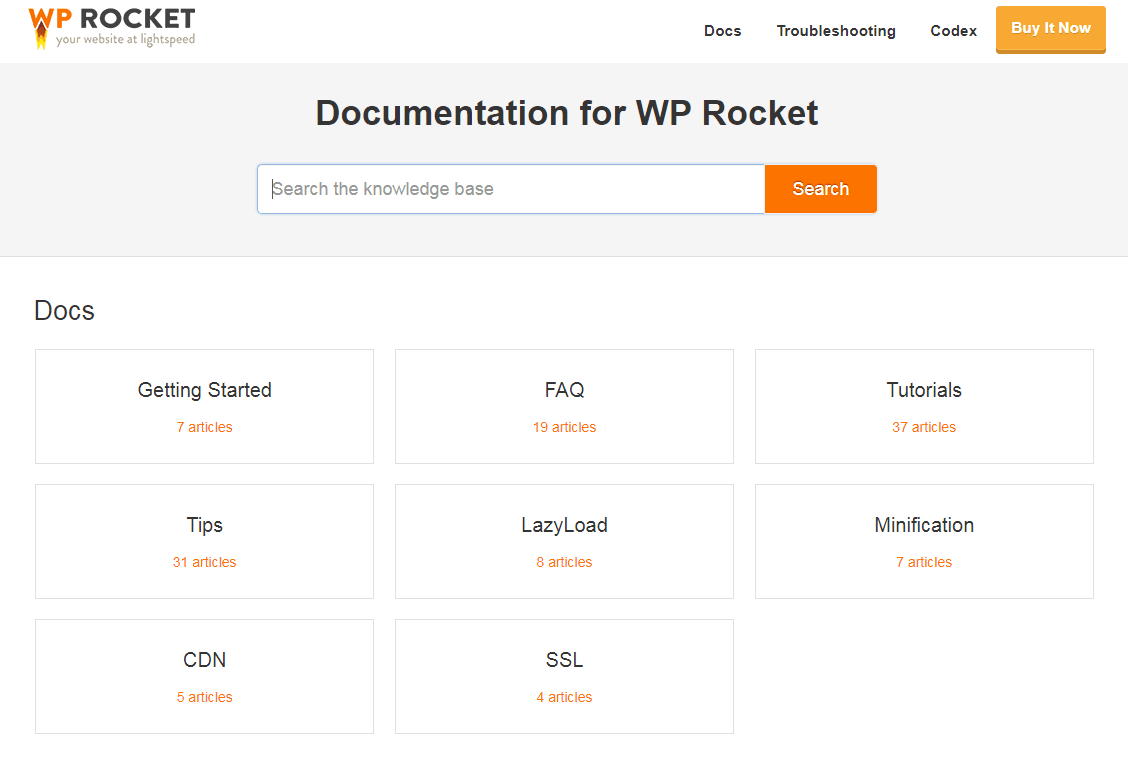
the following is a list of some useful tutorials provided on the official website of WP Rocket: getting started with
- hosting server compatibility
- how to check if WP Rocket caches your pages
- uses WP Rocket’s SSL
- to enable CDN websites to use WP Rocket
- WP Rocket and Cloudflare
- to solve 500 internal server errors
- file slimming problems NGINX configuration of
- WP Rocket

