There are many drag-and-drop website builders on the Internet who can create websites without technical skills. However, you must learn some technical aspects of SEO to keep your site at the top of the search engine results page.
Critical CSS is one of the technical topics used to optimize your content delivery, which in turn directly affects speed. For ordinary users who use multiple plug-ins on their site, the WordPress ecosystem makes this more complicated.
In this article, let’s explore how to create a key CSS for a WordPress site to improve Google PageSpeed scores.
Basic knowledge
Before discussing the key CSS, it is necessary to understand some terminology, such as the first screen and content delivery optimization. In addition, you need to understand the basic ways to use external stylesheets on WordPress.
Content of the first screen
When you open a Web site on your desktop or mobile device, the visible part you see on the screen is the first screen content area. This is a traditional newspaper term in which you can see the first screen at the top of the home page. Generally speaking, people are used to folding newspapers, and important content is provided above the folding area. Similarly, the visible part of the page that is loaded first should provide the user with the most valuable content. Therefore, you should focus on optimizing the visible top to load quickly.
Content delivery optimization
Many speed tools, such as Google PageSpeed Insights, measure how websites provide first-screen content. You can think of it as a measurement of the first time content drawing (FCP). If they detect blocking, you will see a warning to delete the blocking element. One of the popular suggestions you’ll see in the Google PageSpeed Insights tool is to eliminate rendering blocking resources. If you click on the recommendation, Google will show you to optimize the delivery of critical CSS/JS and postpone all non-critical CSS/JS.
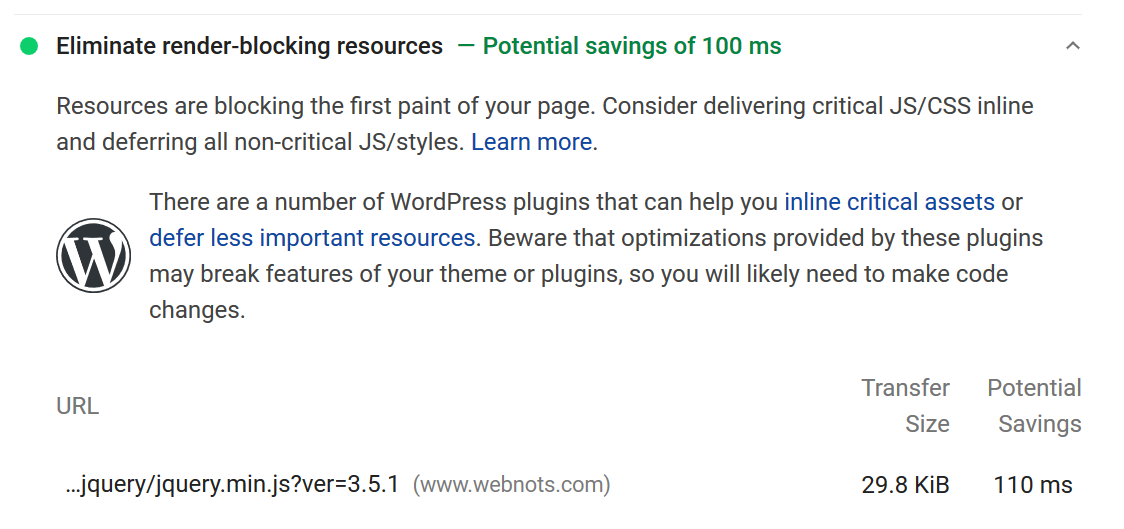
Key CSS and JS recommendations
It is easy to fix JavaScript (jQuery) that blocks rendering because the theme / plug-in loads scripts in the footer section by default. JQuery is the only problem, and many websites may need it to load the first screen content. Because WordPress also uses jQuery, if it’s just because of jQuery, you can ignore this error. Otherwise, if it doesn’t break the layout of your site, use plug-ins such as WP Rocket to combine and deliver all scripts.
The problem, however, is to generate the critical CSS and load it first. In this article, we will explain how to handle CSS optimization to improve page speed scores.
Related reading: correctly configure the WP Rocket plug-in to improve site loading speed.
Load CSS in a Web site
There are several ways to insert CSS into your web page. You can do this inline, internally, or externally. The most popular and recommended method is to link external stylesheets in the title section of the page. Because the content in the header section is first loaded with the web page, it will greatly affect the loading of the first screen content, thus affecting the page speed.
Add Your Content Here
Load CSS in WordPress
WordPress uses style.css as an external file that provides theme styles. This is a required file to run the WordPress website (except for functions.php). In addition, each plug-in on your site may add additional CSS files. Open your Web site in a Chrome browser and view the source code (make sure you do not install the caching plug-in or disable page caching).
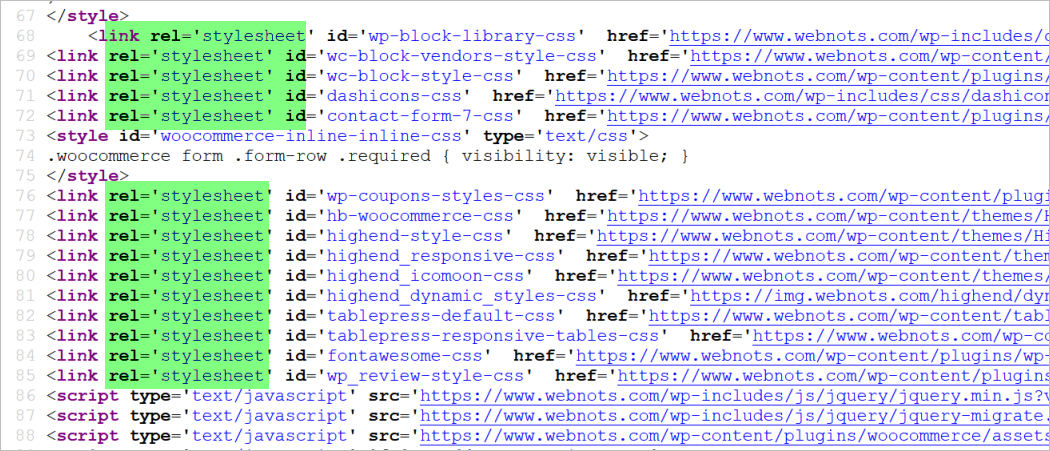
Style sheets in the header
You can see WordPress links to all external stylesheets in the title section of the page. From an optimization point of view, this can lead to multiple problems:
- Some themes use a bloated CSS style of several MB sizes. When a user opens a web page on a desktop or mobile device, you do not need to load all of these styles.
- There are different types of articles, such as products that may use a completely different style. In this case, you do not need another CSS for the initial (first screen) load.
Every page on your site requires a minimum of CSS to load the first screen content. The minimum CSS required for a page to load is technically called a critical CSS. In all of the above cases, Google PageSpeed Insights and other tools will show you warnings to optimize CSS delivery.
Keep in mind that deleting unused CSS and scripts is also related to using too many CSS/ scripts on the page. However, this is completely different from the key CSS optimization. You may not even use some plug-ins on specific pages. For example, you don’t need the CSS of the contact form plug-in on all pages of the site.
In this case, contacting the CSS/JS file in the form file is not necessary in regular blog posts, and you will see a warning to delete unused CSS/JS.
Check out our article on how to disable unused CSS/JS in WordPress and optimize WooCommerce page loading.
How to generate key CSS in WordPress?
Now you know the importance of the key CSS in improving page loading speed. There are two ways to generate a key CSS for your Web site.
- Manually generate key CSS and insert it into your website
- Optimize content delivery using WP Rocket plug-ins
We will explain these two processes in detail, and you can choose the process that best suits your site.
Generate key CSS manually
There are many third-party tools on the Internet that can be used to manually generate critical CSS. However, this makes sense when all the pages on your site are similar and there is no custom content in the first screen area. You can try other free key CSS generation services, such as Sitelocity.
- Go to the Sitelocity website and enter the URL for the page.
- Click the generate critical path CSS button.
- You can get a minimized key CSS for your page.
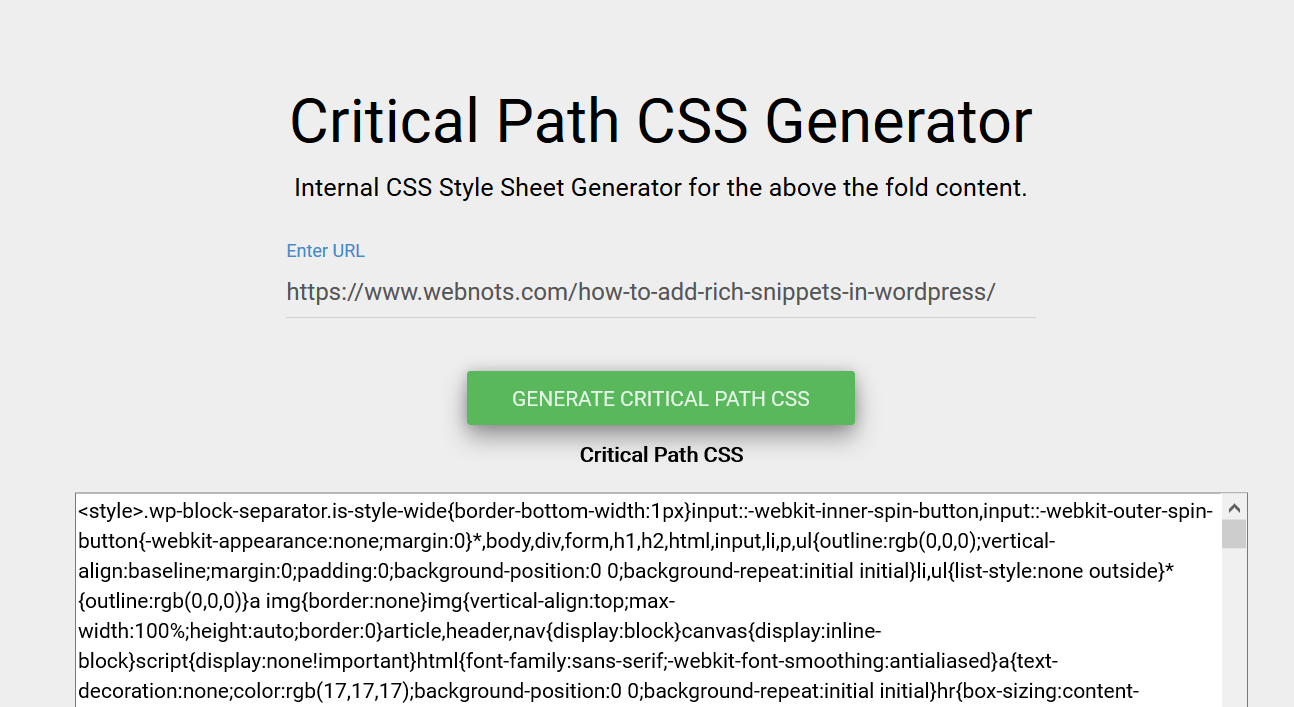
Generate key CSS
Now that you have generated the key CSS, the next task is to insert it into the title section of your site. In theory, you can use the
The style that is inserted in the header.php file between and the tag. There are plug-ins that can help insert styles in the title section without modifying the template file.
Autoptimize is one of the plug-ins we can recommend for this purpose. If you are already using Autoptimize for caching, you can also use the same plug-in to insert the critical CSS.
You can insert the key CSS under “CSS Options” of the Autooptimize plug-in. First enable the “Inline and Defer CSS” check box and paste the key CSS into the text box that appears.
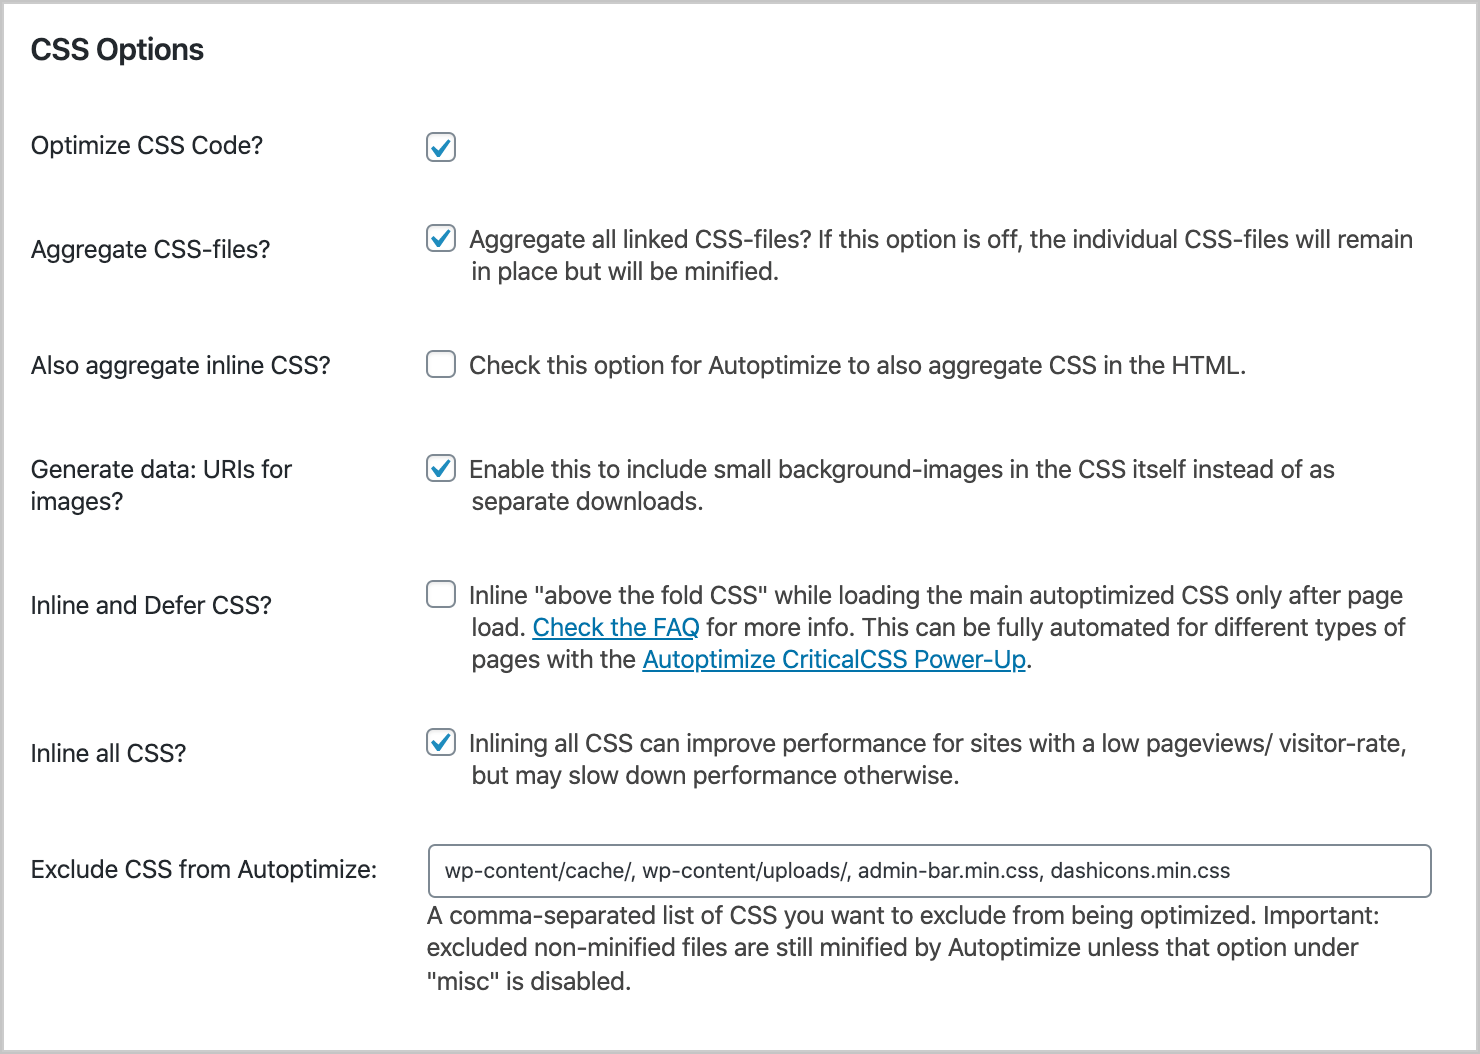
CSS option
As you can see, the Autooptimize plug-in can also automatically inline the first screen CSS while delaying other styles. However, this quickly increases the cache size to 100%, and you cannot choose to automatically clear the cache in the plug-in. In addition, in most cases, it destroys the website. You can use the Autooptimize CriticalCSS Power-Up plug-in, which will help you in a better way. In order to use this add-on, you must obtain API from Criticalcss.com for $10 a month.
Why doesn’t manual critical CSS generation work?
Although the above manual insertion process may seem easy, it is not an easy task. Here are some reasons why your key CSS doesn’t work.
- You may have different content, such as pages, blog posts, products, etc. Each content type on your site requires a different key CSS to load the first screen content. Using plug-ins or manual inserts loads critical CSS on all pages and destroys some content.
- Every time you update themes, plug-ins, and WordPress cores, you must generate a critical CSS. Otherwise, using the old key CSS will damage the layout of your site. For the average user, continuously updating critical CSS for every update on the site is an impossible task. With the available automatic update options, you must be very careful before updating the installed plug-in / theme / core.
- For mobile and desktop devices, you may need a separate key CSS.
For all of these issues, the only option left is to use some plug-ins to deal with these issues and automatically generate critical CSS dynamically.
Use WP Rocket to create a key CSS for WordPress
Fortunately, you have a caching plug-in that can complete this critical CSS generation in WordPress. Because of its simplified setup, WP Rocket is one of the most popular caching plug-ins for WordPress. Similarly, critical CSS generation is one of the advantages of plug-ins, and any ordinary user can benefit without damaging the site.
- First, you must purchase the WP Rocket advanced plug-in.
- After installing and activating WP Rocket, go to Settings & gt; WP Rocket and navigate to the File Optimization section.
- Scroll down and enable the Optimize CSS Delivery check box and select the Load CSS Asynchronously button.
- Save your changes to start the critical CSS generation process.

Generate key CSS in WP Rocket
This will allow the plug-in to automatically generate key CSS for each article type on your WordPress site. It includes the home page. Home page, page, article, and any other custom article types you use on the site. If desired, you can add an alternate key CSS that is manually generated using third-party tools. Typically, you can leave this spare key CSS box blank. You can also enable separate mobile caching in the “Cache” section.
Please note that WP Rocket is an advanced plug-in with a single site license for $49. We believe that this plug-in is worth buying because it provides an end-to-end caching solution to optimize speed. The plug-in provides a year of support and updates. After that, it will continue to work, and you will not need to update to use key CSS and other features. You can renew your subscription at a 30% discount for support and any additional features. This is a better choice than $10 a month for criticalcss API, which is used with Autoptimize.
Regenerate critical CSS
When you update the theme / plug-in / WordPress core or add custom article types to your site, it is necessary to regenerate the key CSS. Otherwise, WP Rocket will use the old key CSS and break the layout of your site. Therefore, make sure you don’t forget to regenerate the critical CSS.
- Click the WP Rocket menu on the top bar, and then select the Regenerate Critical CSS option.
- Alternatively, you can go to the plug-in dashboard and click the “Regenerate Critical CSS” button.
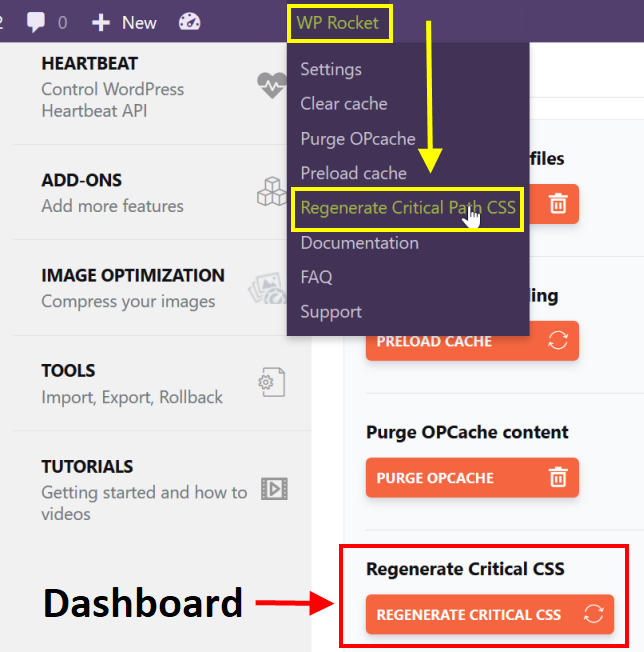
Regenerate critical CSS
Custom key CSS for a specific page
As mentioned earlier, you may have a home page or another page created using the page builder plug-in. Compared to all other blog posts on your site, this page will have a completely different key CSS. In this case, you must create a separate key CSS and load it conditionally only on that page. WP Rocket can help you achieve this goal with just a few clicks.
- Go to the page / article editor where you want to generate a separate key CSS.
- On the sidebar document panel, locate the WP Rocket Options panel. If it is not found, click the three dot buttons in the upper-right corner, and then select preferences. In the pop-up window, you can enable the required documents panel available on the site.
- Select the Optimize CSS Delivery check box and click the Generate Specific CPCSS button.
- This will generate a specific key CSS for the page, and the plug-in will load the key CSS when the user visits the page.
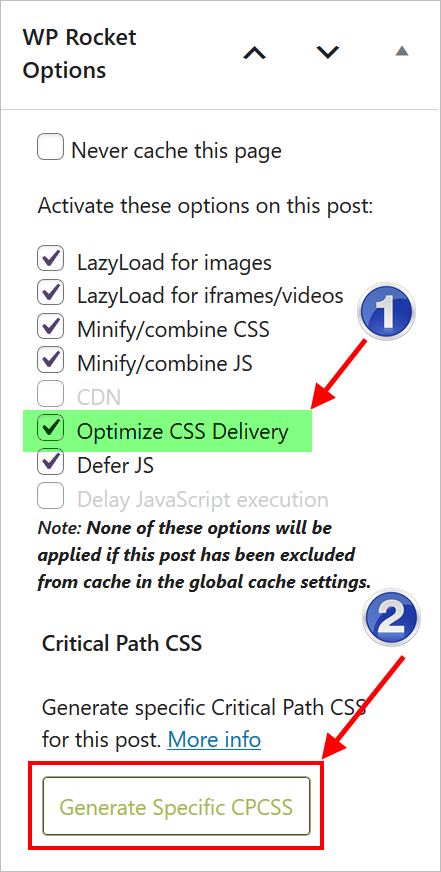
Generate a key CSS for a specific page
Test key CSS
After implementing the manual method or using the WP Rocket plug-in, you can test the page by looking at the page’s source code. Be sure to log out of your administrative panel or enable caching for logged-in users in the plug-in. As you can see in the screenshot below, WP Rocket adds the key CSS to Header.

WP Rocket key CSS
You can also view the page in the Google PageSpeed Insights tool. If all goes well, you will see that rendering blocking resources and other CSS errors have been eliminated under the passed results. This indicates that you have correctly implemented the critical CSS on the website.
Summary
We hope that this article will emphasize the importance of the key CSS in the WordPress website. You can use manual options when your site is small and has fewer pages. However, for a running blog with a large number of articles and different article types, you can try the WP Rocket plug-in. Although it costs you some money, you can get a complete caching solution for your site.

